The Best Brioche Bread Recipe
This homemade brioche bread recipe makes delicious buttery and tender bread. If you are a budding bread baker, perfecting a French brioche recipe is one of the best ways to broaden your bread-baking portfolio.
This post has step-by-step instructions to show you how to make this homemade brioche bread at home.
Authentic Brioche Bread
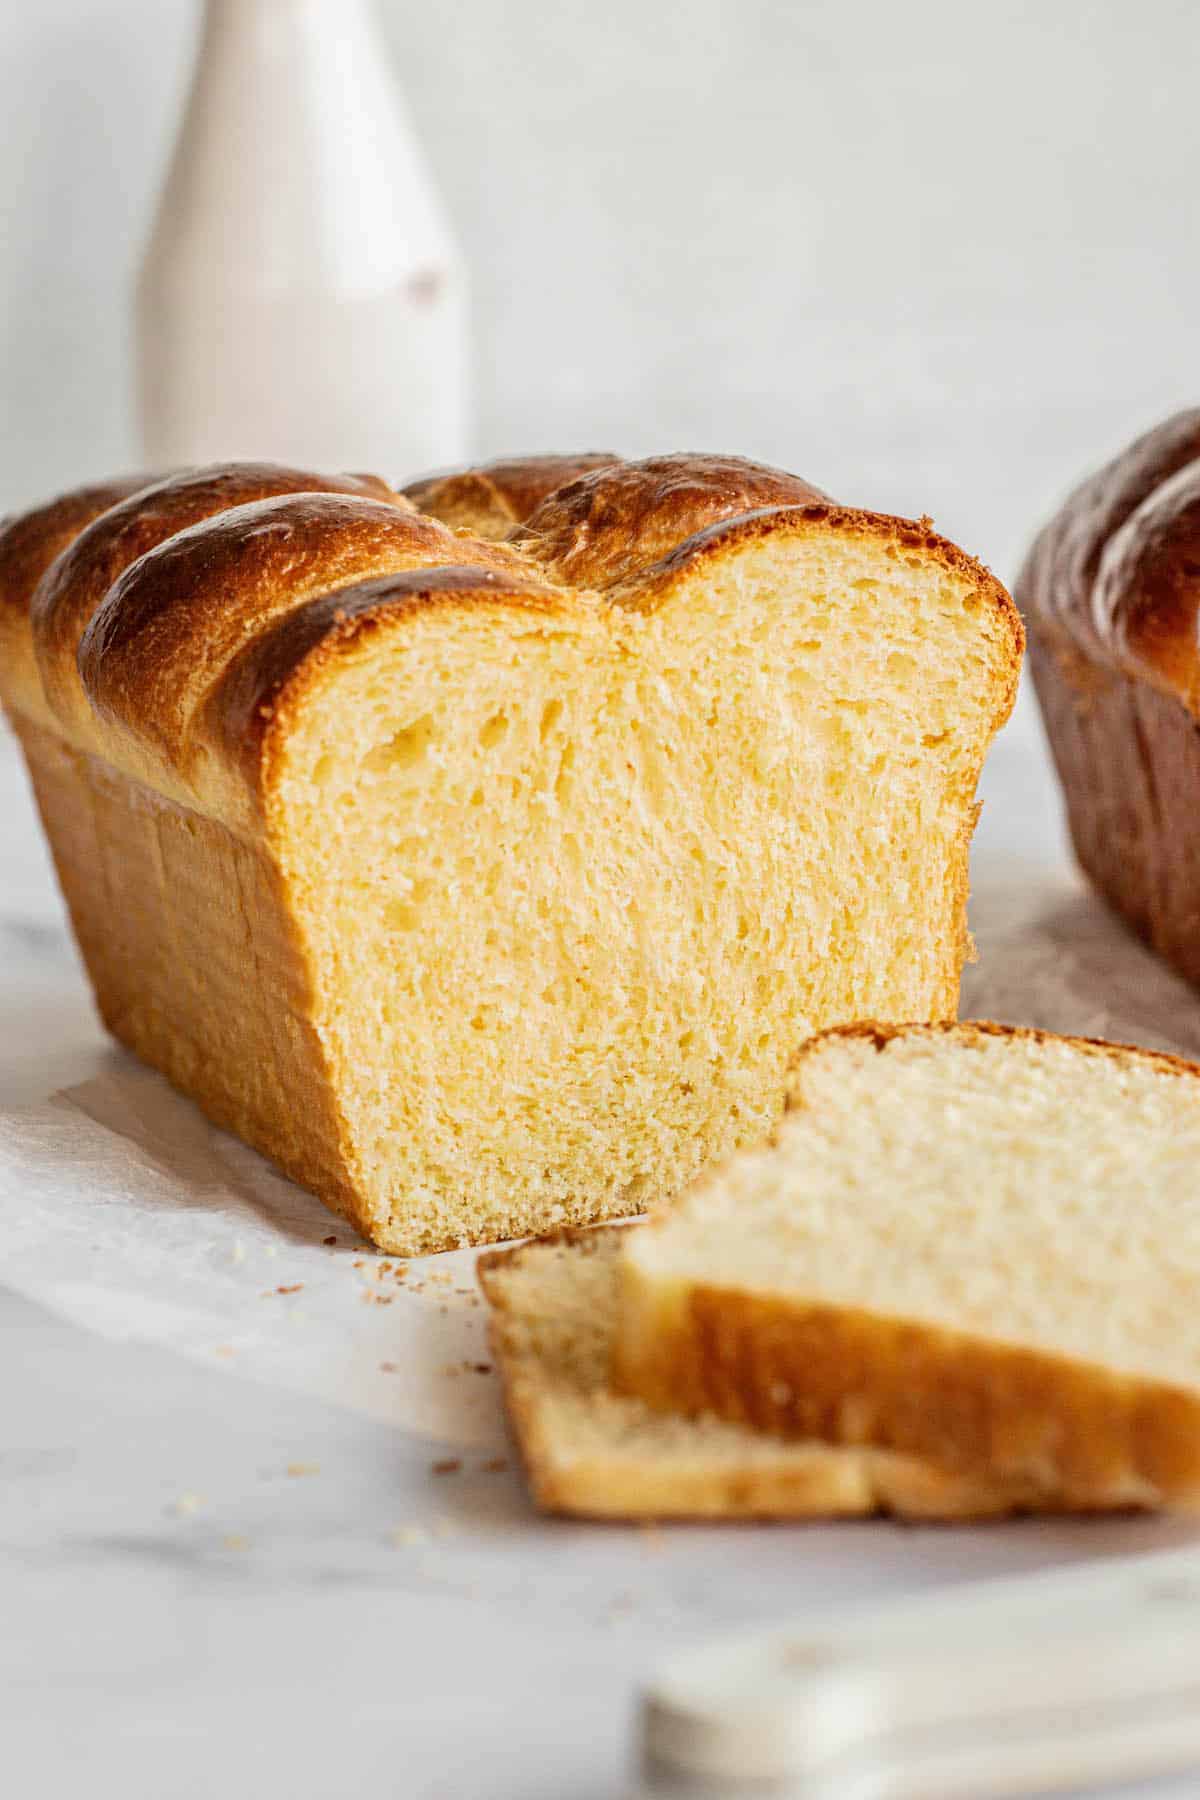
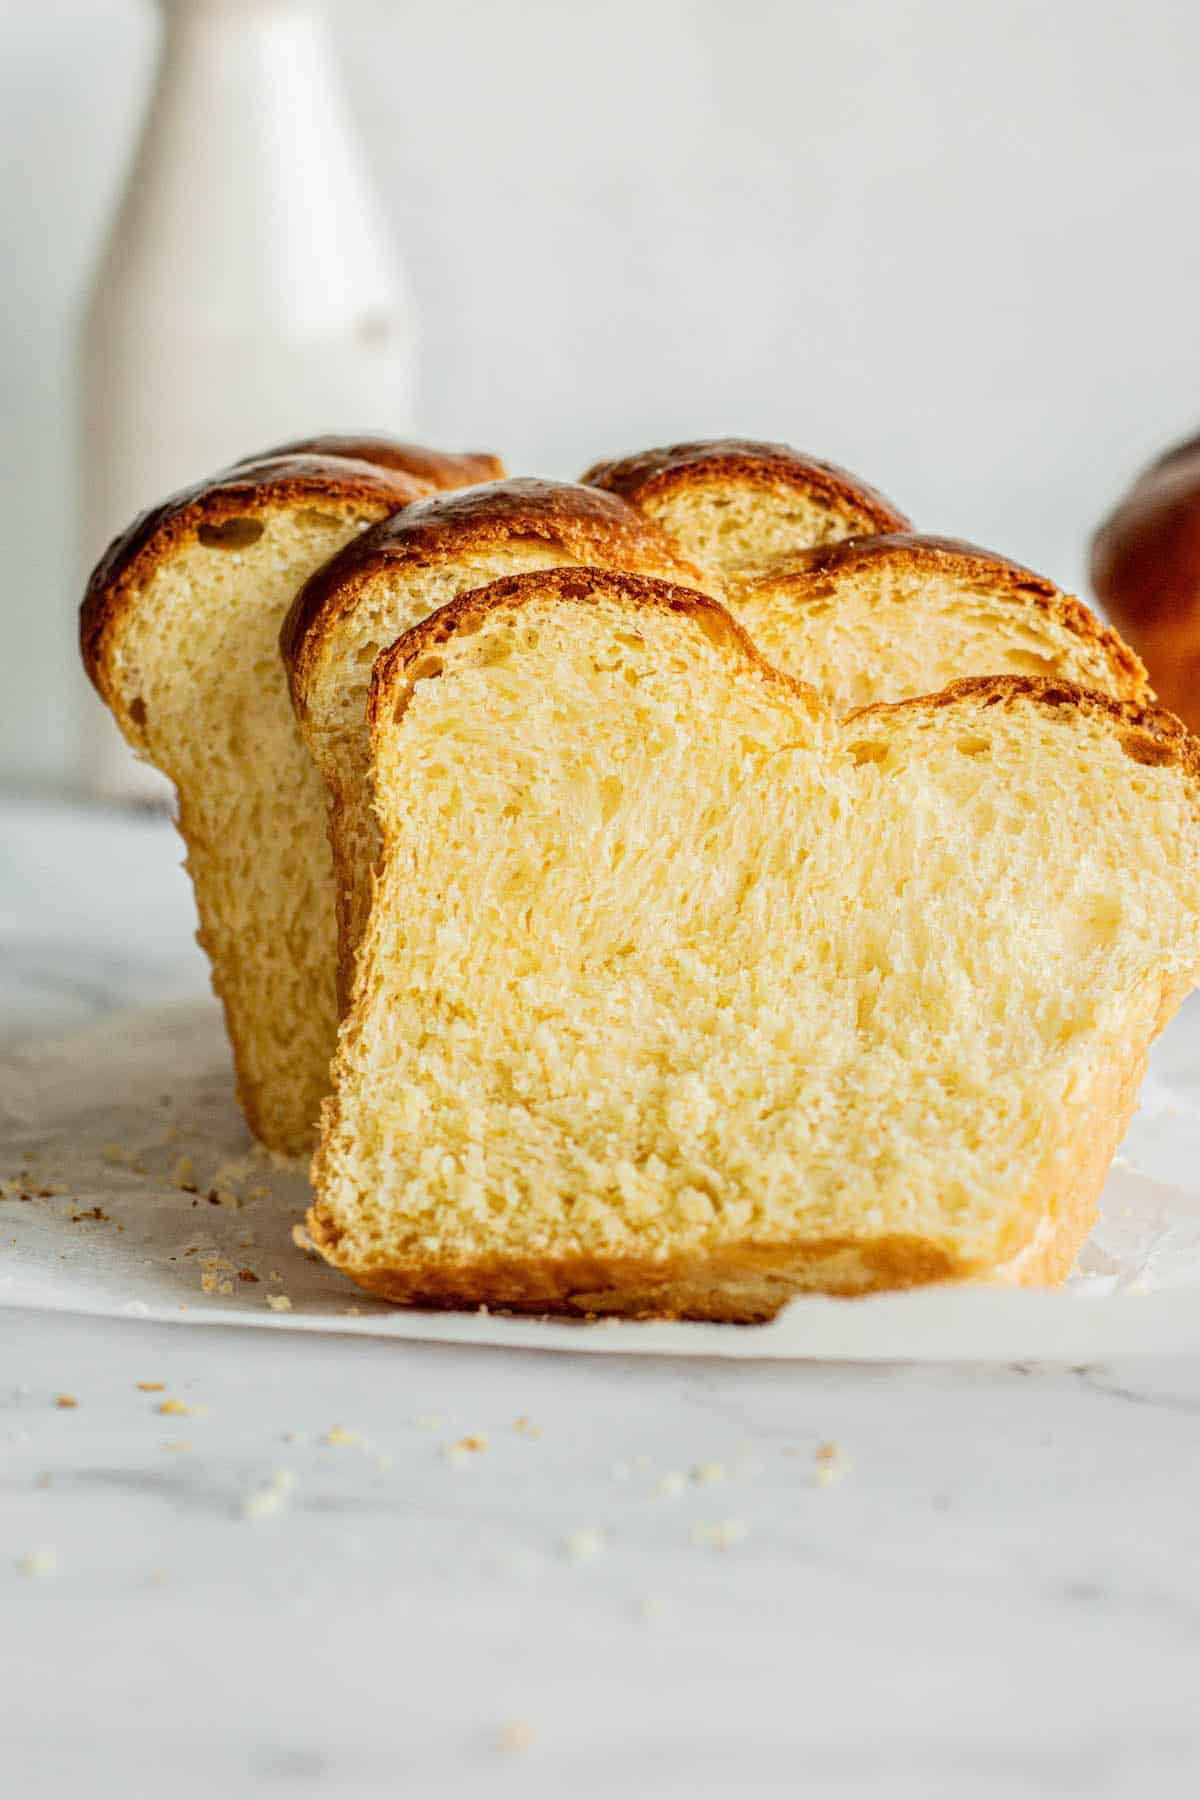
French brioche is a super enriched and buttery bread with rich flavor. It has a delicate and tender crumb and is not very sweet; you can use it for sweet and savory dishes. An enriched dough is one where fats and proteins are added, and brioche dough has a considerable amount of butter and eggs added to the dough.
Adding all this fat means the dough reacts differently to standard bread. The high butter content slows gluten development down, so the initial kneading process is trickier than regular bread. However, you can build the dough’s strength with patience and time.
You can make enriched bread without butter, like these challah buns. They use oil instead.
What should brioche dough look like?
Brioche develops over several stages, and the look and feel of the dough change throughout. The first stage makes a thick dough that uses all the ingredients except butter.
Add in the cubed butter in stage two, a bit at a time. Butter brings in fat and liquid. The dough will become slack and sticky with all this moisture and fat.
Once the butter has been added, it is time to develop the gluten in the dough. This is done by kneading the dough, preferably in a stand mixer, until it becomes glossy and strong, pulling away cleanly from the sides of the mixer.
This is a slow and steady process. The dough will seem sticky, but suddenly, it will come together and become glossy and strong.
Making brioche dough by hand
You can make this enriched French bread by hand, but you will need plenty of patience and elbow grease. With the addition of all the butter, you may think, ‘is my brioche dough too sticky?’ and you could be tempted to add more flour. Resist the temptation and continue kneading.
A slap-and-fold method works well for a very sticky dough. The dough can be slapped down hard on the bench and folded over itself. Use quick motions to avoid it sticking too much on your hands.
Ingredients
Find the ingredient amounts for the brioche loaf recipe in the printable recipe card at the bottom of this post. Here is a rundown of the dough ingredients.
- All-purpose flour- All-purpose flour is used for this recipe, one with a protein level of around 11%. This protein content is enough to develop the gluten but not too much that the bread becomes chewy. Using bread flour with protein levels can lead to chewy brioche.
- Yeast – The yeast used in this recipe can be instant yeast or active dry yeast. Instant yeast will rise faster than active dried yeast. Whichever one you use, it needs to be viable. Usually, the instant yeast sachets are pretty foolproof, but sometimes active dried yeast can lose viability. To test the viability of yeast before beginning, warm the milk (to around 95-104°F / 35-40°C) and mix in the yeast with one tablespoon of the sugar. Leave it to sit for 5-10 minutes first. If it becomes foamy, it’s good to go.
- Milk. This can be whole milk or skim milk.
- Large eggs. Egg sizes vary not only in weight but also in name depending on what country you’re in. Some are labeled large, extra-large, and jumbo, while others are labeled by number. The actual volume of the egg within each shell varies a lot, too, within these labels. Approximately 260-270g of the egg is used in this recipe. That’s around 5 large eggs with a volume between 1.75oz/52g and 1.9oz-/54g (measured without the eggshells.)
- Granulated white sugar. Only a small amount
- Salt.
- Butter – There is plenty of butter needed as it’s an enriched brioche dough.
Equipment
- A stand mixer fitted with a dough hook attachment- A stand mixer makes this brioche recipe nice and easy. It is possible to knead by hand, but with such a large amount of butter and eggs in the dough, it takes a lot of arm muscle.
- Two standard 8.5 x 4.5 inch (21x11cm) loaf pans are used.
Method
- Add the warm milk and stir in the yeast and sugar in the bowl of a stand mixer fitted with a dough hook. To this yeast mixture, add the eggs, flour, and salt.
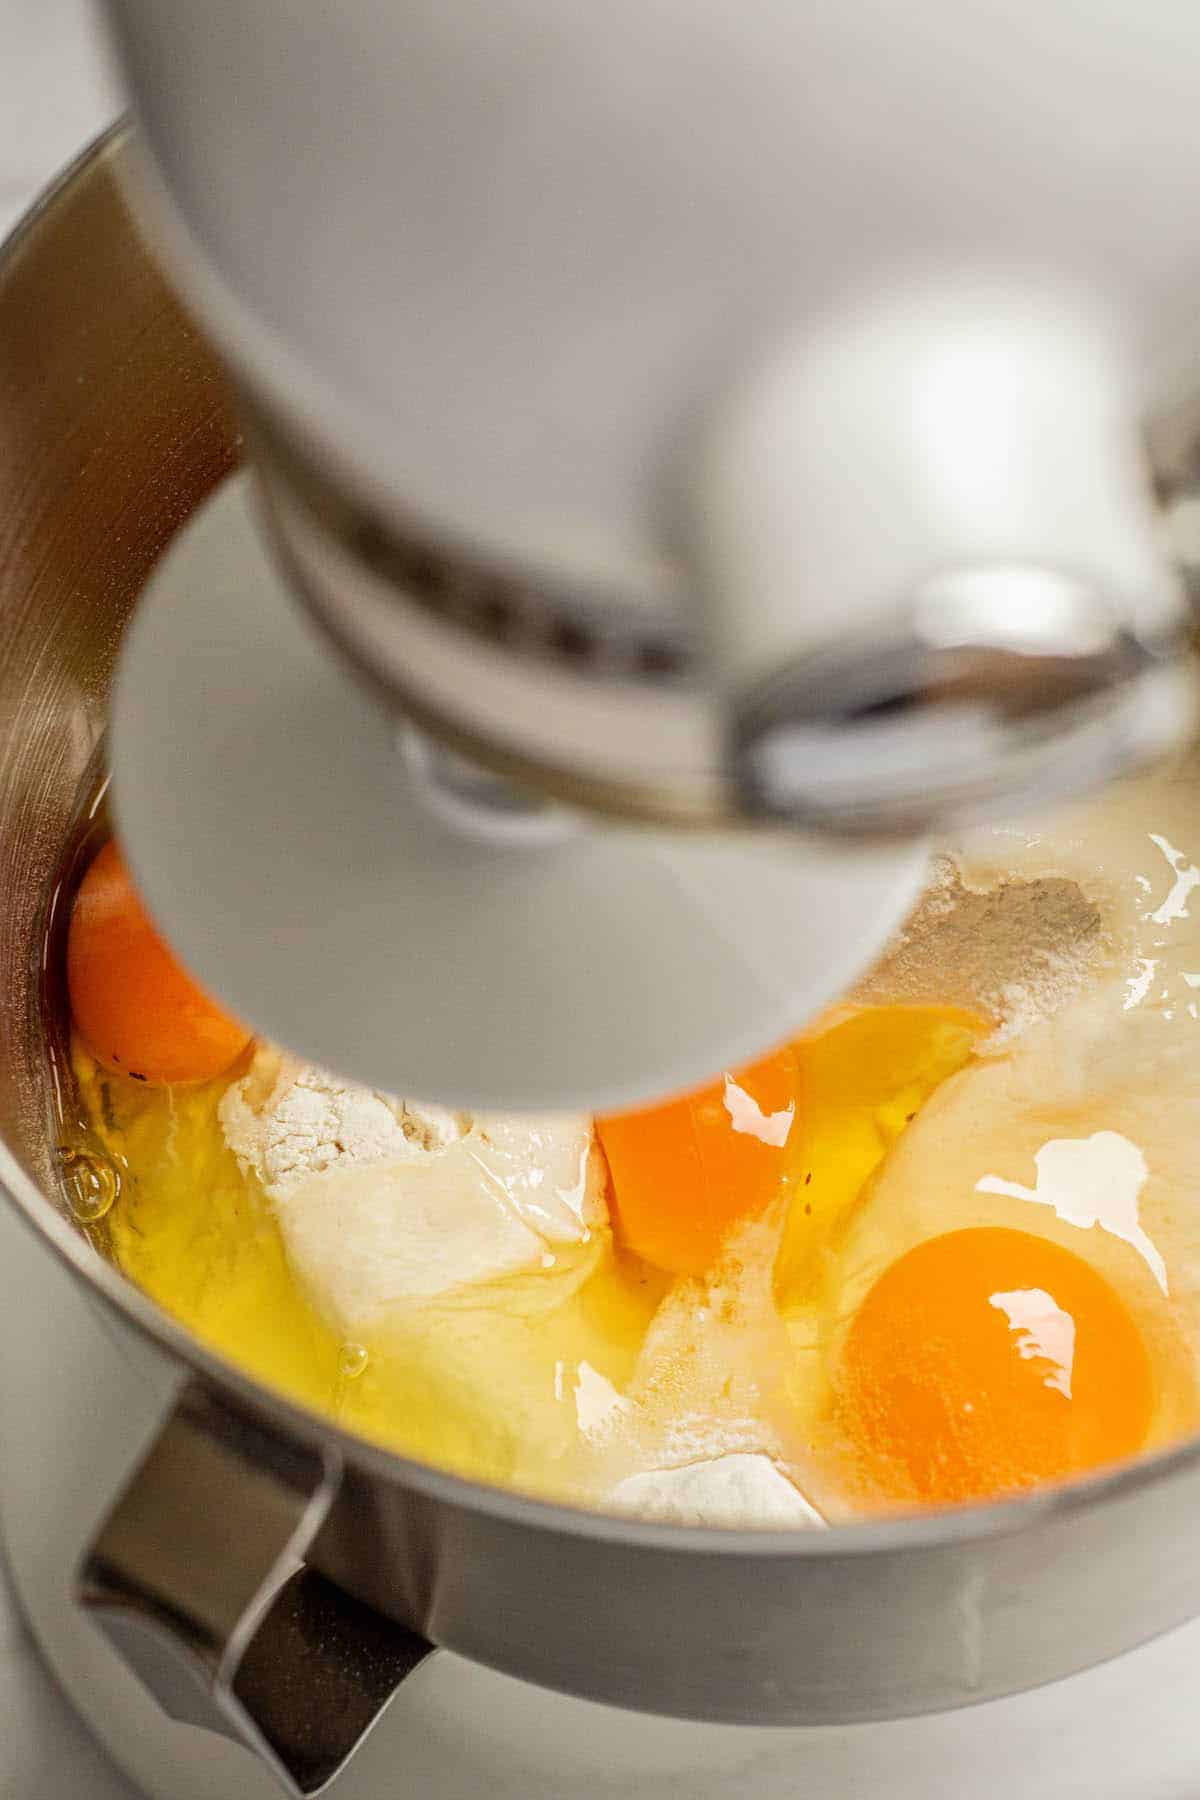
- Turn the mixer on medium-low speed and combine until it forms a thick but slightly sticky dough. Mix this dough for around 5 minutes to begin developing the gluten.
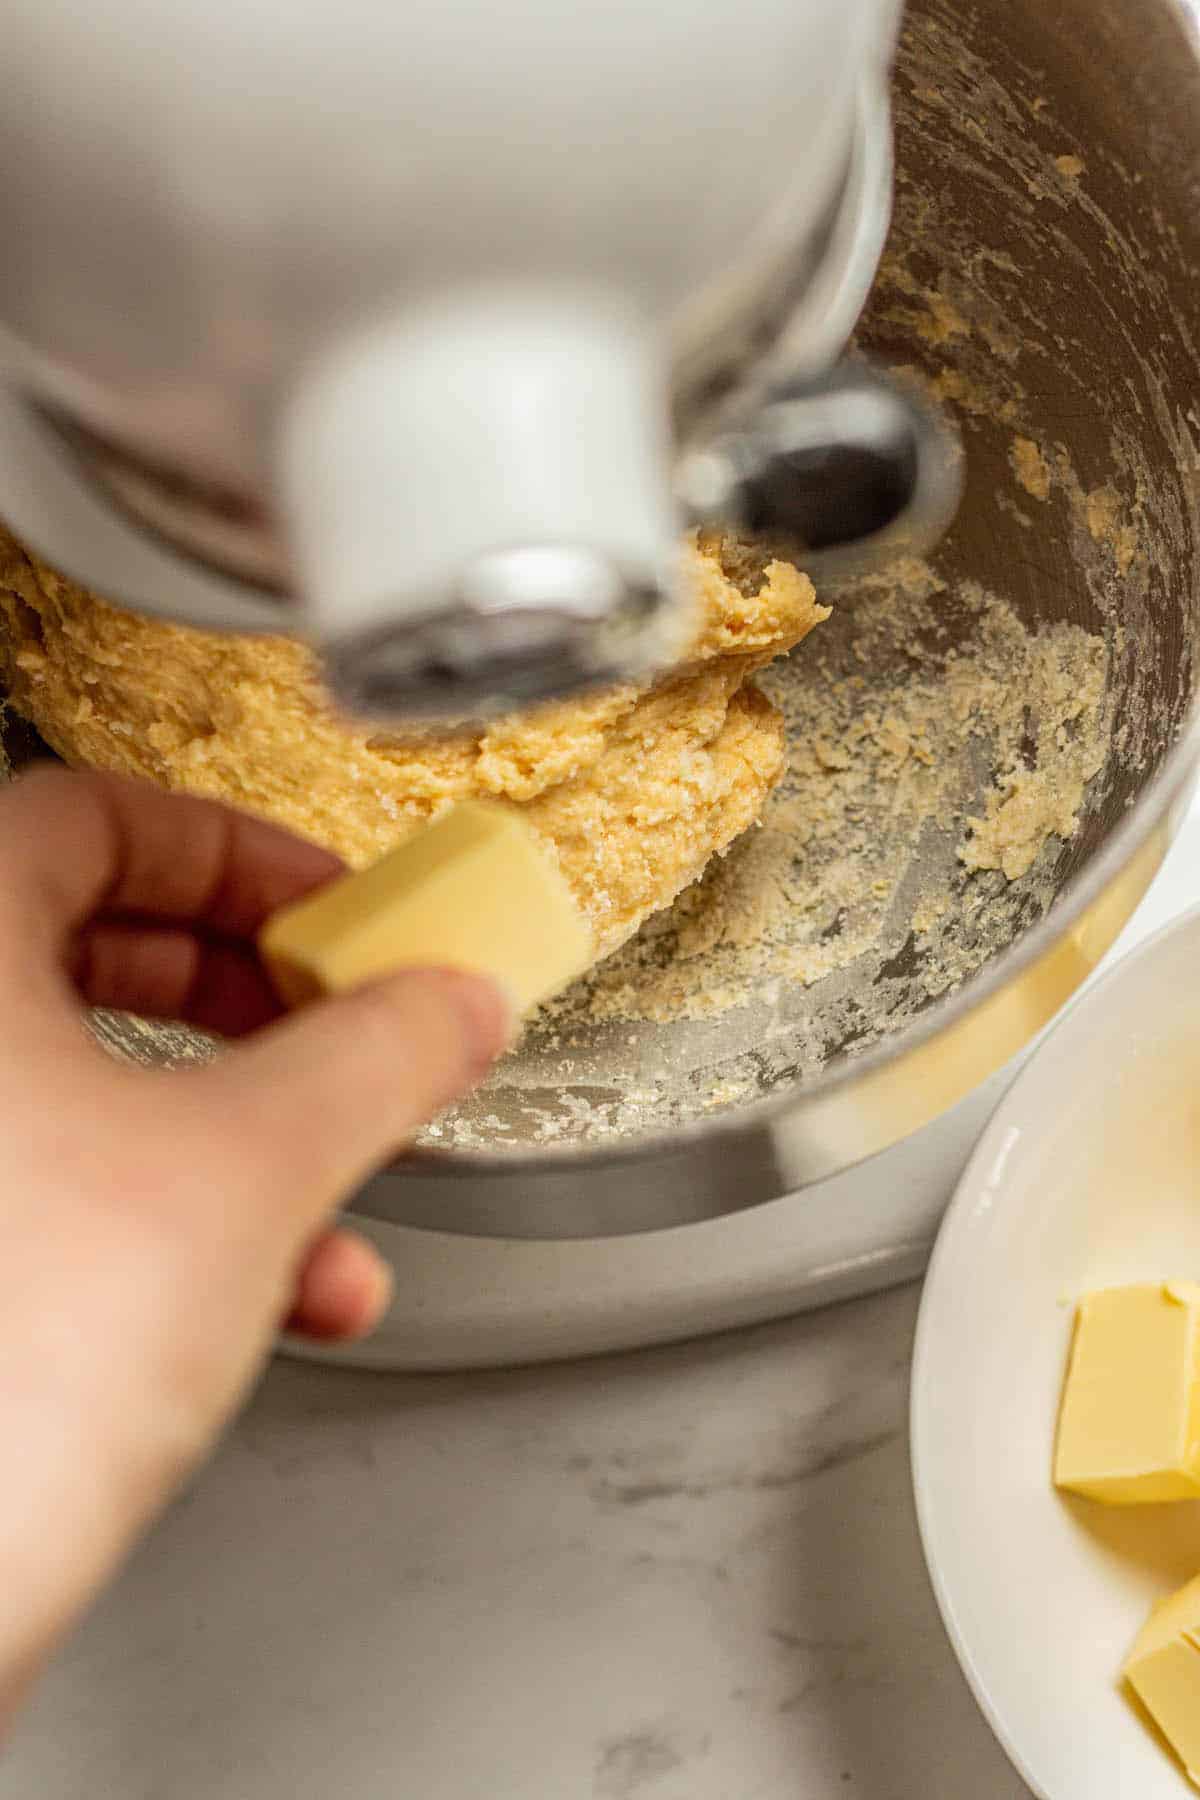
- Add in the cubed butter. Incorporate each cube before the next addition.
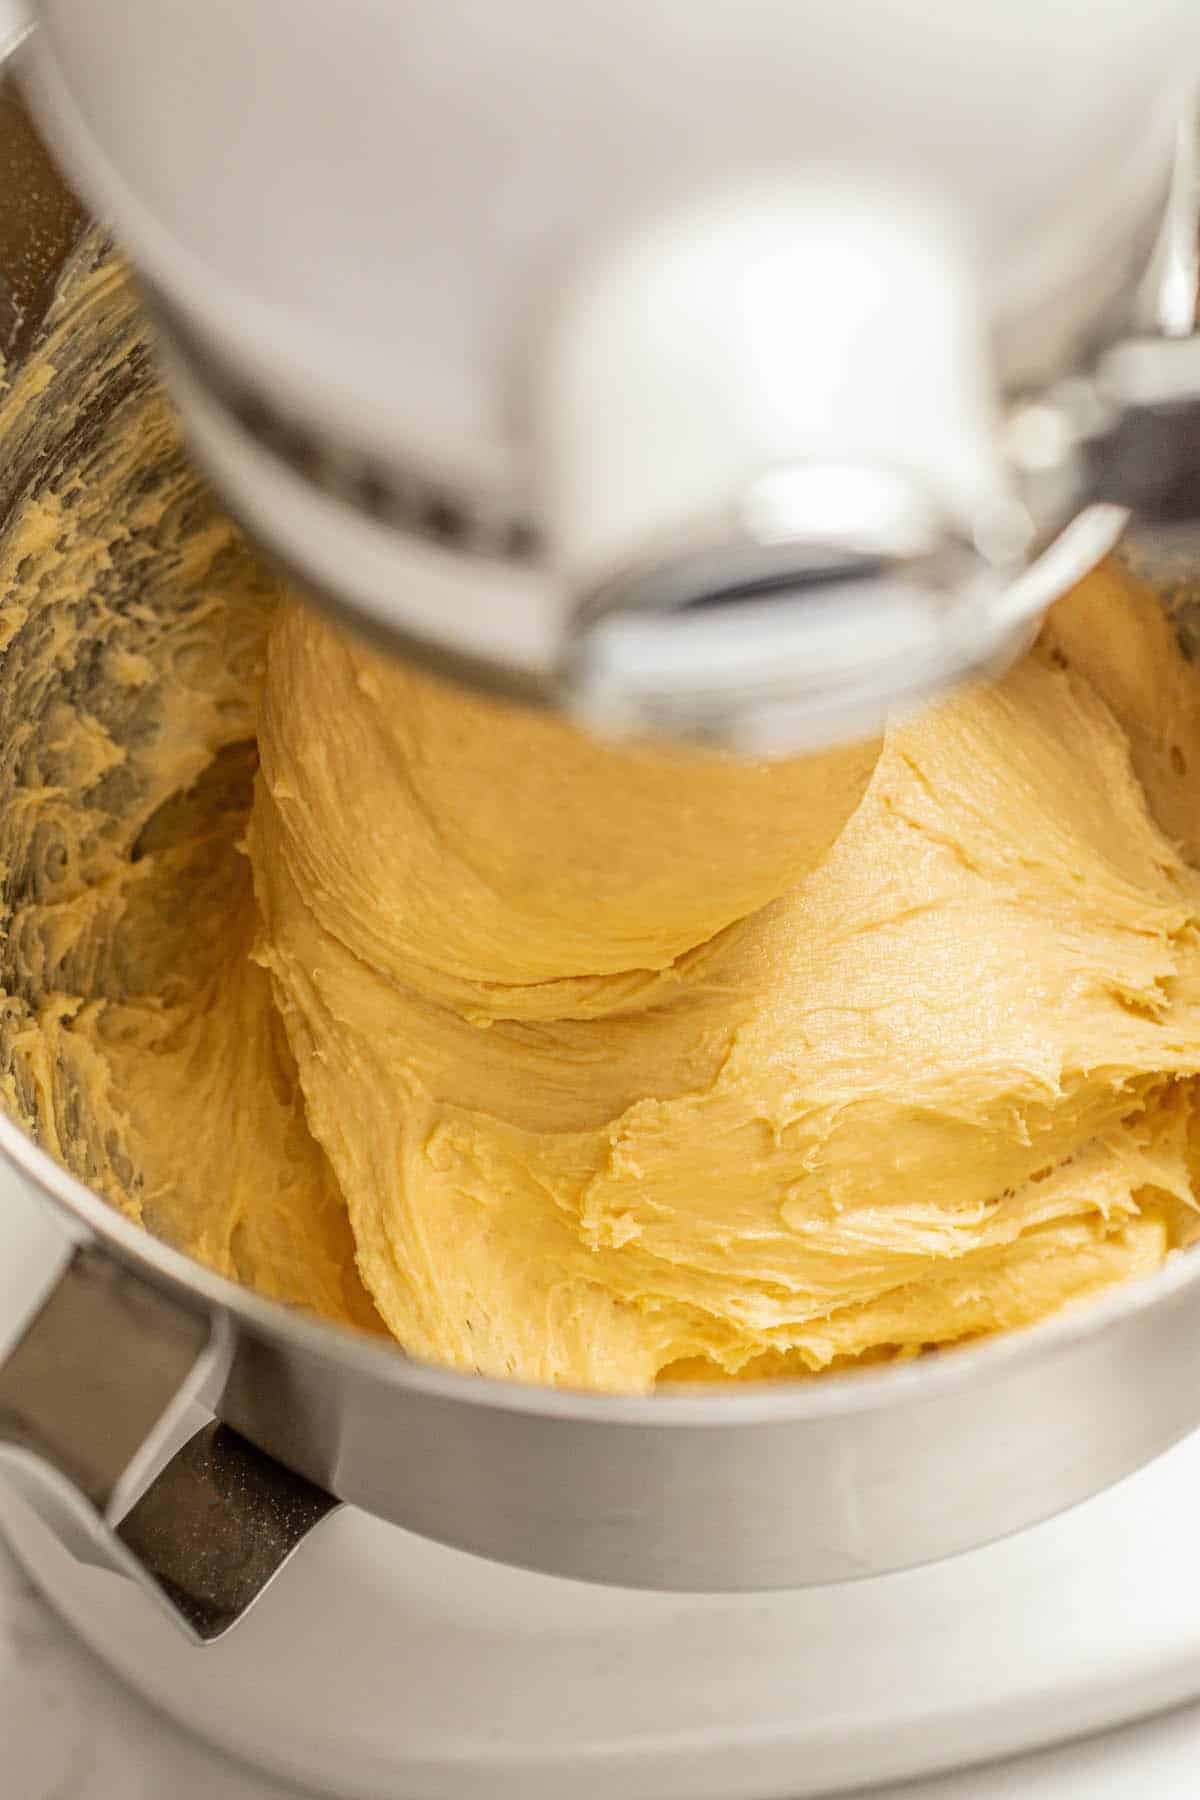
- Turn the mixer on medium speed and keep it mixing until the sticky dough strengthens, comes together, and pulls away cleanly from the sides of the bowl.
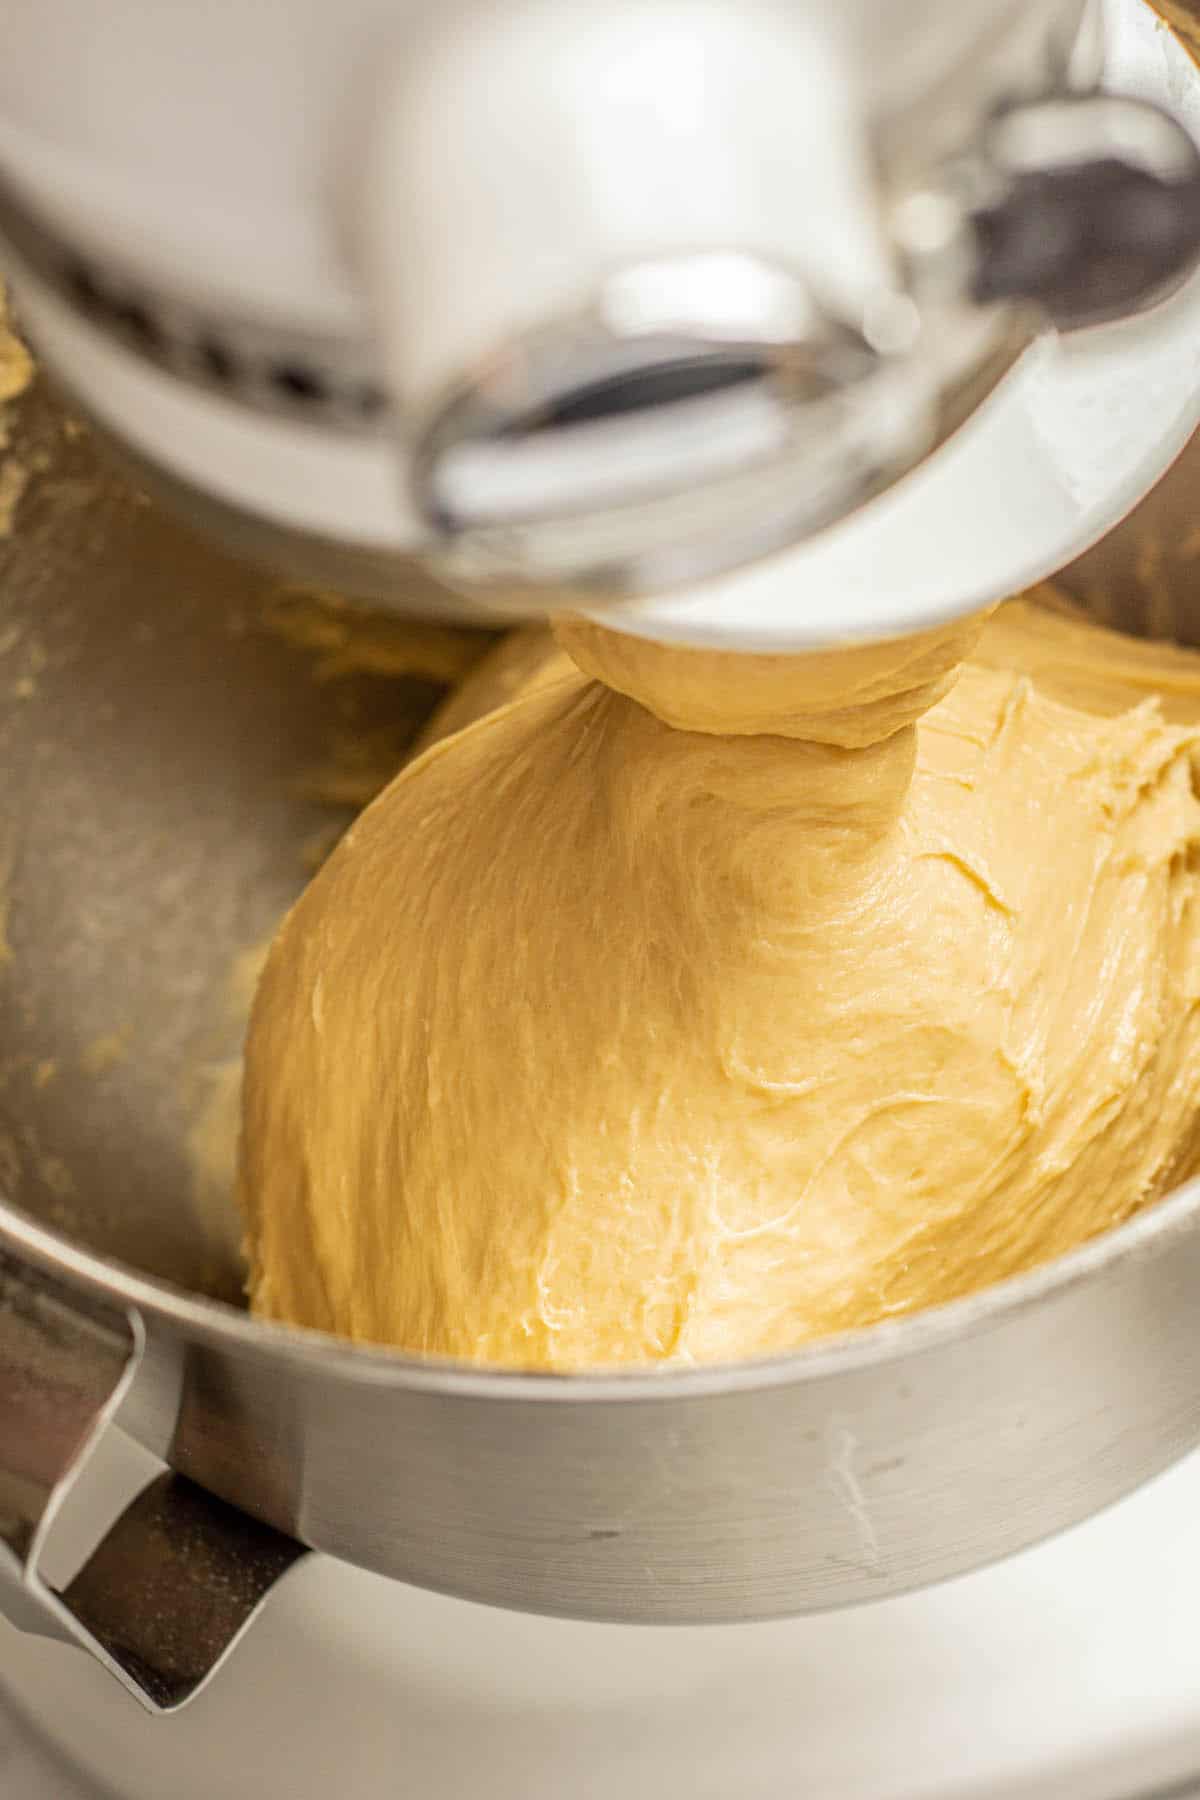
- It will seem very sticky, but don’t add more flour. Too much flour makes dense bread.
- Mix the dough for the best gluten development and brioche crumb for at least 15-20 minutes.
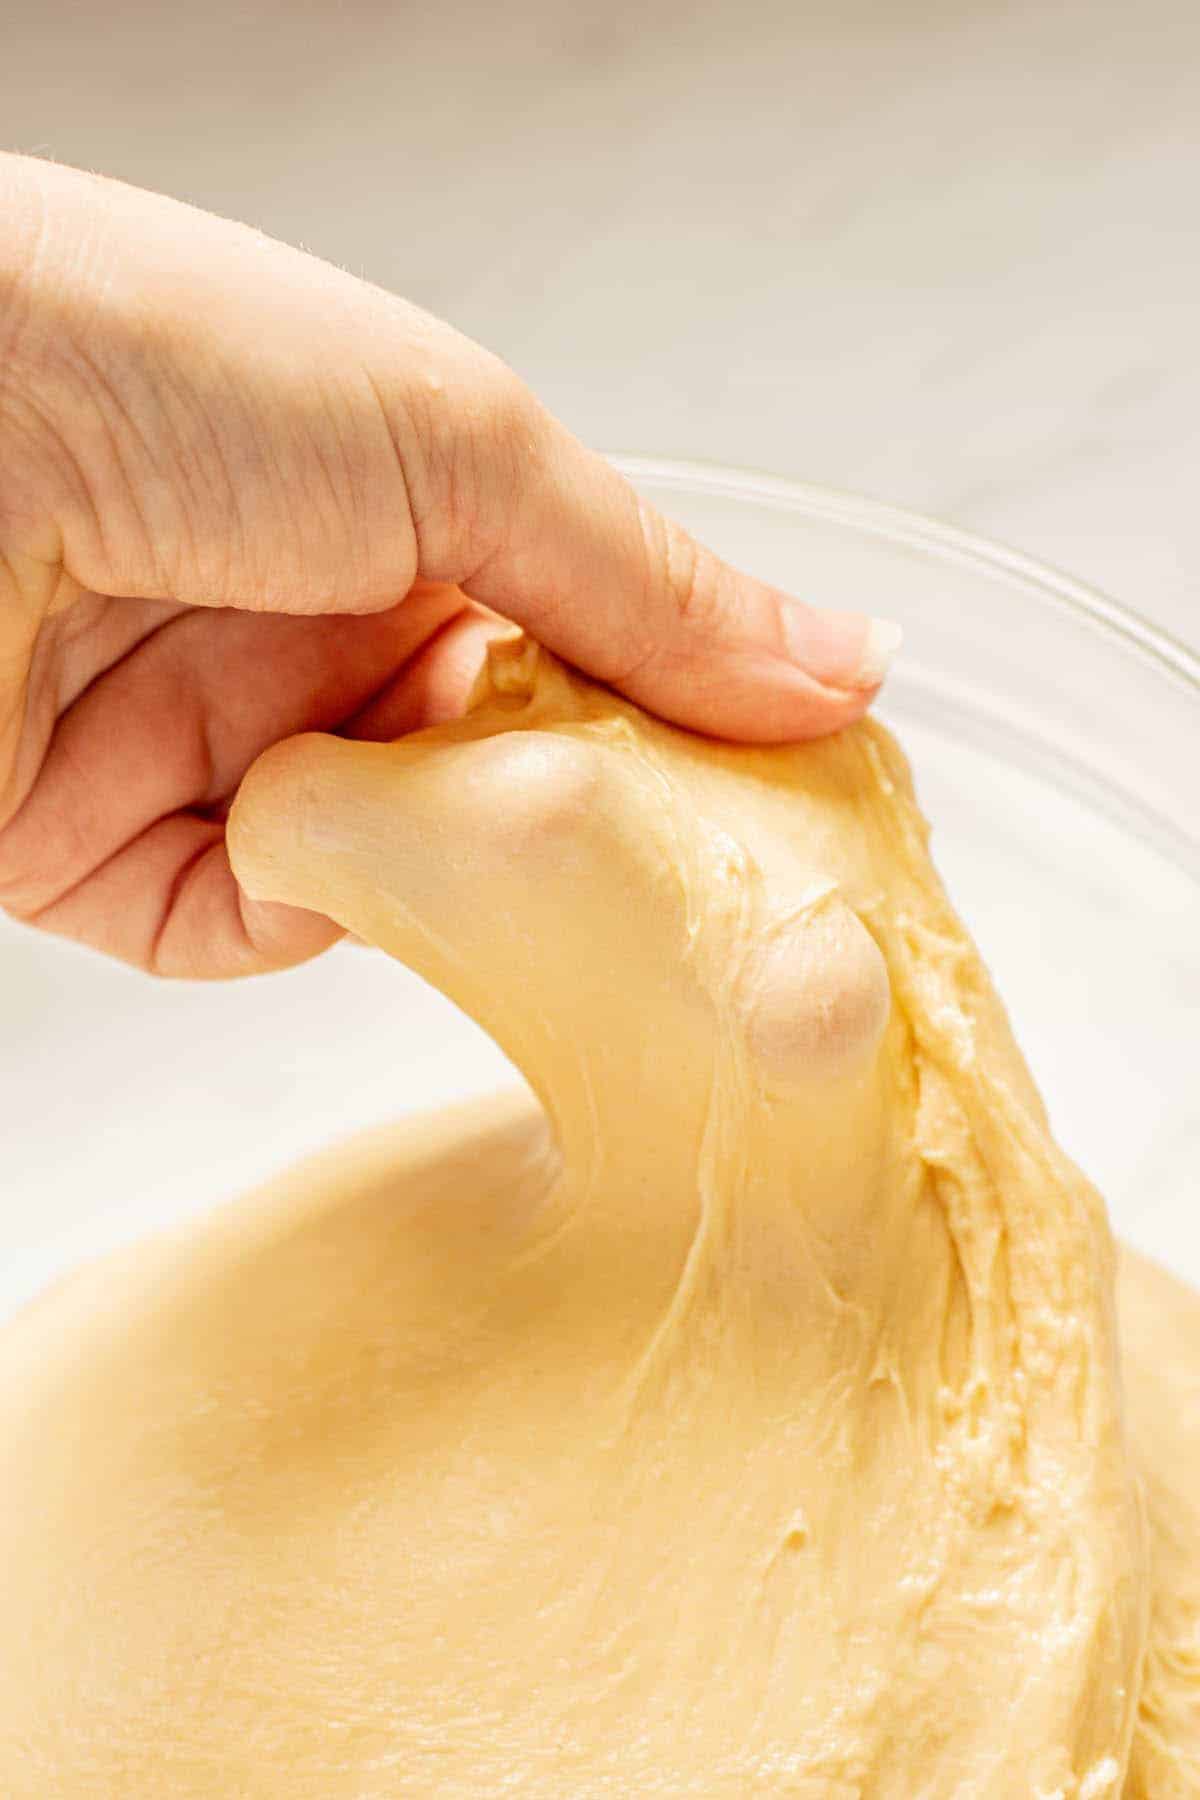
- Proper gluten development will allow you to stretch the dough so thin you can almost see through it. This is called the windowpane test. To test this, let the dough rest for 5 minutes, then grab a piece and stretch it.
- Pull the dough from the bowl onto a bench and form it into a smooth ball. Place the dough ball into a clean bowl, cover it with plastic wrap or a damp kitchen towel, and let it rise in a warm place for around 1.5- 2 hours until doubled in size.
How fast the rise happens will depend on the room temperature.
Cold Proof
- Deflate the dough gently and reshape it into a ball again. Cover it with plastic wrap and place it in the fridge overnight. This step can be shortened, but 8-12 hours long cold proof gives the best flavor.
If you want to skip the overnight proof, the dough will still need a few hours of fridge rest after room temperature proofing. This cold rest will let the butter stiffen up, resulting in much easier shaping.
Shaping
- Pull the stiff, cold dough from the bowl and tip it onto a lightly floured work surface. Divide the dough into two equal portions, and line two loaf pans with parchment paper. Shape the dough as per the two options below.
Shaping Options
Option 1 – Use a bench scraper or knife to divide a portion of the dough into 8 equal pieces.
Roll the pieces of dough into tight balls and place the dough balls in a lined tin, side by side in two rows.
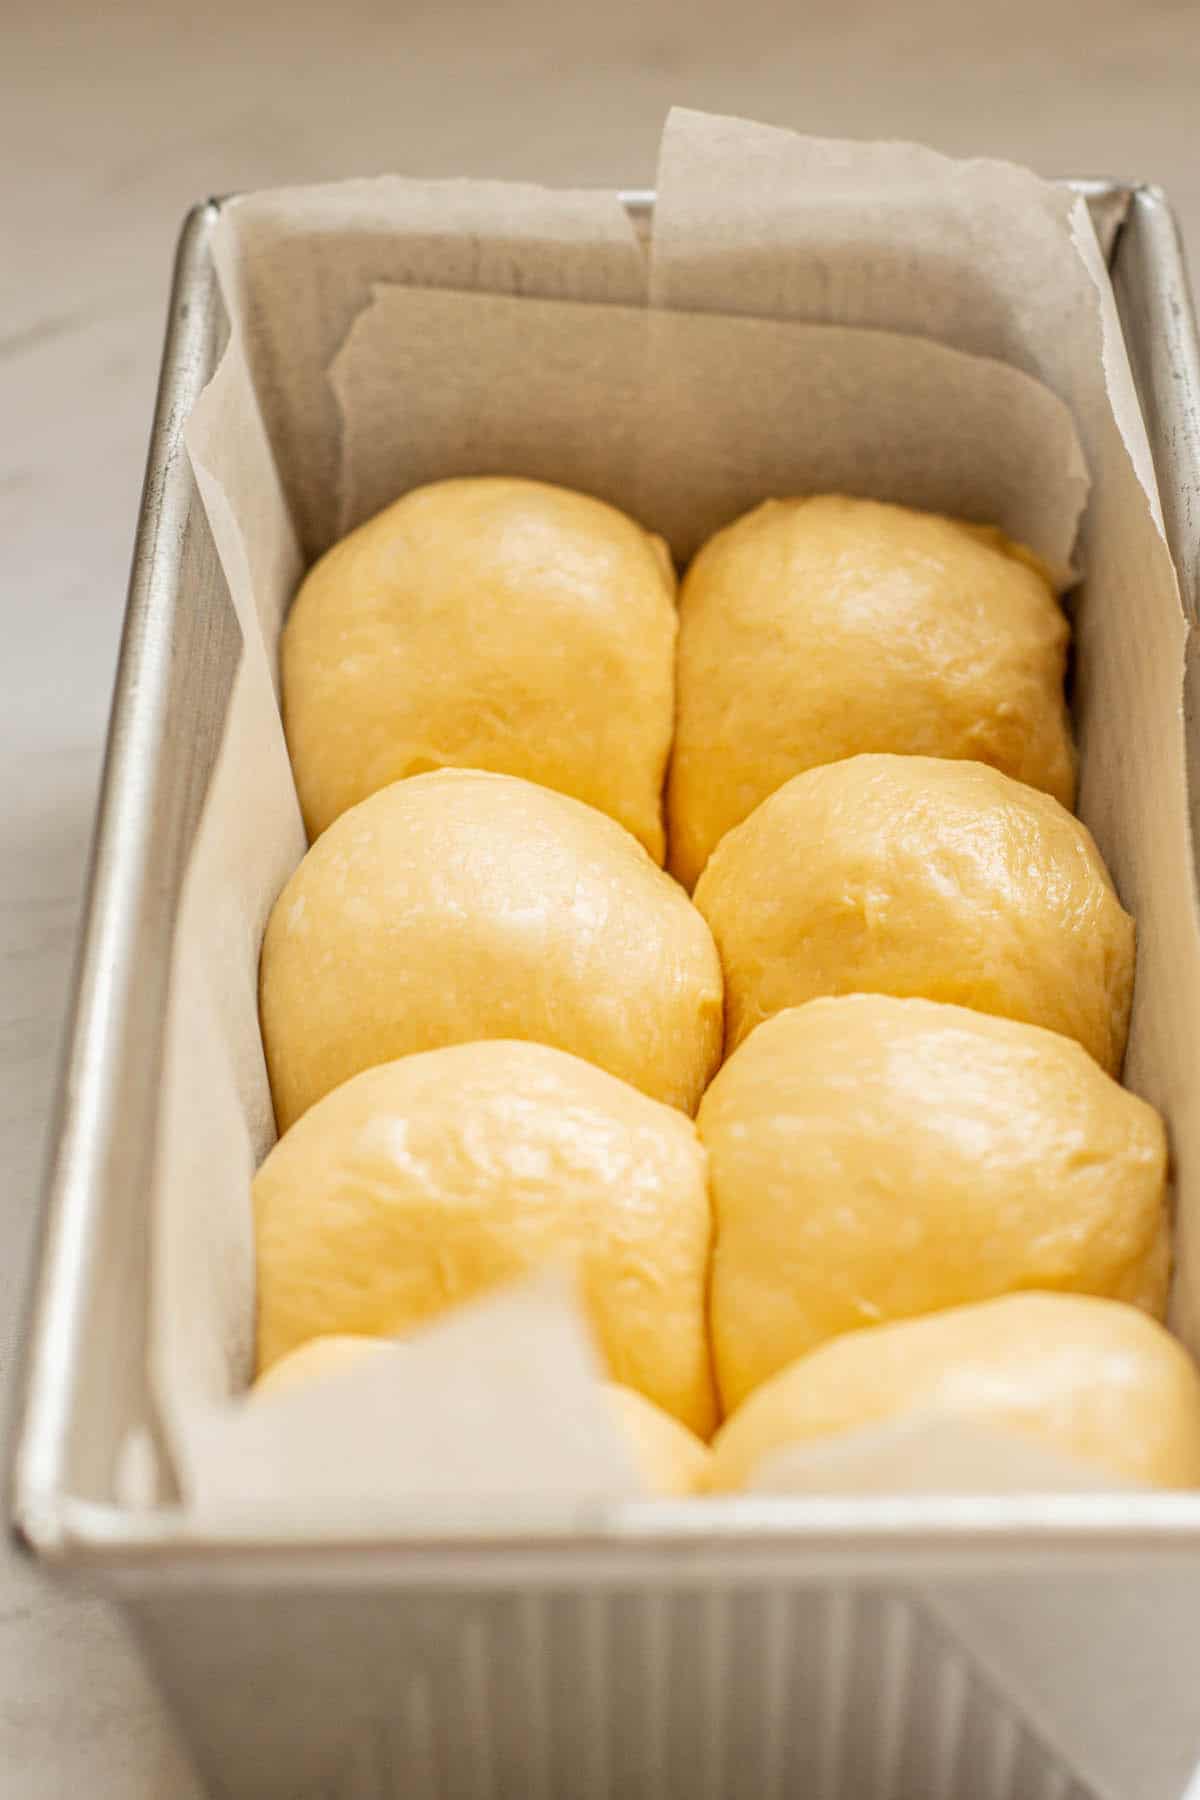
Let them rise until they double in size.
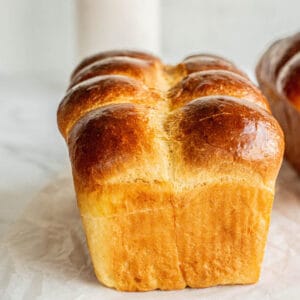
Option 2- Divide a portion of the dough into 3 equal pieces. Roll each piece into a long, about 12 inches (30cm) long on a lightly floured surface.
Braid the three lengths together, tuck in the ends, and place the braided dough into the lined tin.
- Let them rise until they double in size
Baking
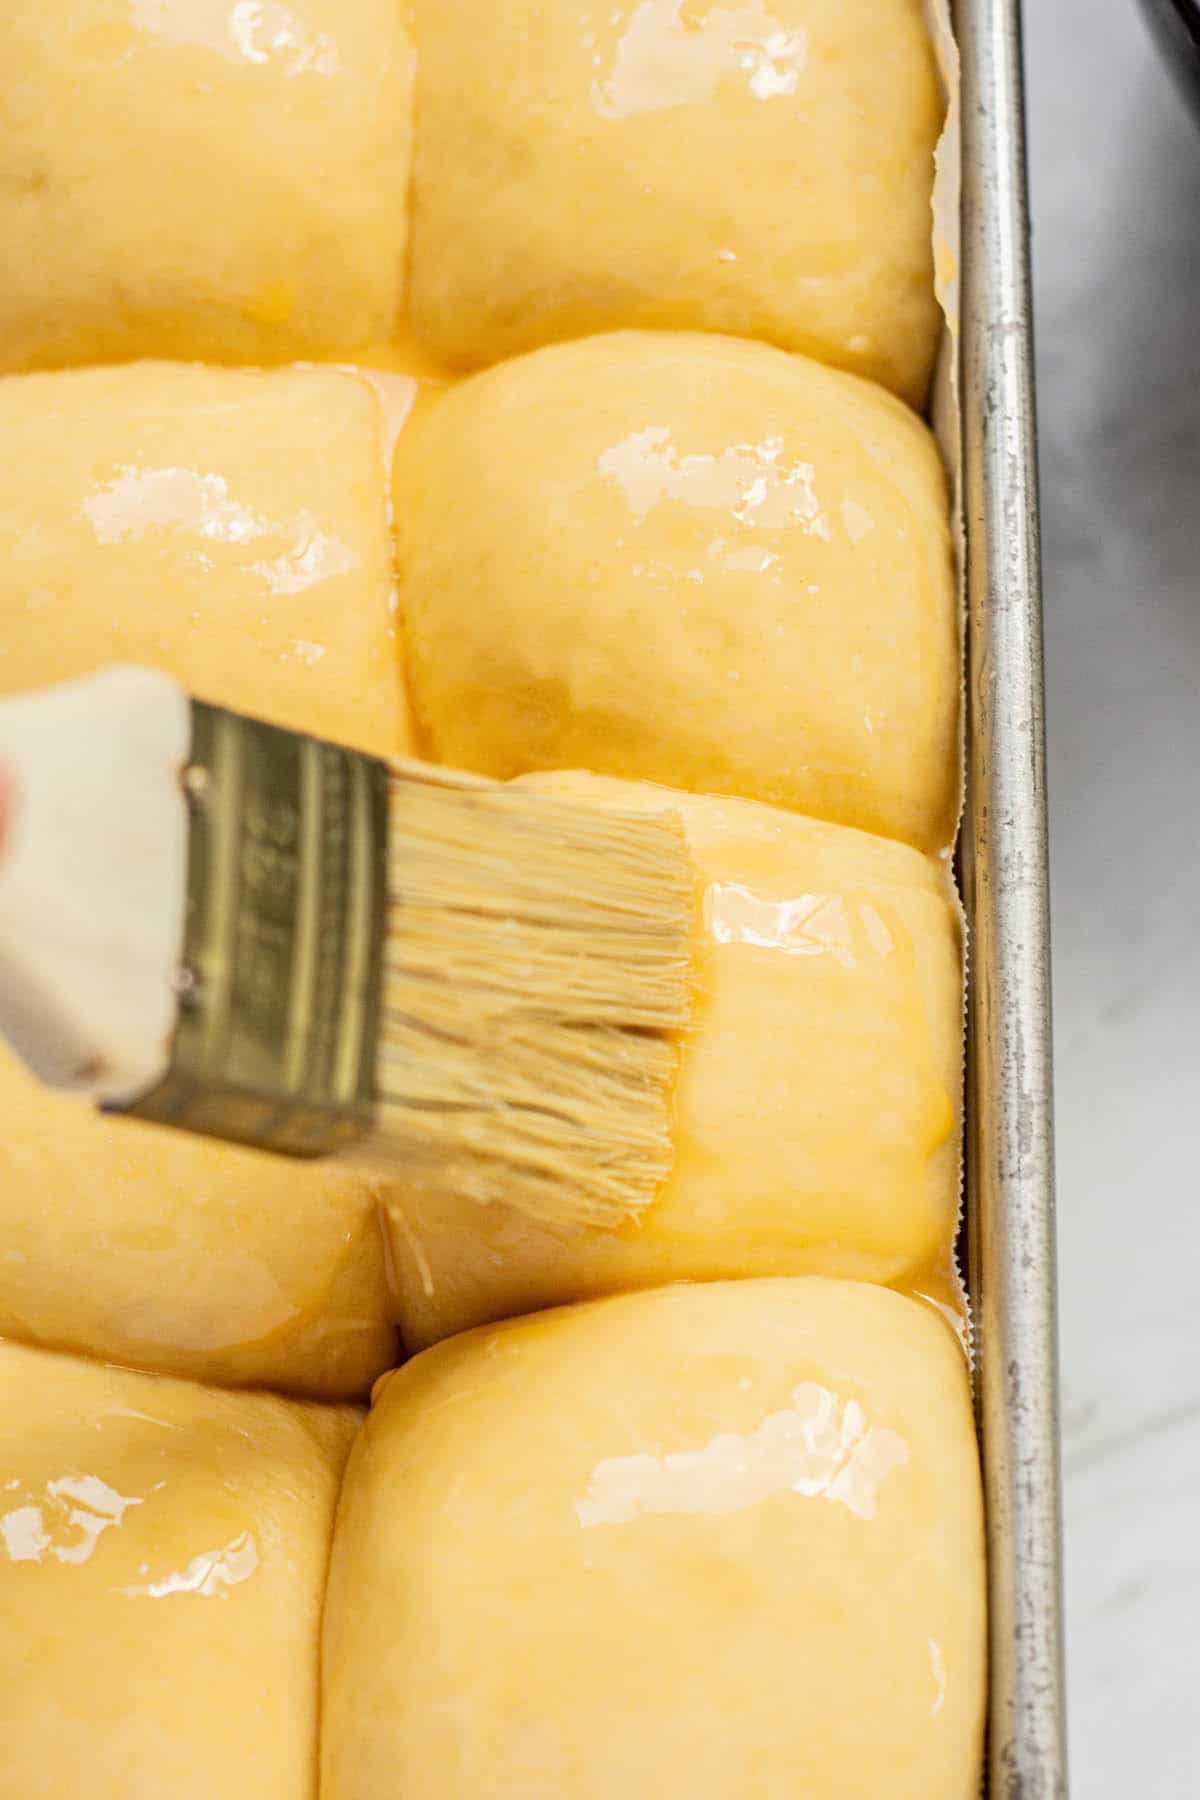
- Whisk an egg in a bowl with a tablespoon of water and brush the surface of the dough with egg wash.
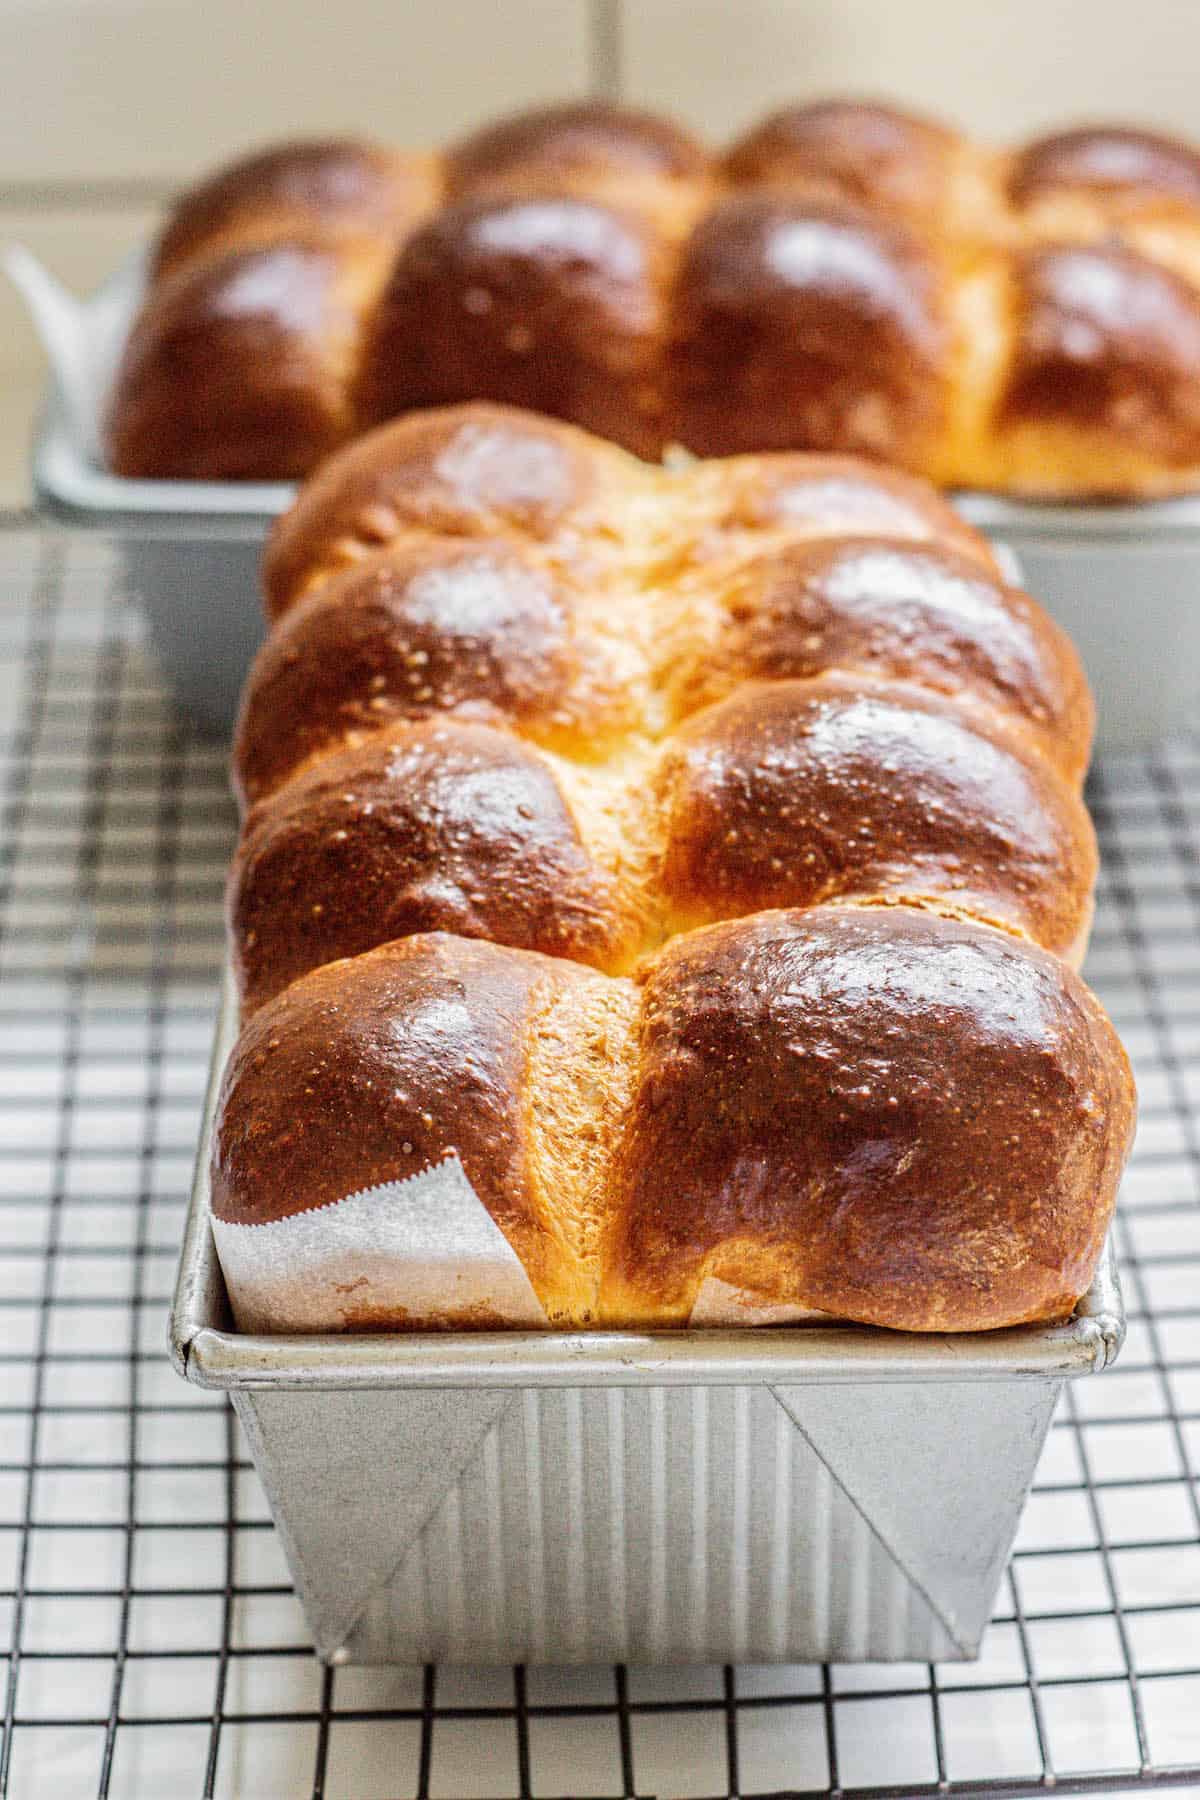
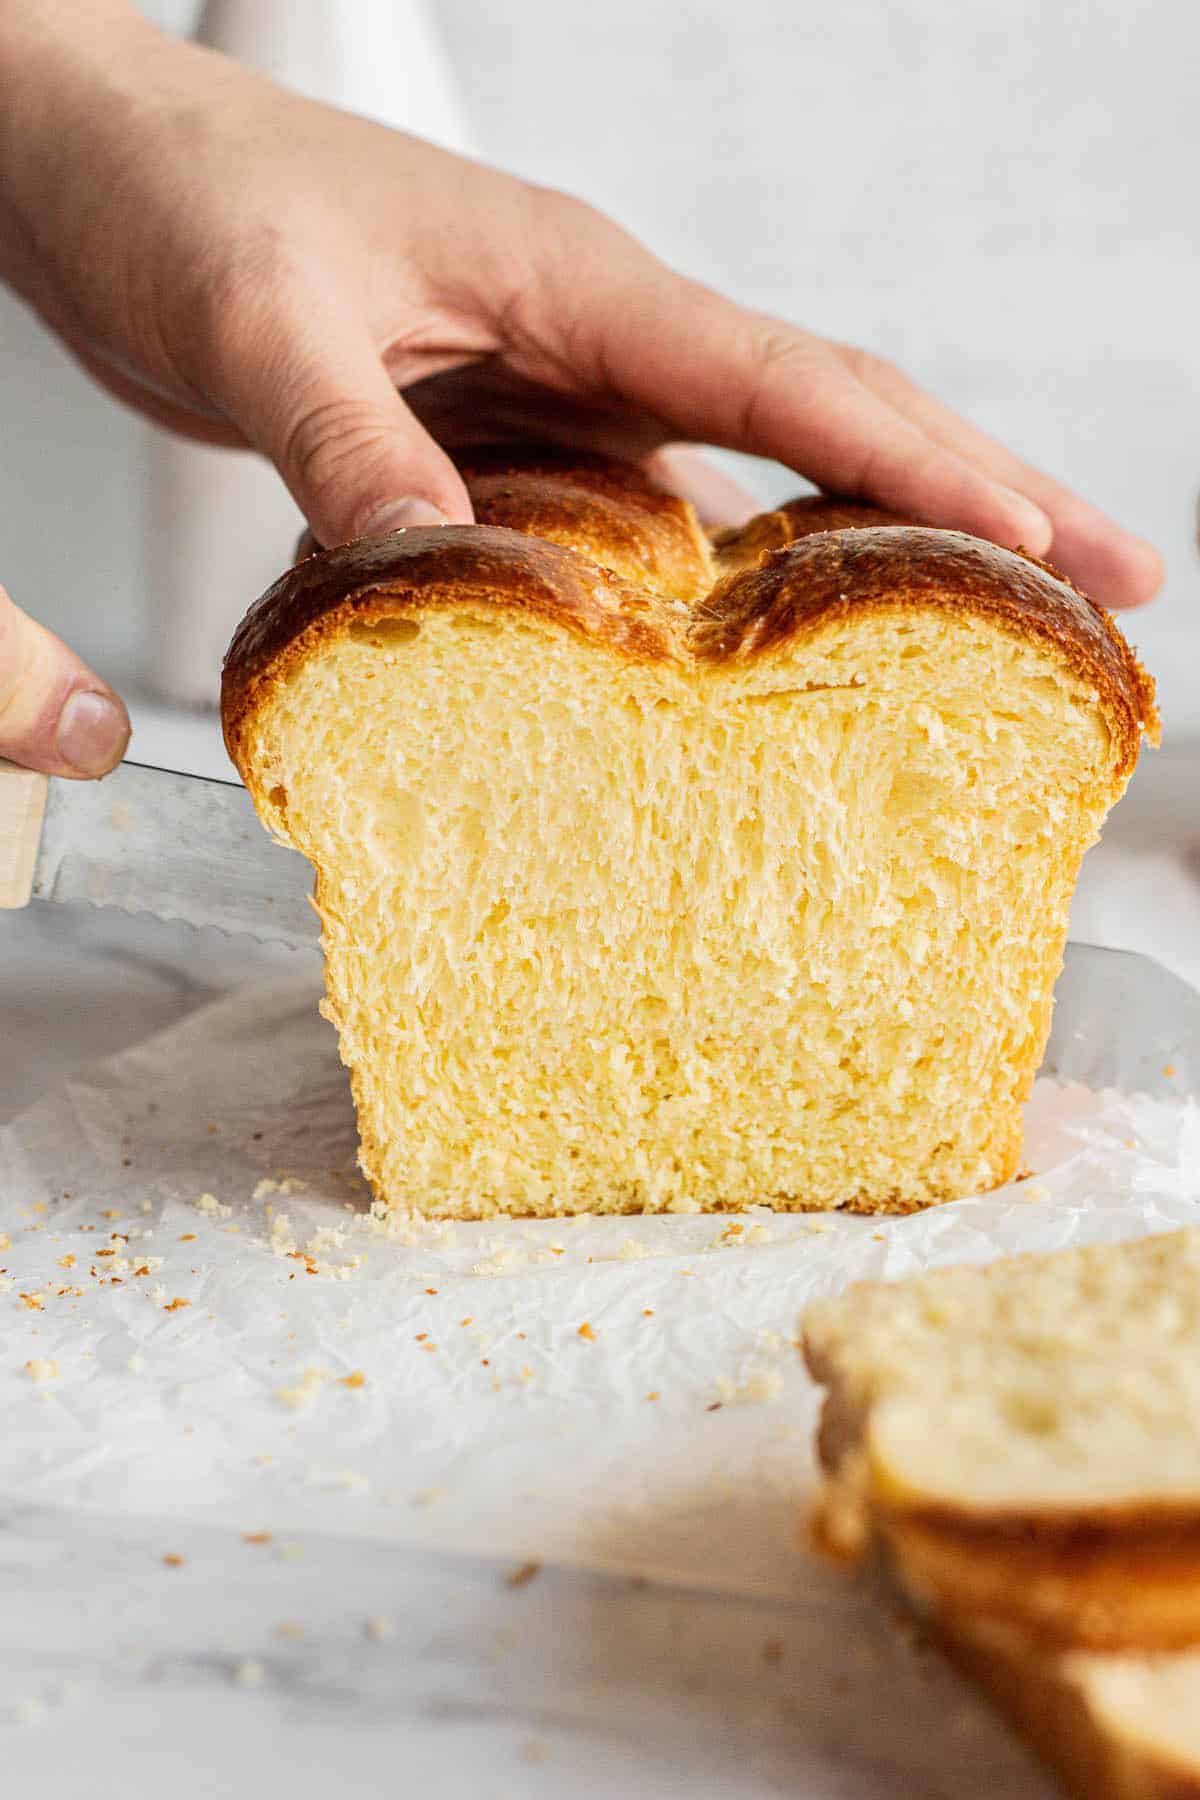
- Bake the bread for approximately 30 minutes until a deep golden brown. If you have an instant-read thermometer, you can check for an internal temperature of 195°F / 90°C.
If the tops are browning too fast for your liking, loosely cover the tops of the bread with aluminum foil. However, don’t be afraid of a deeply browned top. That brings flavor!
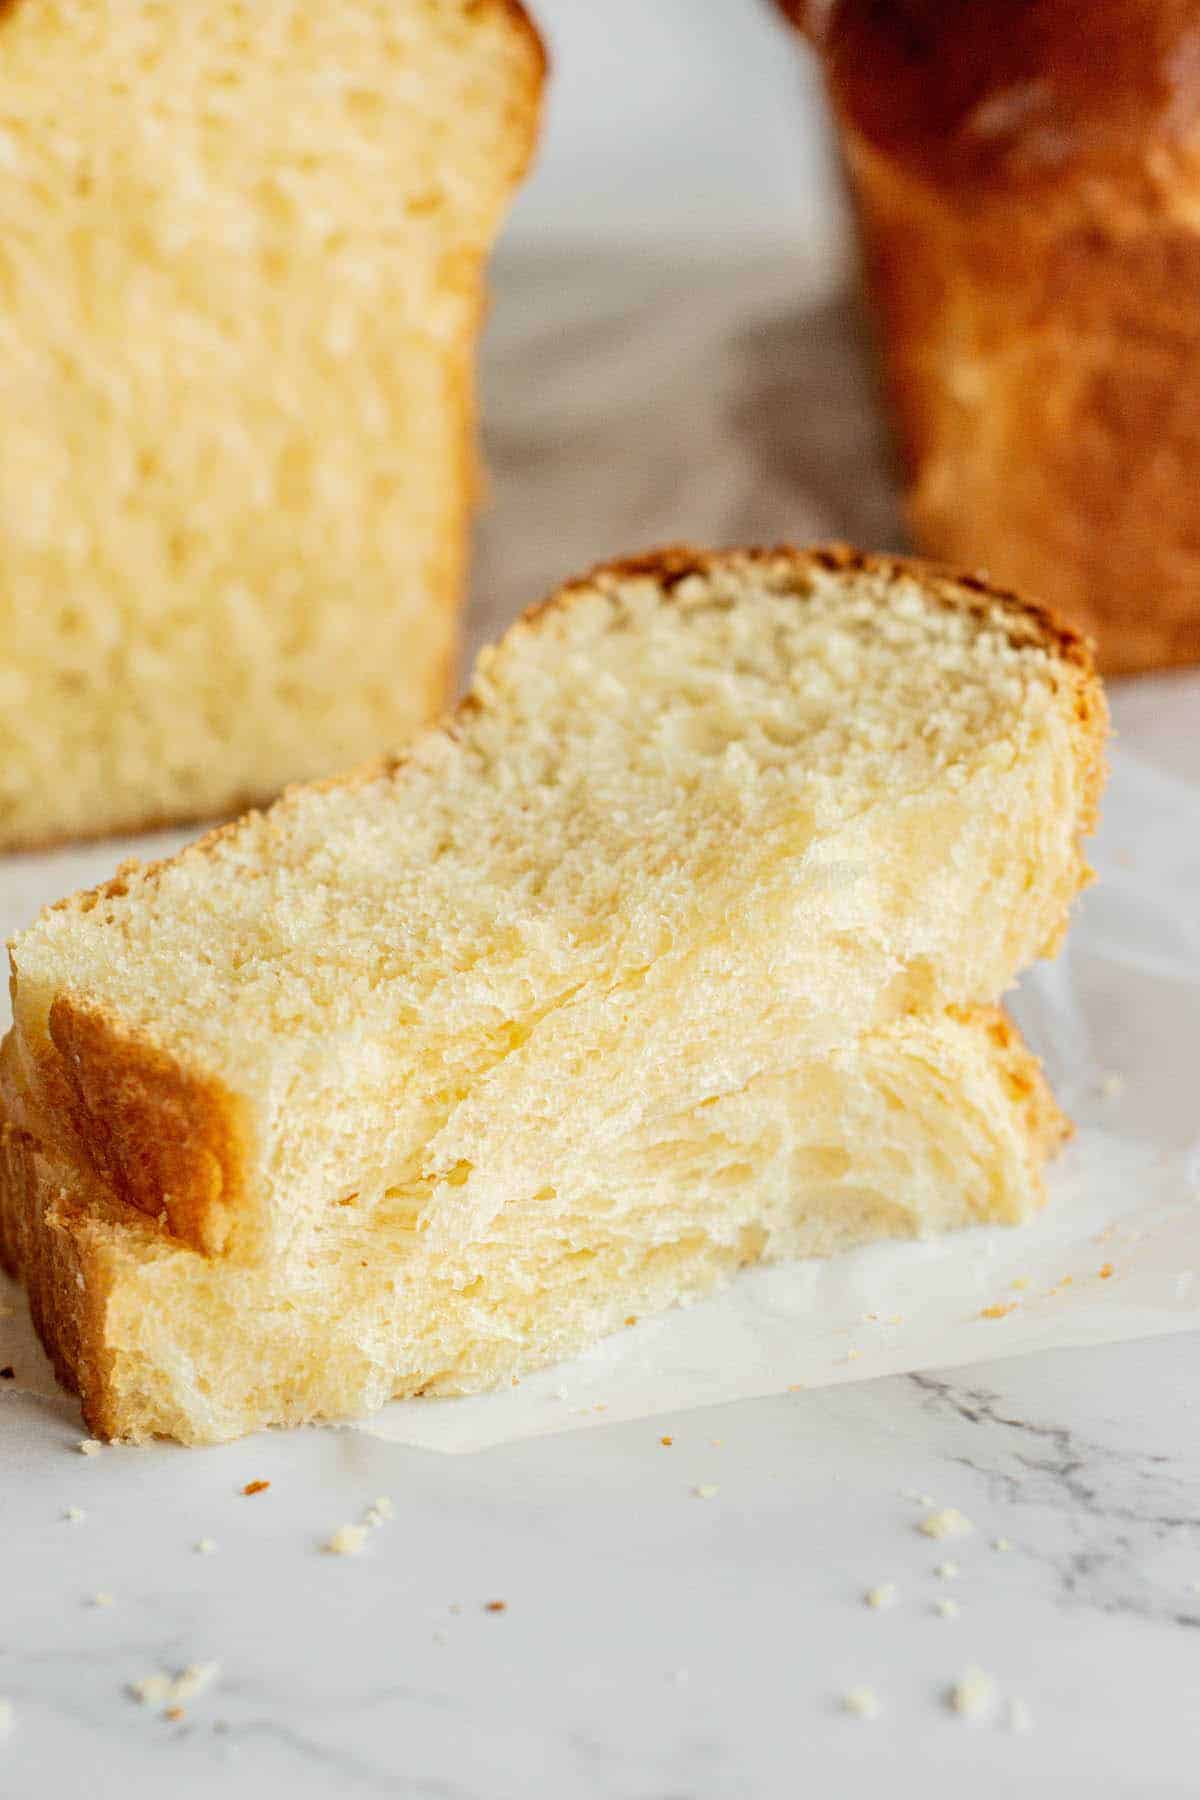
Once baked, allow the bread to cool on a cooling rack before slicing.
Storing
Fresh brioche can be stored in an airtight container at room temperature for up to three days.
Can you Freeze brioche bread?
Yes, you can freeze brioche bread. Brioche freezes well and retains its quality when stored properly. Here are some tips for freezing brioche bread:
- Cool Completely: Ensure the brioche is completely cool before freezing. Freezing warm bread can cause condensation, leading to freezer burn or sogginess when thawed.
- Slice (Optional): If you think you’ll only need a portion of the brioche at a time, consider slicing it before freezing. This way, you can take out just what you need without having to thaw the entire loaf.
- Wrap Tightly: Wrap the brioche tightly in plastic wrap, aluminum foil, or a freezer-safe bag to protect it from air and moisture. If using a bag, try to remove as much air as possible before sealing.
- Label and Freeze: Label the wrapped brioche with the date, so you know how long it’s been in the freezer. Brioche can be frozen for up to 3 months without significant loss of quality.
- Thawing: To thaw, leave the brioche at room temperature until it’s fully thawed. If you’ve frozen slices, you can also toast them directly from the freezer.
Uses for brioche
By day two, especially day three, the bread will firm up a bit. Use older brioche in recipes that add some extra moisture to the bread.
Here are 21 great ways to use brioche bread, including french toast, bread pudding, savory recipes, and more! You can also use this dough recipe to make brioche burger buns, brioche cinnamon rolls, and biscoff babka.
More bread recipes
For more bread, try these chocolate cinnamon rolls, overnight bagels, or homemade focaccia.
FAQs
Can brioche bread be made without a stand mixer?
Brioche bread can be made without a stand mixer. It can be kneaded by hand, although it may take longer and require more effort. It’s a very sticky wet dough, so don’t be tempted to add more flour or it will ruin the texture.
Brioche bread is best stored in an airtight container or plastic bag at room temperature for up to 2-3 days. It can also be frozen for longer storage.
Brioche bread can be made with whole wheat flour, but the texture will be denser and the flavor will be different than traditional brioche made with all-purpose flour.
Yes, it’s delicious when used for cinnamon rolls and brioche donuts!
Absolutely! It’s best this way. Refrigerating overnight to develop its flavor and texture.
Authentic Brioche Bread Recipe
Equipment
Ingredients
- 125 g lukewarm milk (95-104°F / 35-40°C)
- 2 1/2 teaspoons instant yeast or active dried yeast
- 50 g granulated sugar
- 600 g all-purpose flour
- 1 ½ teaspoon salt
- 5 large eggs approx. 260g-270g excluding shell.
- 230 g unsalted butter, at room temperature, cubed
Egg wash
- 1 egg
- 1 Tablespoon water
Instructions
- In a stand mixer bowl fitted with a dough hook, add the milk and stir in the yeast and one tablespoon of sugar. Leave it to sit for 5-10 minutes until foamy. Add to it the remaining sugar, eggs, flour, and salt. Turn the mixer on low and combine until it forms a thick but slightly sticky dough. Mix this dough for around 5 minutes to begin developing the gluten.
- Add in the butter, a cube or two at a time, ensuring each cube has been incorporated before the next addition. Turn the mixer on medium and keep it mixing until the sticky dough starts to strengthen and come together and pull away cleanly from the sides of the bowl.
- For the best gluten development and brioche crumb, mix the dough for at least 15 minutes. Proper gluten development will allow you to stretch the dough so thin you can almost see through it. This is called the window pane effect.
- Pull the dough from the bowl onto a bench and form it into a ball. Place the dough ball into a clean bowl, cover it with plastic wrap or a damp kitchen towel, and let it rise for 1.5-2 hours (depending on room temperature) until doubled in size. Deflate the dough gently and reshape it into a ball again. Cover it with a lid or plastic wrap and place it in the refrigerator overnight. This step can be shortened, but an 8-12 hour fridge proof gives the best flavor.
- Cold ProofIf you want to skip the overnight proof, the dough will still need a an hour of fridge rest after room temperature proofing. This cold rest will let the butter stiffen up, resulting in much easier shaping.
- Pull the proofed dough from the bowl and tip it onto a lightly floured bench. Shape it into a round, then divide this into two equal portions. Line two 8.5 x 4.5 inch (21x11cm) loaf pans with parchment paper.
- Shaping Options
- Option 1. Divide a portion of the dough into 8 equal-sized pieces. Roll each piece into a tight ball and place the balls in a lined tin, side by side, in two rows.Option 2. Divide a portion of the dough into 3 equal-sized pieces. Roll each piece into a long roll, about 30cm in length. Braid the three lengths together, tuck in the ends, and place the braided dough into the lined tin.
- Let the shaped dough rise in a warm spot until it has doubled in size.
- Preheat the oven to 375°F/190 °C and gently whisk an egg and one tablespoon of water in a small bowl. Brush the tops of the dough with the egg wash.
- Bake the brioche bread for approximately 30 minutes until a deep golden brown.
- Once baked through, it should sound hollow when tapped. If you have an instant-read thermometer, you can check for an internal temperature of 195°F / 90°C.
- Once baked, allow the brioche bread to cool before slicing.


I live in the U.S. and my oven goes up by 10s so if I can’t do 392F could I do 390F or 400F?
390 🙂
Love your recipes ( I have two questions at the end of this)
When I made this bread. It was on a very cold day so my kitchen was not warm, however, during the first proof of sitting covered on the counter it to let it rise and it rose within an hour. For the second proof in the refrigerator it also rose quickly and was almost going over the side of the bowl within two hours. I then shaped into small balls for buns (using a muffin pan) and then did a braid for the loaf pan, covered to let is rise for a third proof. It more than doubled in 30 minutes. The bread is good and cuts like butter. Makes wonderfully tasty French toast. The buns worked out good and the kids loved them with a little butter and a slice of ham or even just plain. I do plan on making this bread again, however I do have a couple of questions.
First, How come during the proofs it rose so quickly. I followed the measuring and mixing instructions word for word (I even bought a scale to weigh out the ingredients).
Second: For this brioche bread are you able to add dried fruit and nuts to it at all after you do all the proofs when you are forming it into a loaf?
Hey, did you use instant yeast? That proves quite quickly! It’s not a problem though, as long as it doesn’t overproof on the last rise just before you bake it :).
You can add fruit and nuts after it has been kneaded, before the first rise.
I made 2 batches of your cinnamon rolls the first time, they turned out so tasty and beautiful. I froze a few to enjoy later and shared the rest equally with four other siblings and their family. I was requested to bring the dinner rolls for our Thanksgiving dinner tomorrow. So today I’m making two more batches of the recipe for our thanksgiving dinner. I know they’ll be a hit at our dinner.
I am trying this recipe for the first time this morning and I got about 80% of the way through the mixing process when my stand mixer broke! The pin that hold the mixer head on worked its way out and I didn’t notice until it was too late! So I turned it out and started the first proof. The problem us, the dough never became less sticky and glassy! Will it still work??? I’m so sad. 😔
Hey Beth, sorry to hear about your mixer! Your bread should still work out though.
I made it exactly and weighed everything. I didn’t have instant yeast so used regular active yeast. It is in the refrigerator now, been there for about 4 hours. It is almost over the sides of the large bowl. I make regular sourdough bread weekly and have never had one rise this much.
I’m afraid by morning it will have escaped the bowl, lol. What should I do?
Punch it down and place it back in the fridge, it will rise again so maybe a bigger bowl too but will be fine to shape in the morning 🙂
Thank you for responding. I light punched it part way down and went to bed. This morning it had not rose back up and I was afraid I had messed it up. But I followed the rest of the recipe and wow. It is fantastic. My fresh eggs are such a wonderful color that made a beautiful bread. I wish I could attach a picture.
I am a novice at making bread, but this recipe was easy to follow. During the first and second rise, the bread doubled in size, but it never rose during the third proof. I took it right out of the refrigerator and plopped it in a loaf pan (I did half the recipe). There is no kneeding or shaping before I put it in the pan. I baked it anyway but it turned out like a brick. What could I have done wrong? Thank you for the recipe!
Hey Jane, it’s essential to deflate the dough after it rises, then shape it before putting it in the loaf pan. If you just put it in the loaf pan right out of the fridge after it rose in there, the structure of the dough will be fragile and full of large air pockets that can’t expand anymore. Therefore, the dough won’t rise anymore and will most likely collapse (and you end up with dense bread). Deflating and then shaping the dough helps create a new structure for the dough and provides ‘a new place’ for the yeast to work and the gases to expand during the final rise.