Homemade Danish Pastry Dough
This homemade Danish pastry dough is buttery, flaky and softly enriched with milk, egg and vanilla. You can fill and shape it with all sorts of fillings! Makes approx 2.2 pounds (1kg) laminated dough.
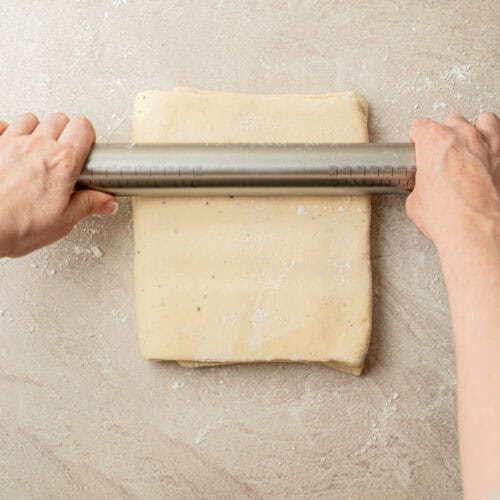
Equipment
- Stand mixer with dough hook
- Rolling Pin
- Parchment paper
Ingredients
Base dough
- 120 g whole milk cold
- 80 g water cold
- 7 g instant or active dry yeast
- 440 g all-purpose flour with at least 11% protein
- 50 g granulated sugar
- 3/4 teaspoon fine salt
- 1 teaspoon vanilla bean paste or vanilla extract
- 30 g butter room temperature
- 1/4 teaspoon ground cardamom freshly ground, optional
- 1 large egg
Butter packet
- 226 g butter cold
For finishing shaped pastries
- 1 large egg
- 15 g water
Instructions
Mix the base dough
- Add the cold milk, water, yeast, flour, sugar, salt, vanilla, softened butter, cardamom and egg to the bowl of a stand mixer fitted with a dough hook.
- Mix on low speed until the ingredients form a firm dough and no dry flour remains. Scrape down the bowl if needed.
- Continue kneading on low speed for around 10 to 15 minutes. The dough should become smooth, strong and elastic and pull cleanly away from the sides of the bowl. A small piece should stretch without tearing easily, but you do not need to achieve a perfect, paper-thin windowpane.
- Press the dough into a flat rectangle. Wrap it tightly and refrigerate for 2 hours.
Make the butter packet
- Cut the 226 g butter into four even slabs. Arrange them in a two-by-two grid in the center of a large sheet of parchment paper.
- Fold the parchment into a neat square 15×20 cm / 6×8 rectangle frame around the butter. Turn the packet seam-side down.
- Pound the butter firmly with a rolling pin to flatten and soften it, it might take quite a few whacks, then roll it toward the corners of the packet. Continue until it forms one even sheet without gaps.
- Refrigerate the butter packet while the dough chills. Before laminating, remove the butter from the fridge and bash it again with a rolling pin to make it very pliable.
Enclose the butter
- Unwrap the chilled dough and place it on a lightly floured surface. Roll it into a rectangle approximately twice the length of the butter packet, with enough width to fit the butter inside.
- Brush any excess flour from the dough. Remove the parchment from the butter and place the butter in the center of the rectangle, leaving enough dough exposed at the top and bottom to cover it.
- Fold the top and bottom sections of dough over the butter so their edges meet in the center without overlapping. Pinch the center seam together, then press the open edges firmly closed so the butter is completely enclosed.
- Use a sharp knife to slice down the folded edge opposite the center seam, cutting it open to release tension in the dough.
First fold
- Place the dough seam-side up on a lightly floured surface. Tap it gently along its length with the rolling pin to begin flattening the butter evenly.
- Roll in one direction from one short end to the other, focusing on lengthening the dough rather than widening it. Lift the dough regularly to make sure it is not sticking. Keep the edges straight and the corners as square as possible, and roll it into a long rectangle about 8 mm thick.
- Brush all loose flour from the surface. Fold the top third down over the center, then fold the bottom third up over it, as though folding a business letter.
- Wrap the dough and refrigerate it for 30 minutes.
Second fold
- Place the dough with the folded edge rotated 90 degrees from its previous position. This keeps the rolling direction alternating between folds.
- Lightly flour the surface, then roll the dough into another long rectangle about 8 mm thick. If the dough resists or shrinks, cover and chill it for another 15 minutes.
- Brush away the loose flour and repeat the business-letter fold.
- Wrap and refrigerate for 30 minutes.
Third fold
- Rotate the dough 90 degrees again. Roll it into a long 8 mm-thick rectangle, maintaining straight sides and even pressure.
- Brush away all loose flour and complete the third business-letter fold.
- Wrap the dough tightly and refrigerate it for at least 2 hours or overnight before shaping.
Shape, proof and bake
- Roll and shape the chilled dough according to your chosen filling recipe.
- Arrange the shaped pastries on parchment-lined baking sheets, leaving space between them. Cover loosely.
- Proof until visibly puffy and airy. At approximately 75°F / 24°C, this takes around 2 hours. In a cooler room, it may take 2 1/2 to 3 hours or longer. The pastries should wobble slightly when the tray is moved, and a light press should spring back slowly.
- Whisk together the egg and water. Brush the exposed dough lightly with egg wash, avoiding the cut edges where possible. For open-centered Danish, press the centers after proofing and add the chilled filling immediately before baking.
- Bake according to the individual recipe. Most small Danish bake at 200°C (400°F) conventional for approximately 18 minutes, until deeply golden.
Notes
Danish pastry filling ideas
This dough can be shaped and filled in lots of different ways. Try my apple Danish pastries, strawberry cream cheese Danish pastries or custard Danish pastries. Other filling ideas include:- Custard topped with blueberries, raspberries, sliced peaches or apricots
- Cream cheese filling with lemon curd or fruit preserves
- Cinnamon sugar, rolled and sliced like cinnamon rolls
- Almond filling topped with sliced almonds
- Chocolate batons or chopped dark chocolate
- Thick cherry, blueberry, raspberry or apricot filling
- Thinly sliced pear with almond filling
- Stewed rhubarb with vanilla custard
Nutrition
Serving: 1serveCalories: 321kcalCarbohydrates: 33gProtein: 5gFat: 19gSaturated Fat: 11gPolyunsaturated Fat: 1gMonounsaturated Fat: 5gTrans Fat: 1gCholesterol: 78mgSodium: 299mgPotassium: 71mgFiber: 1gSugar: 5gVitamin A: 594IUVitamin C: 0.01mgCalcium: 28mgIron: 2mg
Tried this recipe?Let us know how it was!