
Step by Step Pain aux Raisins Recipe
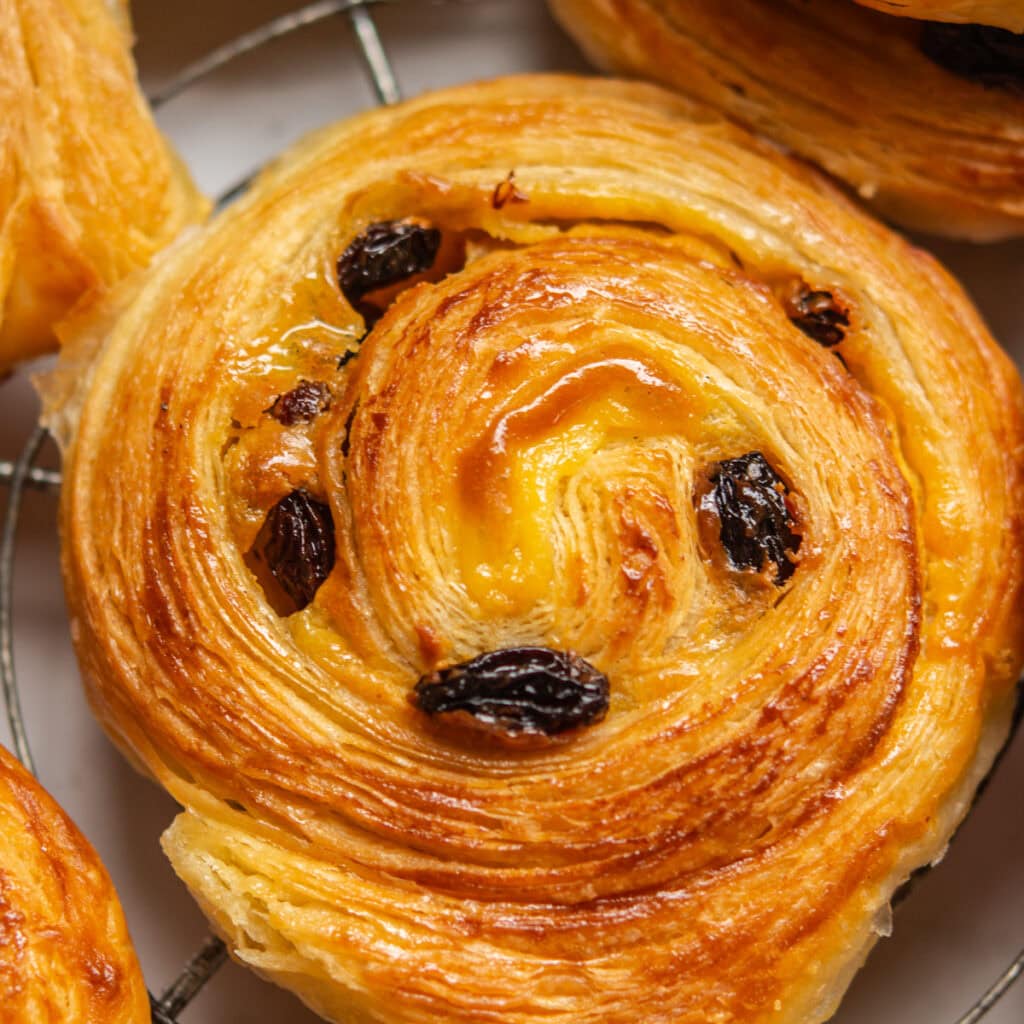
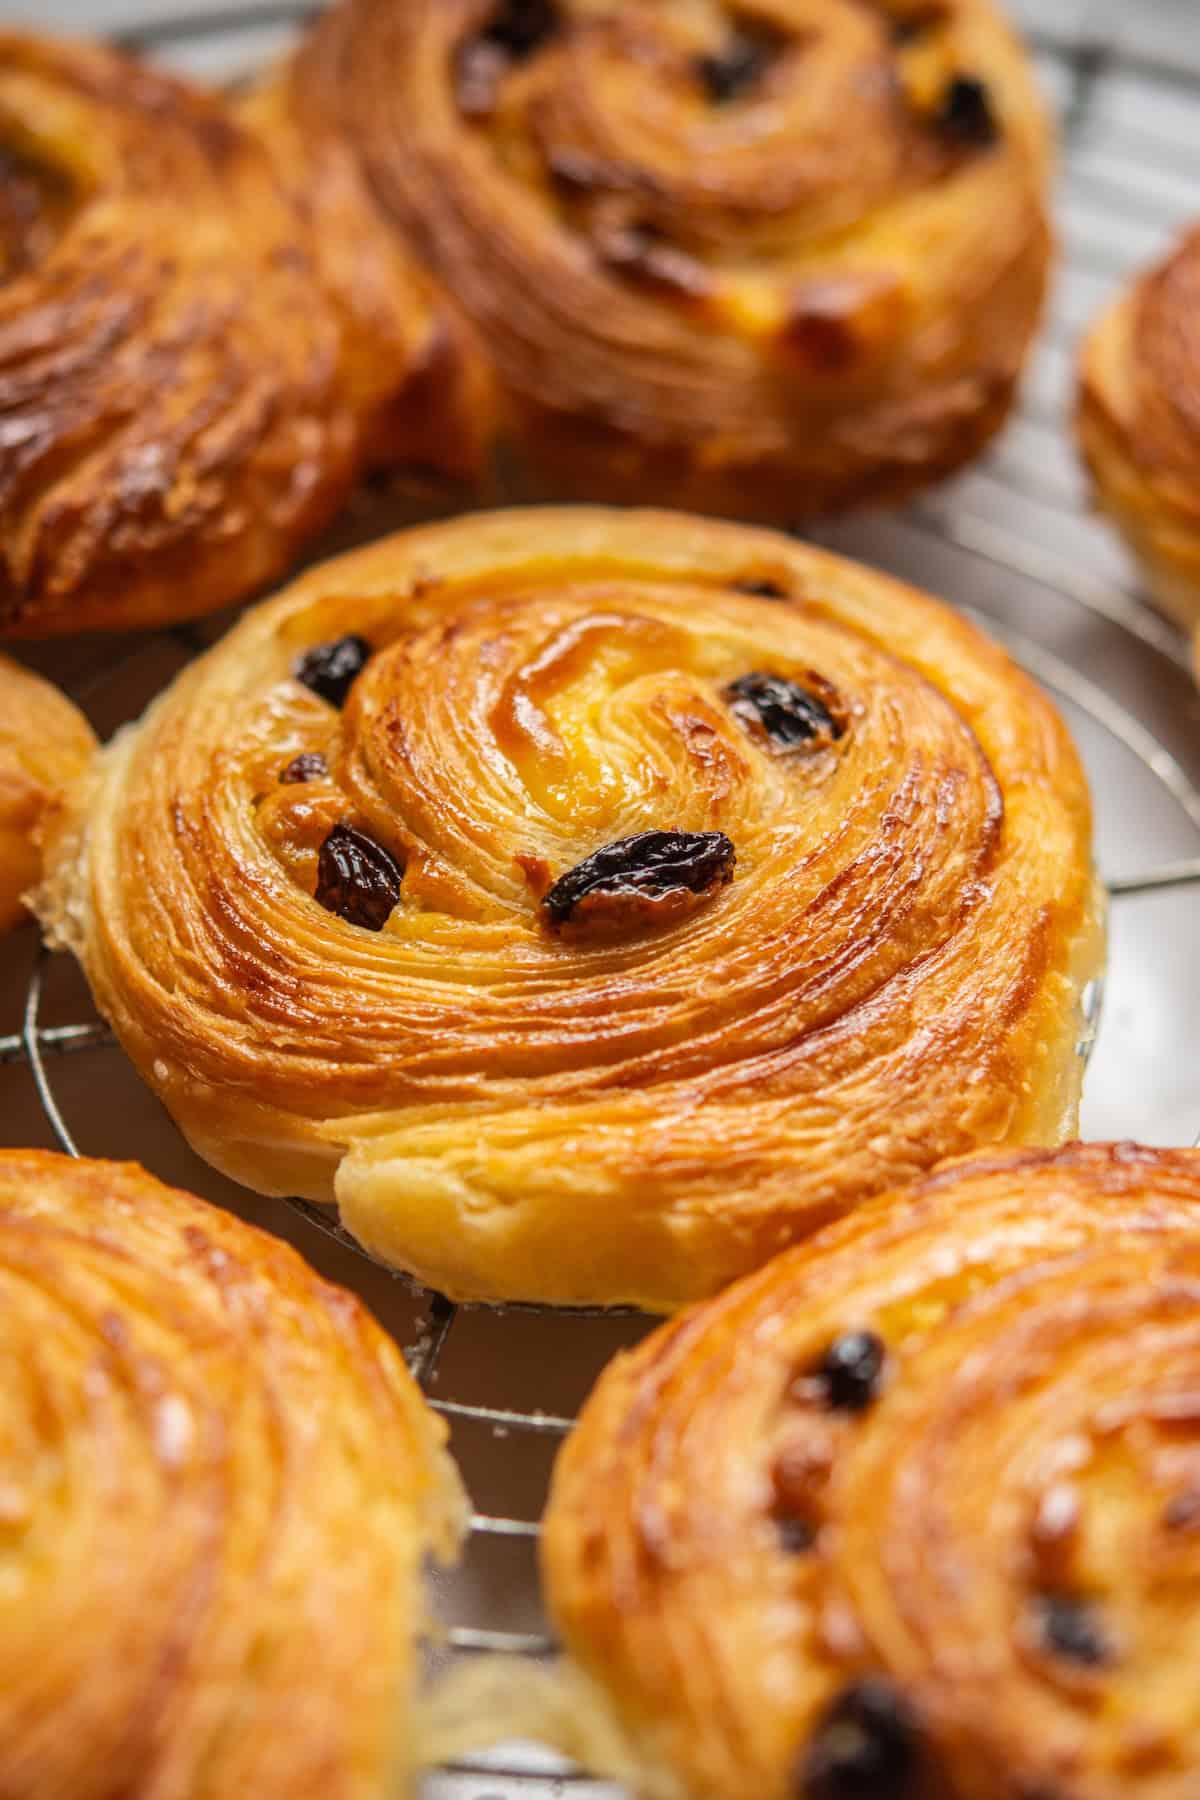
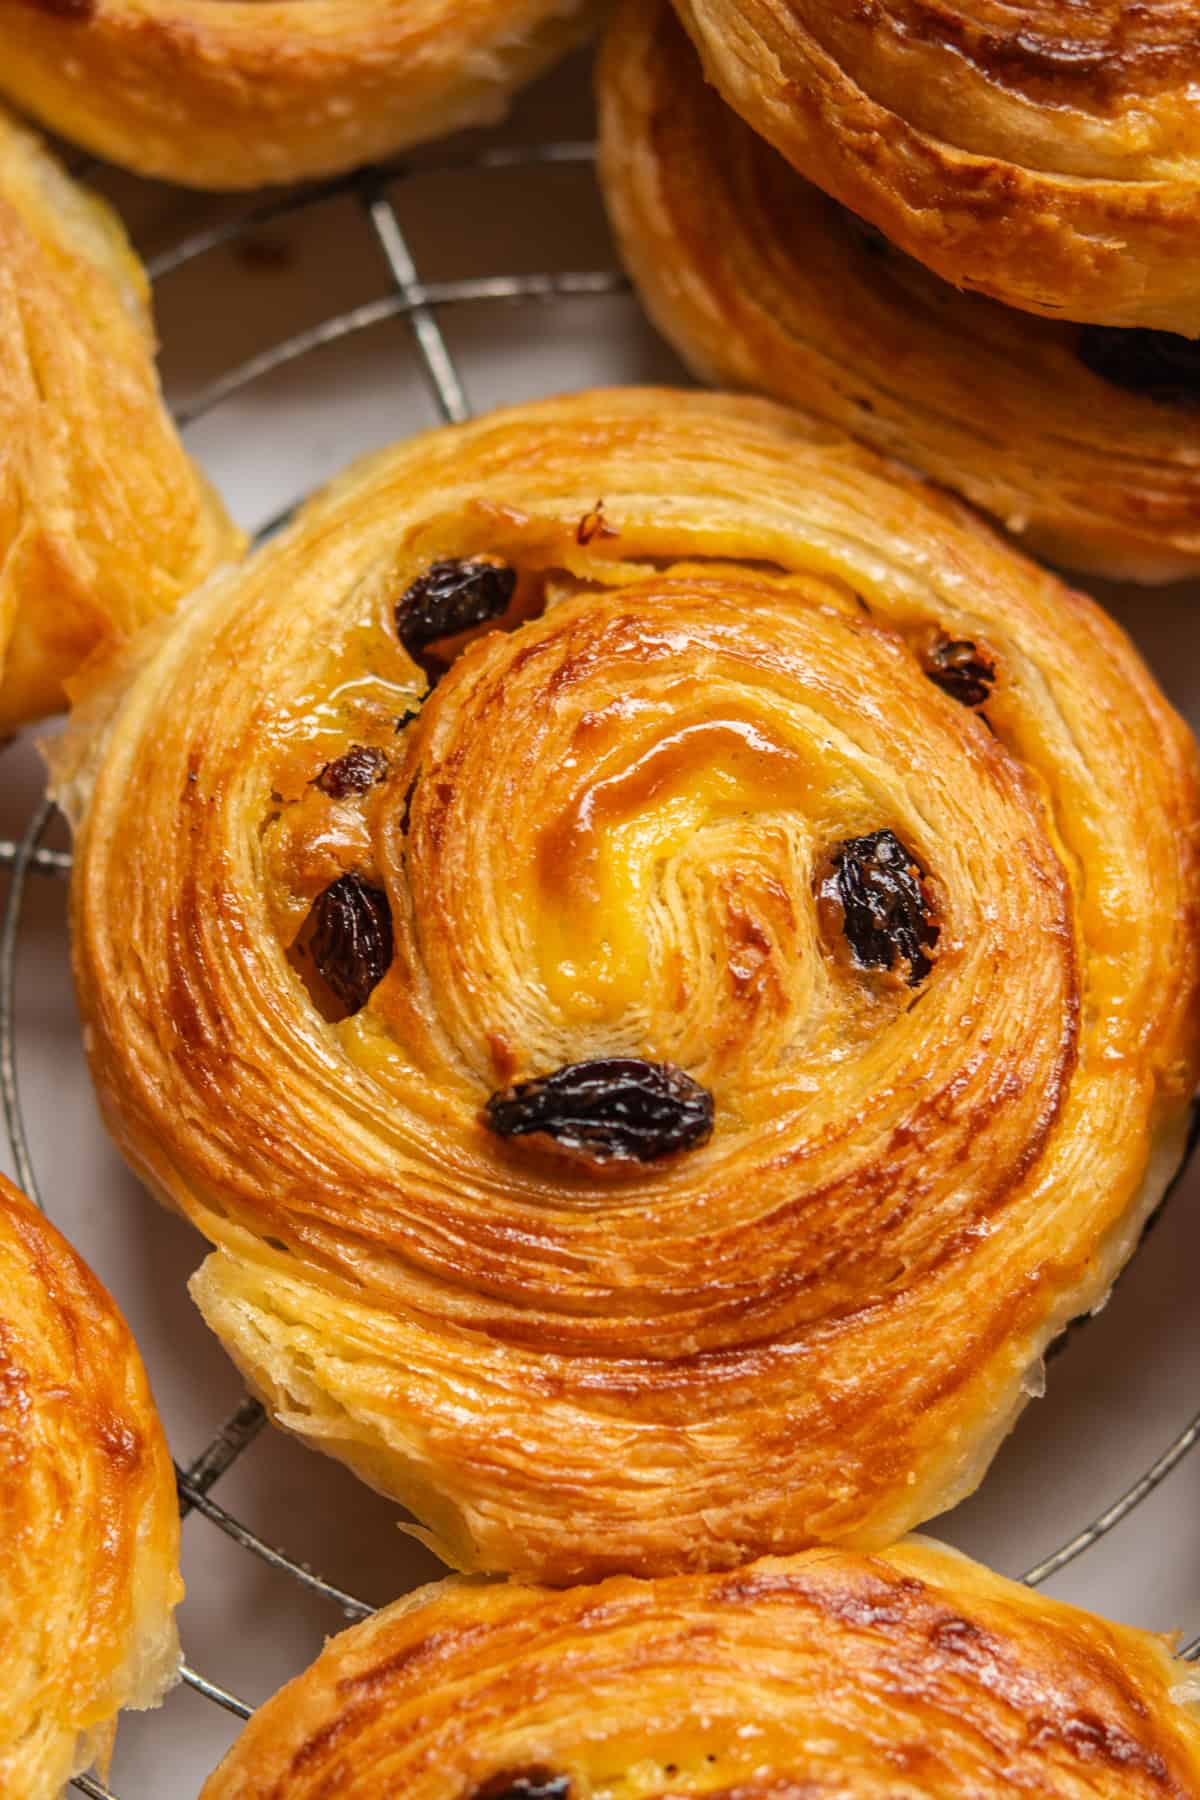
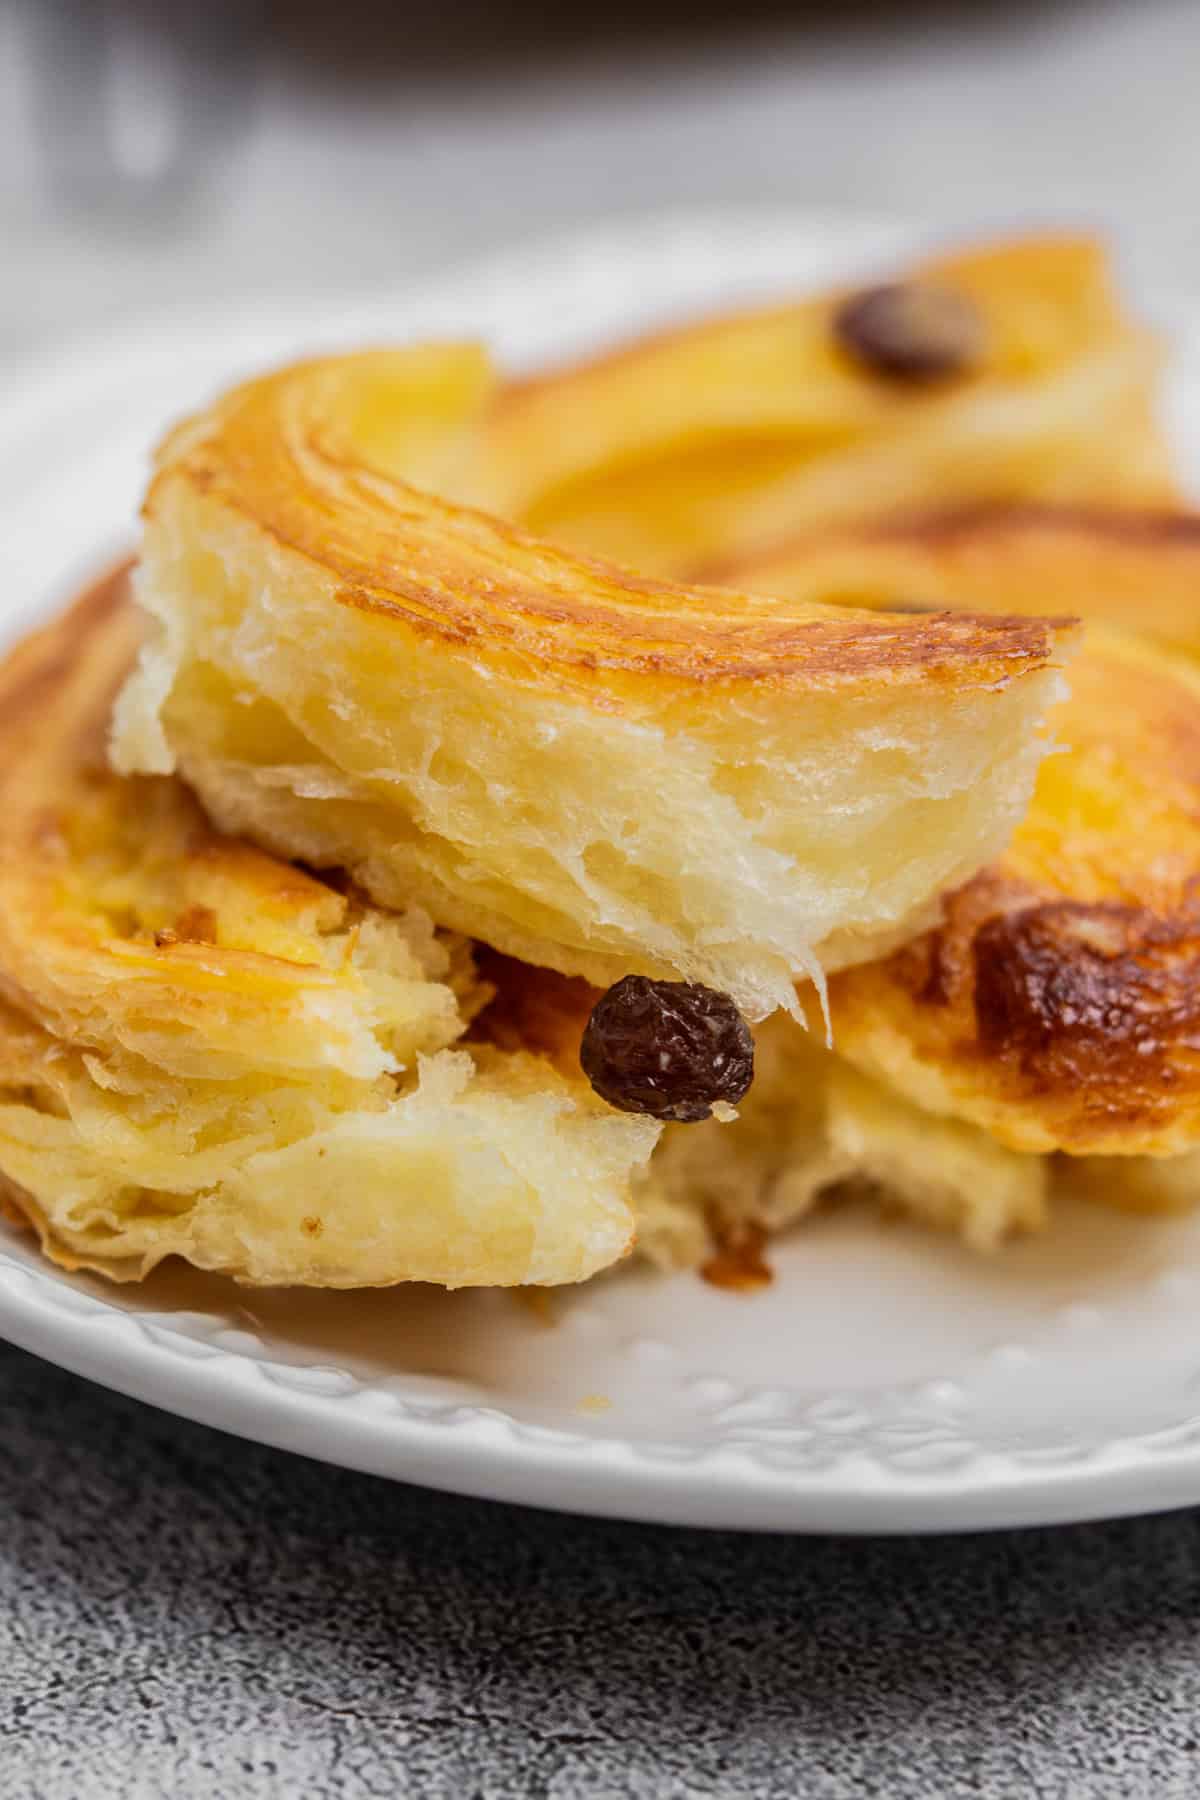
Pain aux raisins are beautiful pastries. The outside is beautifully golden and crisp, and the inside has a tender, buttery dough swirled with creamy custard and plump raisins. As with all laminated pastry it can take a bit of time to make, but I’ve added lots of photos of the steps so you can make these raisin pastries at home too!
For these pain aux raisins, I use the same laminated dough process as my croissants. I love it because even if your lamination isn’t perfect on the first try, they’ll still taste great. If you’re new at laminating, read through the entire post before starting so you can see the step-by-step photos and get a feel for the process.
I like to do the first part of the recipe (making and resting the dough) the day before. The dough is mixed, kneaded, and chilled overnight so the gluten has time to relax. This makes rolling out the dough during lamination much easier. If you’re already comfortable with the process, feel free to click “jump to recipe” at the top of this post to go straight to the recipe card.
Pain Aux Raisins Timeline Planner
How do you want to plan your bake?
How To Make The Dough (Détrempe)
Pain aux raisins starts with a détrempe, which is the dough portion of the recipe. It’s a simple mix of flour, sugar, salt, yeast, milk, water, and a small amount of butter. You can do this by hand or use a stand mixer.
It will initially feel a bit sticky, but it becomes smooth as you work it. Once the dough is kneaded and smooth, flatten it into a rectangle, wrap it, and chill it overnight. It will proof slowly in the fridge.
The Butter Block (Beurrage) – Two ways
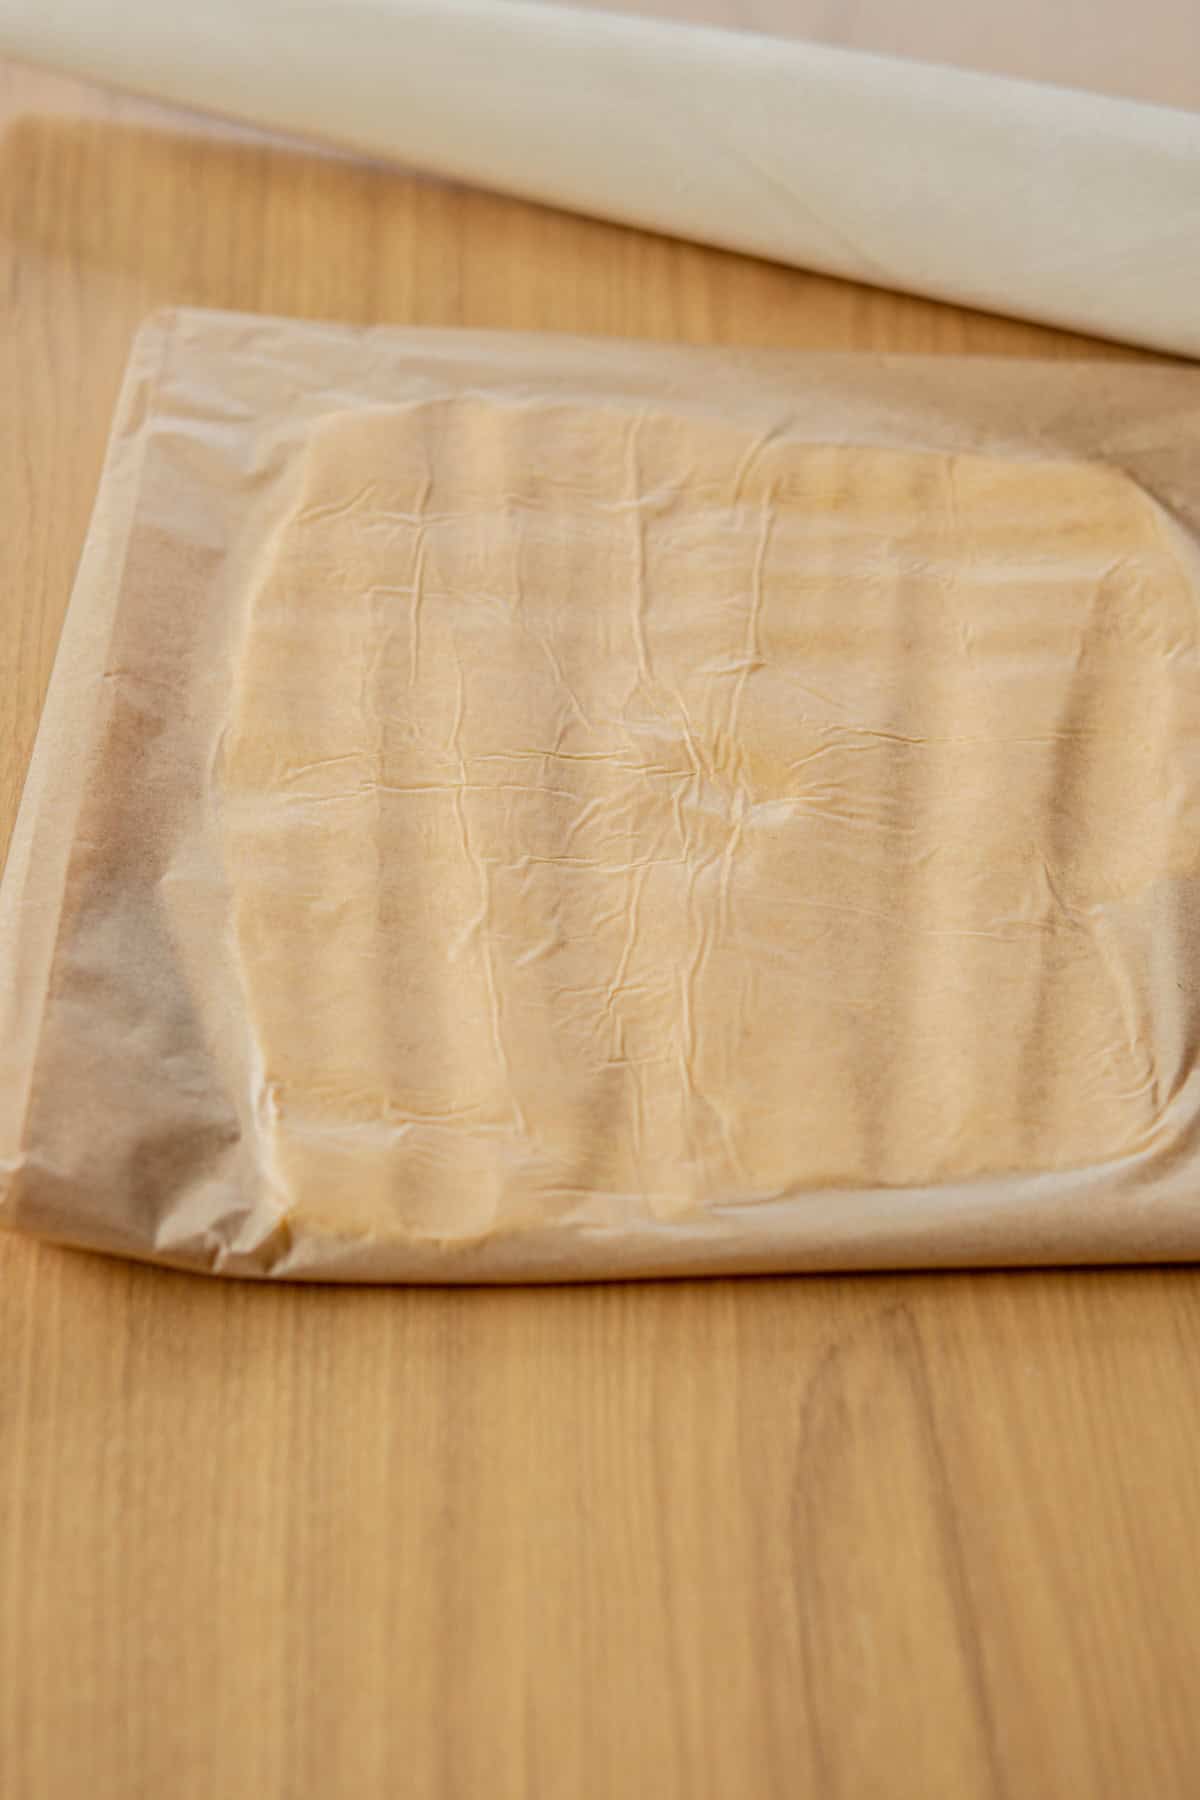
The butter block is a slab of cold butter with good plasticity. This is the sweet spot between rock‑hard and melty‑soft, where the butter will bend without cracking or melting and it lets you roll it into nice thin layers in between the dough as you laminate it. There are two ways I make my butter block, and I’m going to talk about both. For both these methods, I add the butter inside two sheets of parchment paper, folded to make a nice neat square. Then I can roll the butter out to the edges, and it keeps the lines neat.
- Butter + Flour: The first is mixing room-temperature butter with a bit of flour to help stabilize it. After you combine the flour and butter, shape it into a neat rectangle using parchment paper and chill it. This way, it is easier to roll into a rectangle, but since it needs chilling again afterward, it can easily make the butter too cold and stiff when re-chilling. When you are ready to use it, you will need to pound the butter rectangle with a rolling pin to slightly soften it or else it will shatter.
- Pounding Cold Butter: The second is to take cold butter, cut it into four equal pieces, lay them out on a piece of parchment, then pound it flat with a rolling pin. By pounding the cold butter, you’ll both soften it slightly and then you can keep rolling it until you create a nice rectangle. The key is to keep the butter cold enough to maintain its structure but pliable enough to roll out smoothly. With this method, once it’s flattened you can start laminating with it right away cause it should still be pretty cold. That being said, if it has gotten too warm it does need re-chilling too. If the butter does firm up too much in the fridge, just pound it again to re-soften it.
Laminating the Dough
After chilling overnight, the dough should be cool and ready to laminate.
- Roll the dough out to a rectangle slightly larger than twice the width of your butter block and about 1.5 times the height.
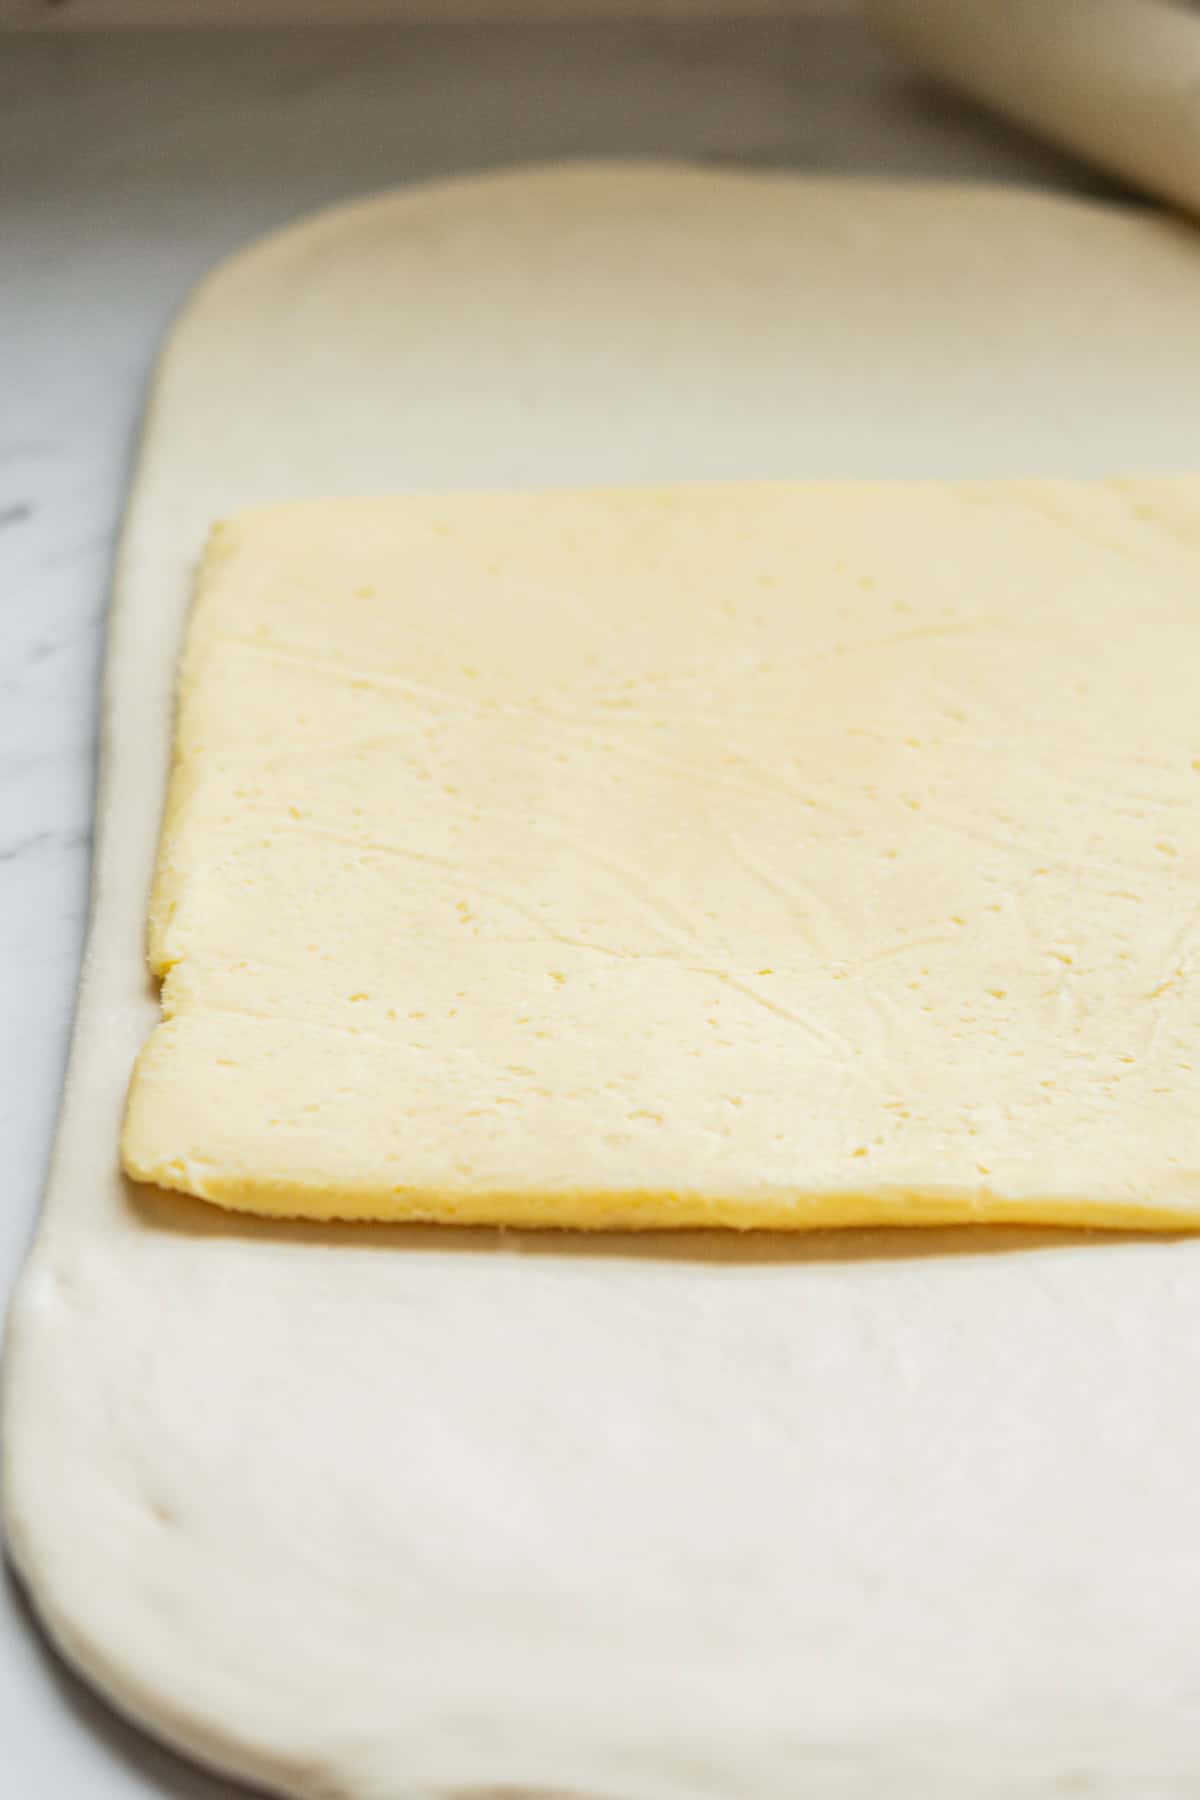
- Place the cold (but pliable) butter block in the center of the dough.
- Fold the top edge down and the bottom edge up to fully encase the butter. You’ll have a neat envelope of dough with the butter sealed inside.
- Turn the dough 90 degrees so the “seam” is running vertically in front of you.
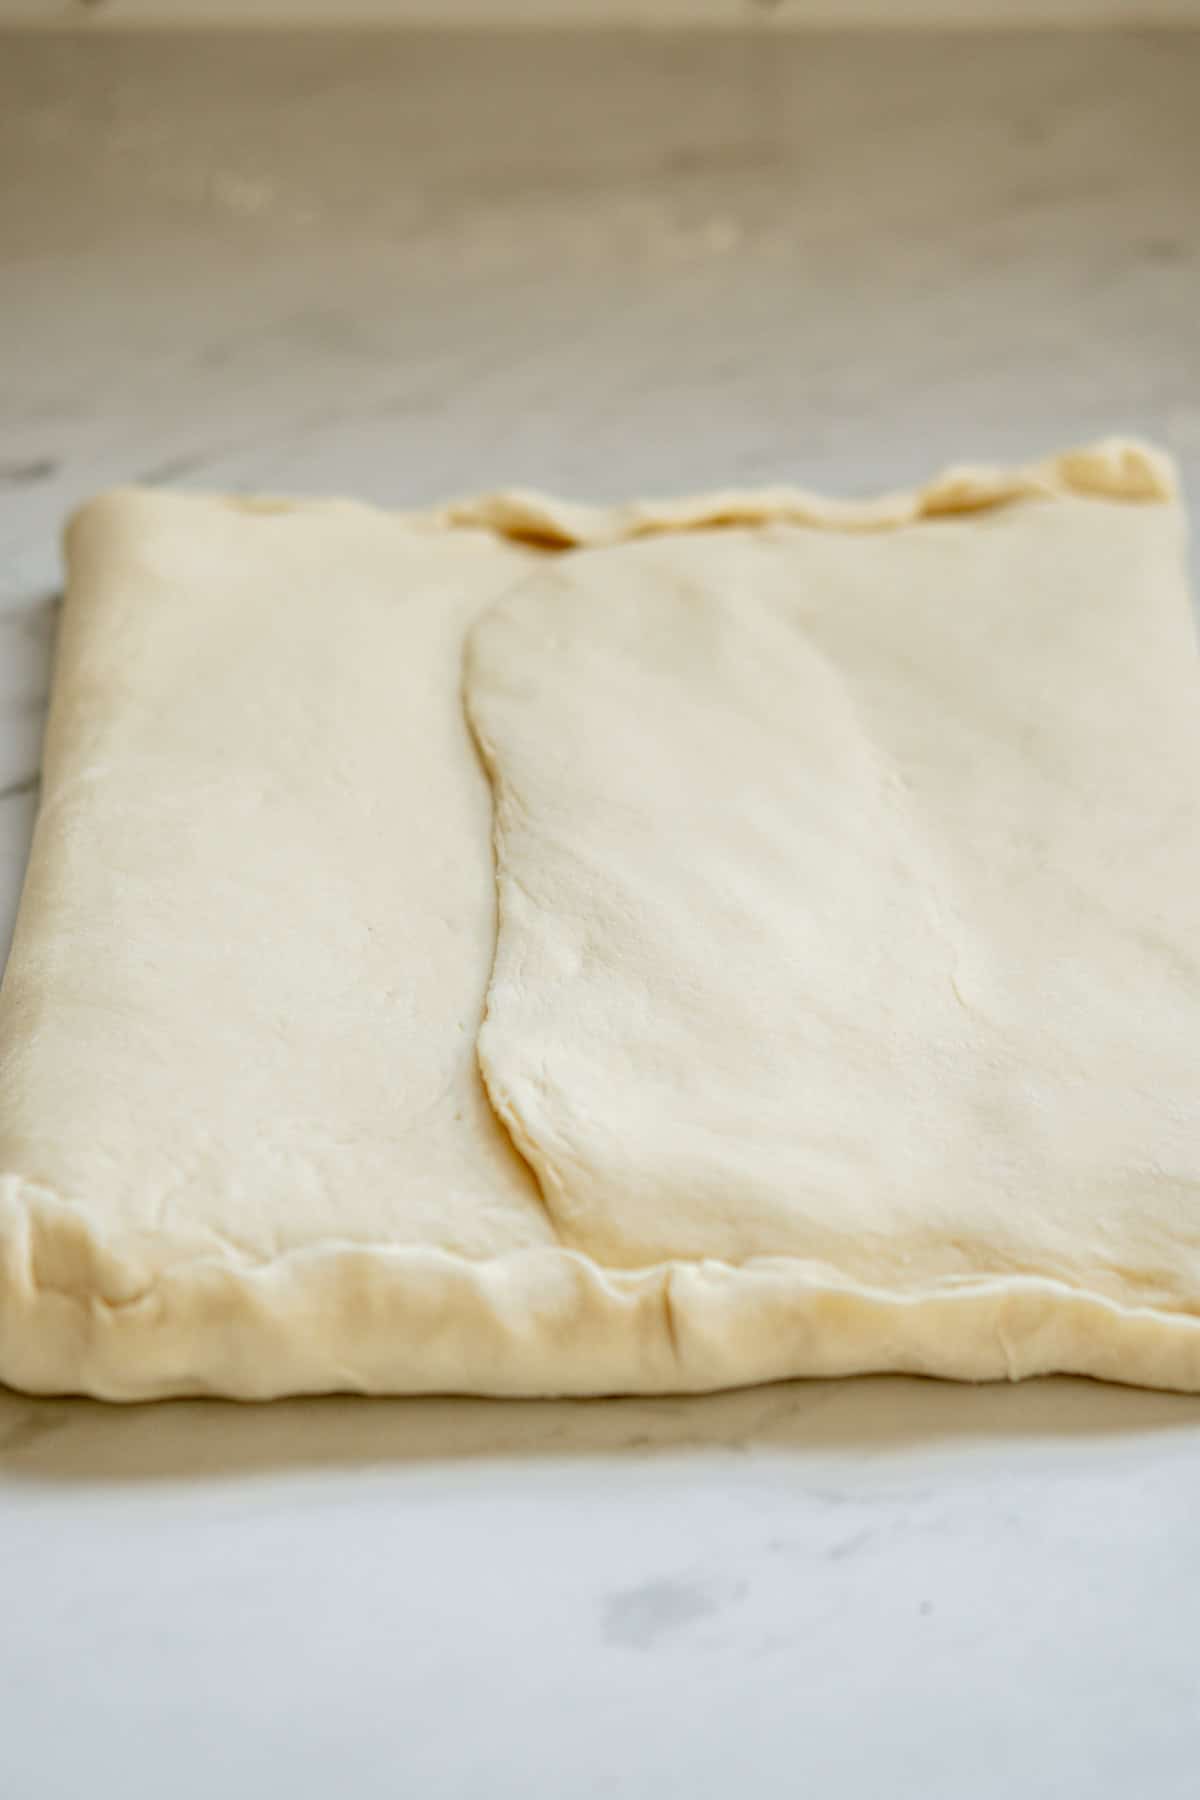
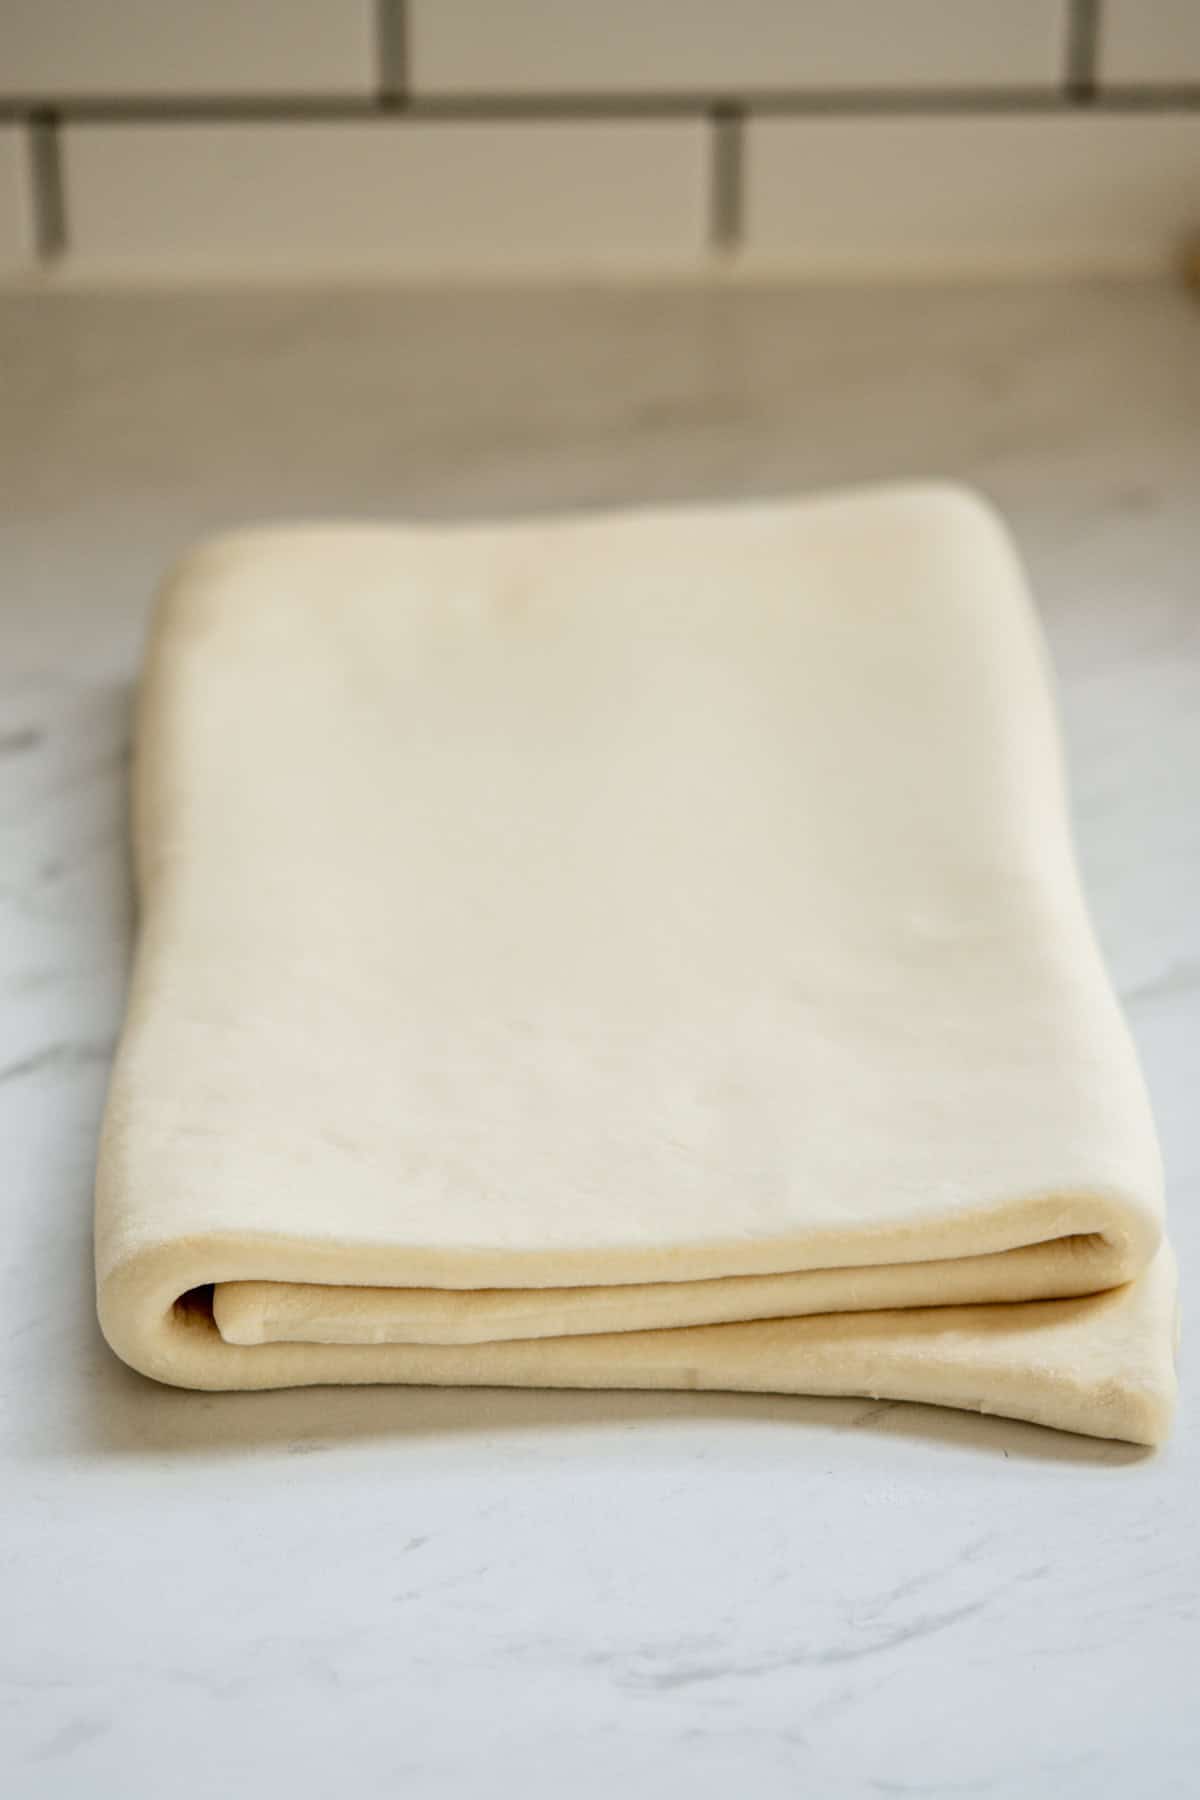
- Roll it out gently to a larger rectangle of about 6mm thickness. I have these handy wooden sticks that show me the thickness, but you can do this by just measuring with a ruler too. Then, fold the dough into thirds (like a letter). This is a ‘single fold’
- Wrap the dough in plastic wrap and chill for about 30 minutes.

- Remove the dough, repeat the rolling and single-fold process two more times, chilling for 30 minutes between each fold. After the third fold, refrigerate the dough for at least two hours (longer is fine).

Why chill the dough in between folds
Rolling warms the butter, so a quick chill brings it back to a cool but pliable state so it won’t smear in the next turn. Each roll tightens the dough, too, so a rest stops it snapping back and makes the next rollout easier.
In a cool kitchen (18 °C / 64 °F or less), butter warms more slowly, so 20 – 30 minutes can be enough. If the butter has gotten too cold again and feels stiff and brittle, leave it on the counter for about 5 minute. Once the butter flexes instead of cracking, you’re good to roll.
Signs your butter is the right temp
- Press a knuckle into the dough: you should leave a soft dent without feeling greasy.
- Lift a corner, it bends without snapping.
- Rolling pin glides without resistance.
Bottom line: Aim for cool and pliable butter. Whether that takes 15 minutes or a full hour depends on your kitchen temperature, dough thickness, and how warm your hands are. Use the chill time in the recipe as a guide, then let touch and feel make the final call.
Making the Pastry Cream
While your dough chills, prepare a simple pastry cream (crème pâtissière) by heating milk with sugar, thickening it with egg yolks and cornstarch, and adding a little vanilla and butter for flavor. Let the pastry cream cool completely and keep it in the fridge.
Shaping
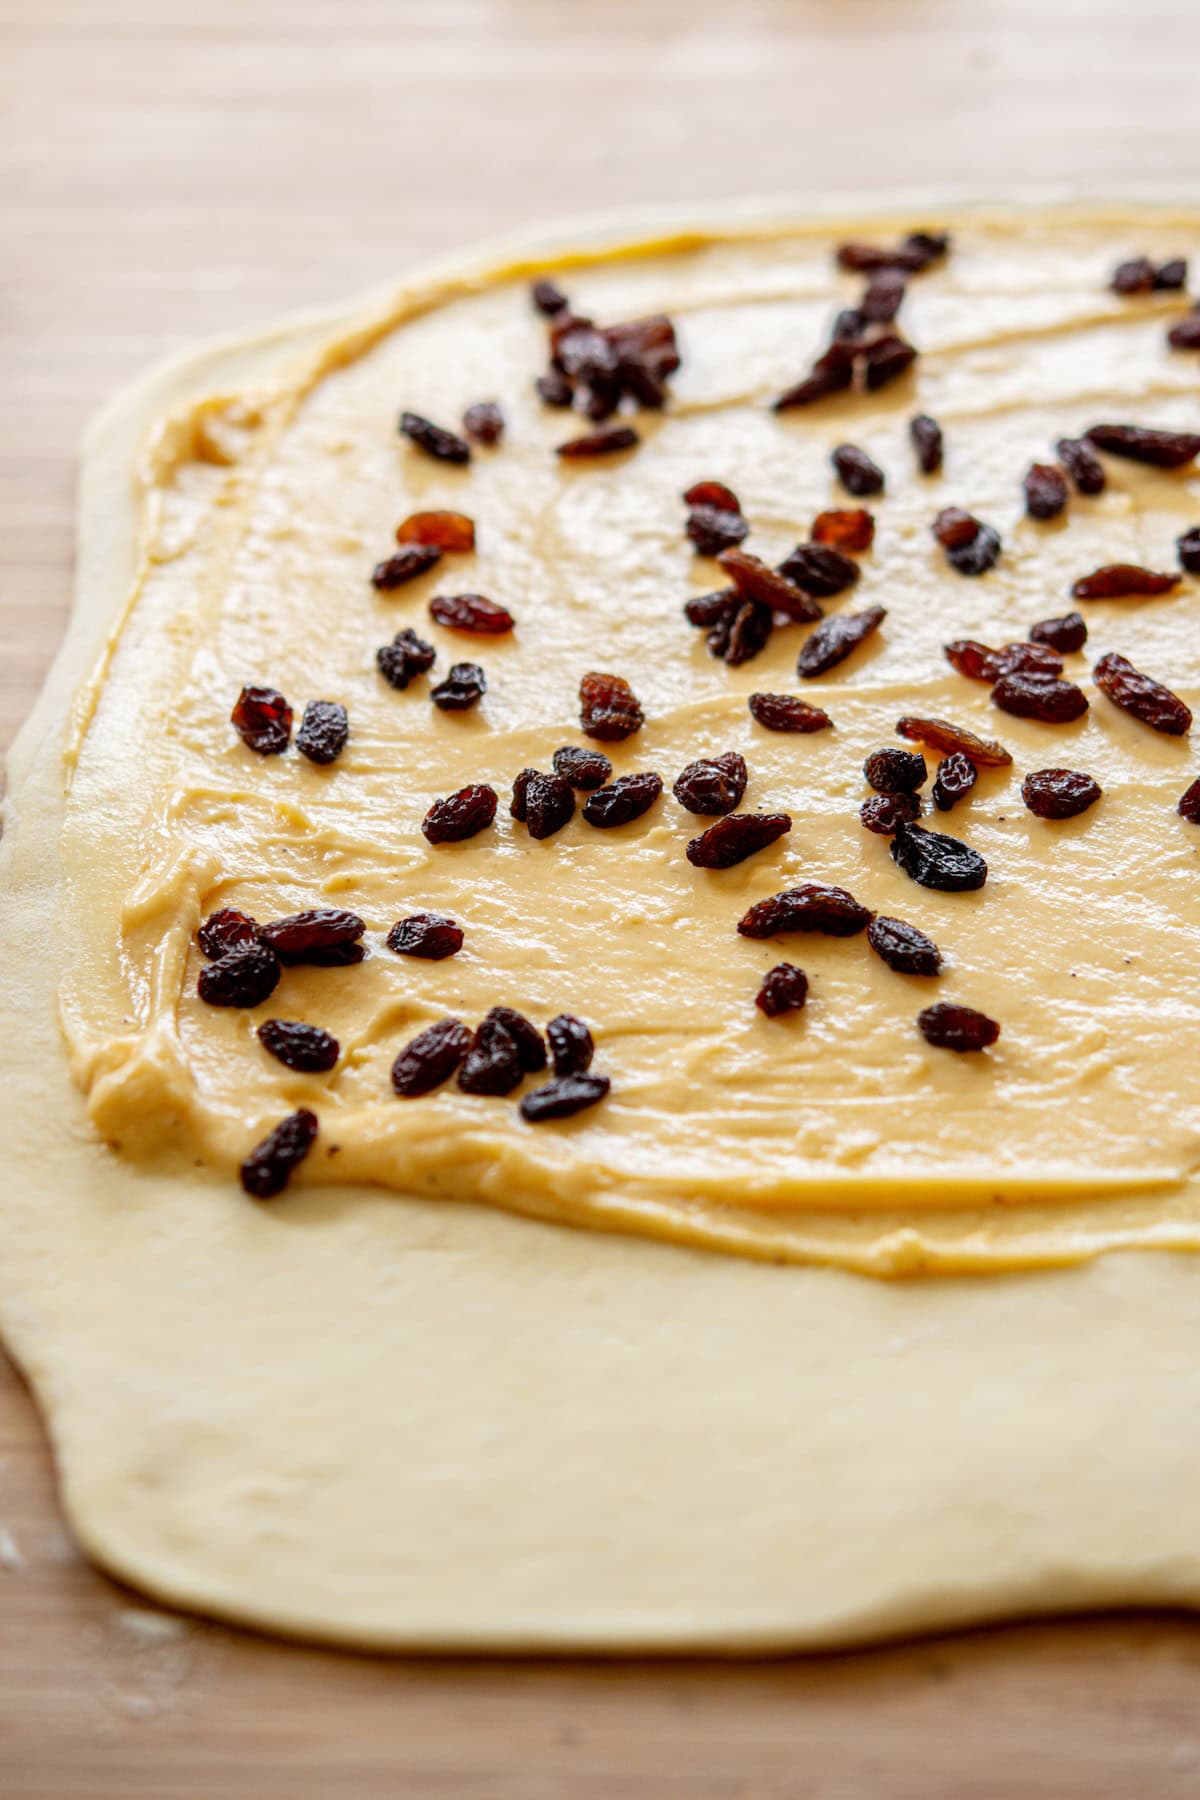
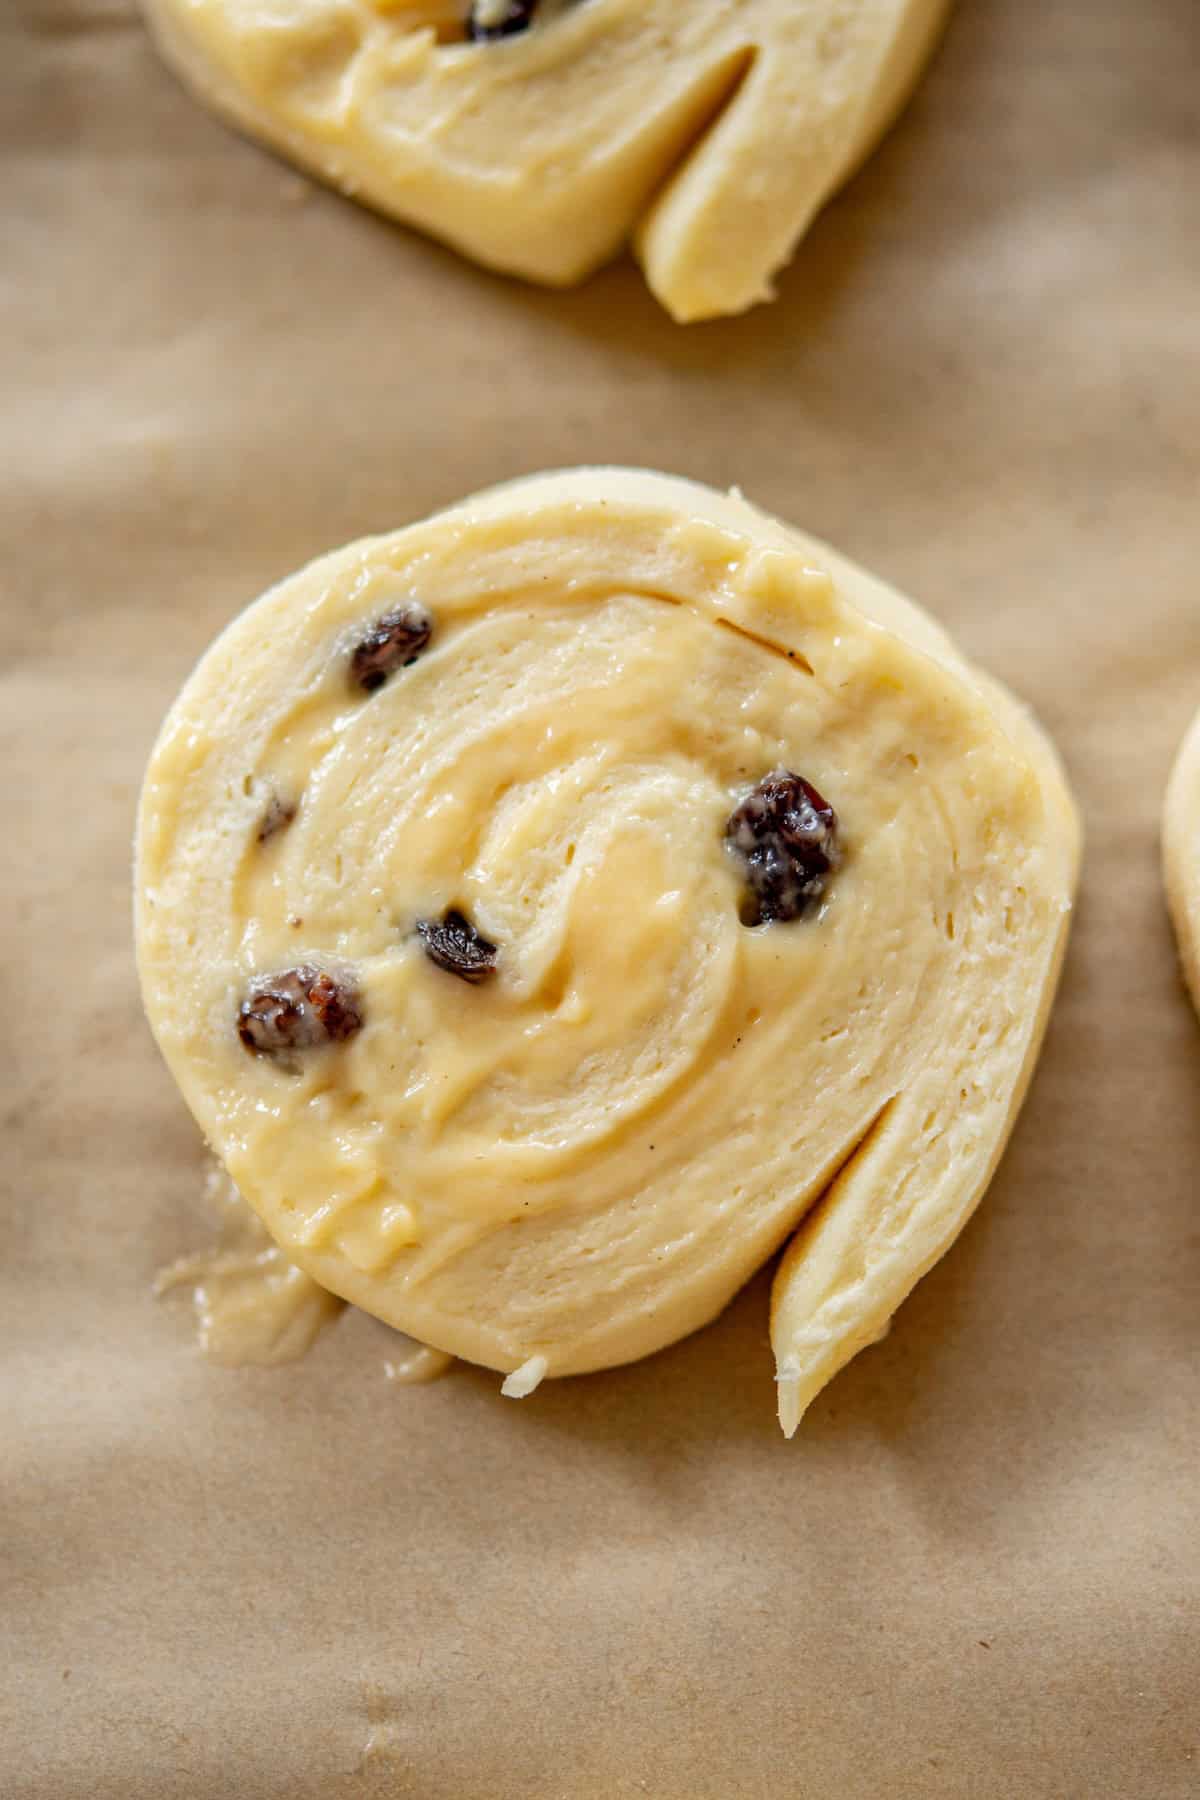
- Roll out the chilled laminated dough into a rectangle. Spread the cooled pastry cream across the entire surface, leaving a border at one long edge clean so it can seal nicely.
- Sprinkle raisins evenly over the pastry cream.
- Roll the dough into a tight cylinder, starting from the long edge with filling and finishing at the clean border so it can seal. Slice the log into rounds

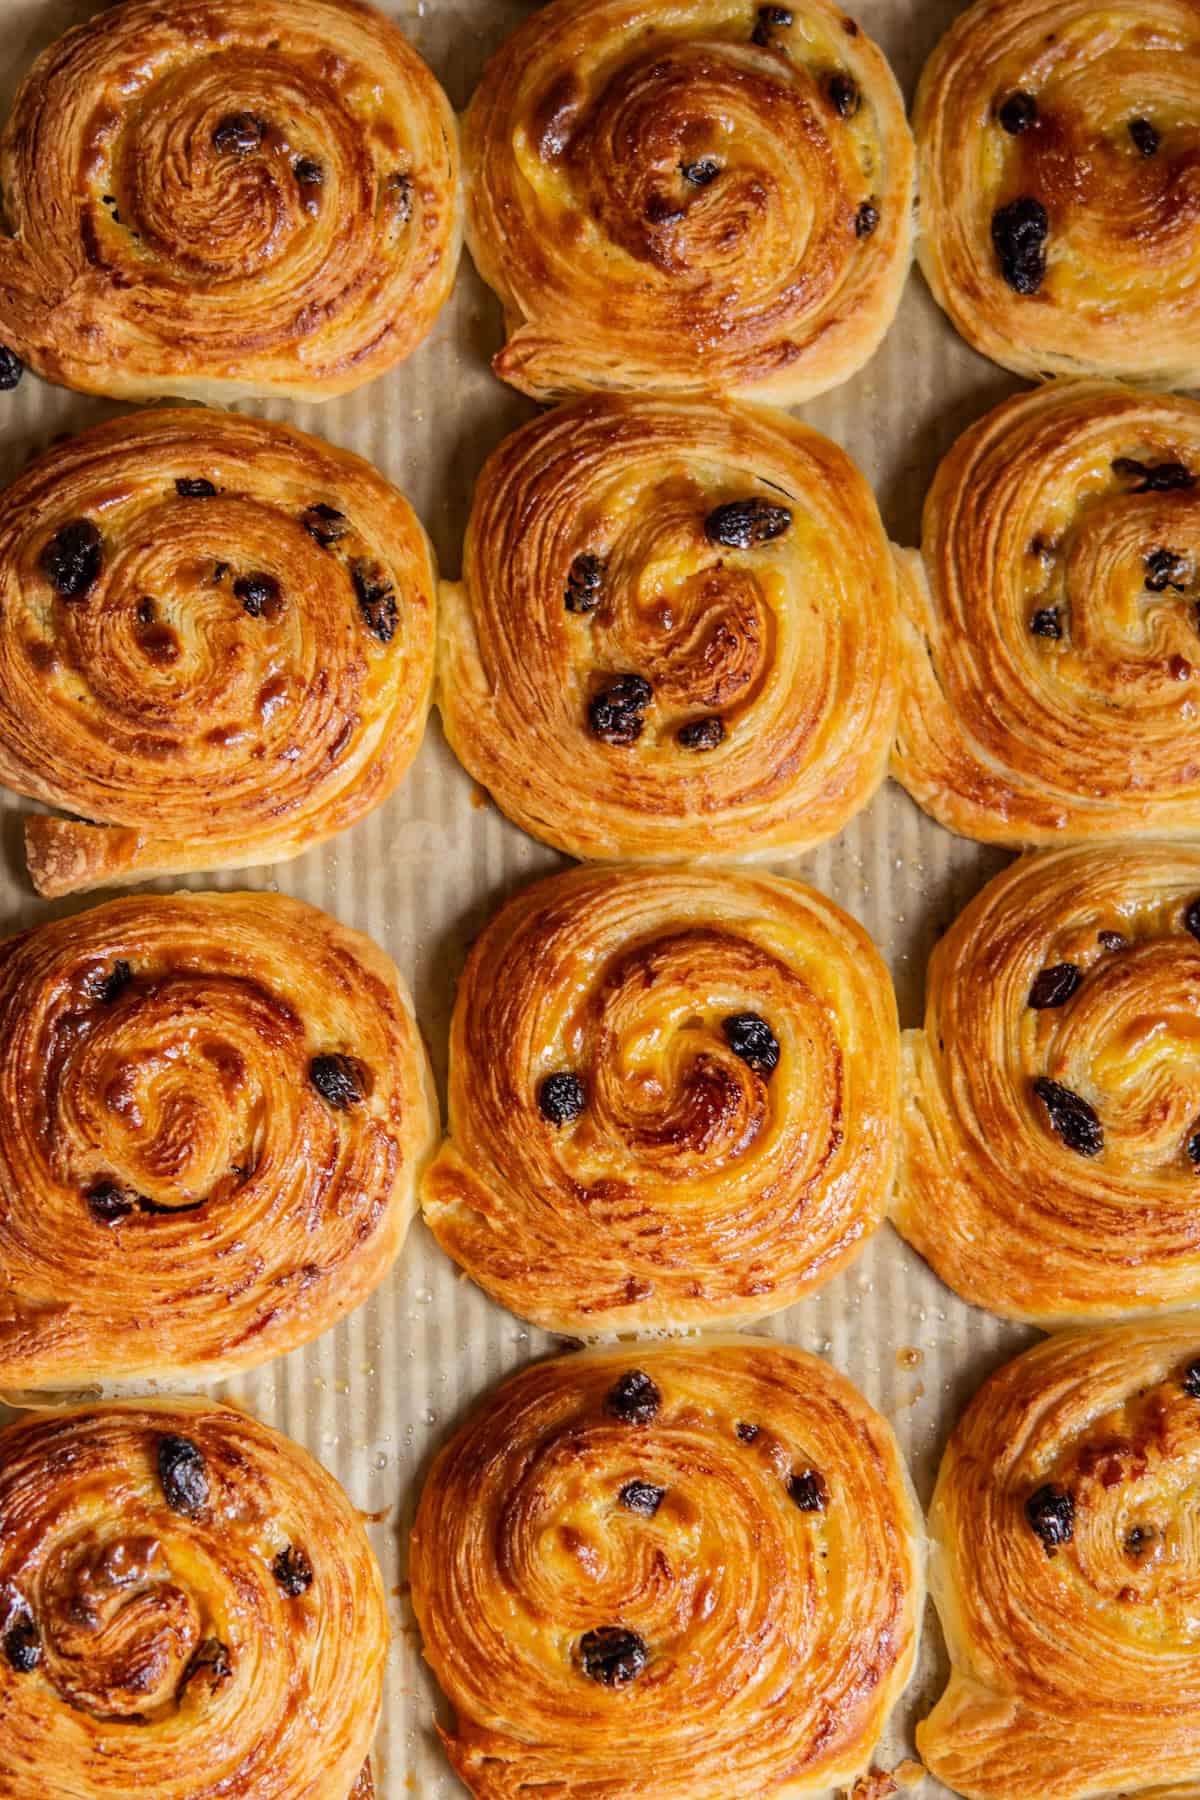
- Slice the log into rounds and let them proof for 1-2 hours until puffy. For larger pain au raisin, give them ample room to spread, about 5cm between each pastry. For smaller ones, you can space them a bit closer.
- Bake until golden brown and brush with sugar syrup or jam as they come from the oven.
Tips
- Use high-quality butter (European style, 82%+ fat content). The higher fat content helps create a flakier pastry.
- Keep everything cold. Chill the dough between folds to prevent the butter from softening or melting.
- Roll gently and evenly, pressing forward without heaps of force.
- Soak your raisins for extra flavor and plumpness. You can use just warm water or a little rum or orange juice.
- Make sure to give the pastries enough time to proof. In a warmer kitchen, 1-2 hours might be enough, but in colder environments, it can take up to 3 hours.
- I wouldn’t make these if your kitchen is over 25°C (75–77°F). At this temperature, butter softens way too fast, which can lead to greasy dough, smeared layers, and zero flake.
More laminated pastries
- Kouign Amann Recipe Step-by-Step
- Homemade Cruffins Recipe
- Sourdough Pain au Chocolat
- Pain au Chocolat Recipe Step by Step
Pain Aux Raisins

Ingredients
Dough (détrempe)
- 2 1/4 teaspoons instant yeast or active dry yeast
- 160 g whole milk lukewarm
- 120 g water
- 470 g all-purpose flour plus extra for dusting
- 50 g granulated sugar
- 1 1/2 teaspoons salt
- 30 g unsalted butter room temperature
Butter block (beurrage):
- 250 g unsalted butter cold
- 1.5 Tbsp all-purpose flour
Pastry Cream
- 240 g whole milk
- 1 teaspoons vanilla paste or extract
- 35 g sugar
- 15 g cornstarch
- 2 large egg yolks
- Pinch salt
- 20 g unsalted butter
Raisins
- 100 g raisins
- Hot water for soaking + a tablespoon of rum (optional)
Egg wash
- 1 egg
- 1 Tbsp water
Sugar syrup
- 50 g sugar
- 60 g water
Instructions
- In a large bowl add the milk, water, yeast and sugar. If using active dry yeast, let it sit for 5-10 minutes until frothy. Skip this step if using instant yeast.
- Add the flour and salt and combine until a rough dough forms.
- Turn the dough onto a lightly floured surface and begin kneading. Work the dough for about 3 minutes to start developing the gluten. The dough should become smoother and less sticky. Once the gluten has begun to develop, add the 30g of room temperature butter to the dough. Continue kneading for another few minutes until the butter is fully incorporated.
- Roll it into a rough rectangle, wrap it in plastic, and refrigerate for at least 2 hours or overnight.
Butter Block
- Mix 250g butter with 1 1/2 tbsp flour until combined.
- Place the butter between two sheets of parchment paper and roll it into a 20×15 cm (8×6 inch) rectangle, about 0.5 cm (1/4 inch) thick. To get clean, straight edges, fold the edges of the parchment paper around the butter block to create a square frame, then press the butter with the rolling pin to fit neatly into this frame. Refrigerate until firm.
Laminating
- Remove your butter block from the fridge and let it sit at room temperature for a few minutes. Roll it in the parchment paper with the rolling pin to make it pliable and mouldable. It should be cold but able to be bent slightly.
- On a floured surface, roll the chilled dough into a 20×32 cm (8×12.5 inch) rectangle. The dough should be twice the height of the butter, and around the same width.
- Place the butter block in the center of the dough, folding the top and bottom edges over the butter to fully encase it like a letter. Press this seal closed with your fingertips.
- Turn it 90 degrees so the crease where you encased it is vertically in front of you.
- First fold: Applying gentle pressure, roll the dough into a long rectangle about 6 mm thick. Don’t worry about how wide it is. Always roll forward with gentle, even pressure and focus on length, not width. Avoid pushing too hard, which can tear the dough and crack the butter layers. Ensure the dough is not sticking to the bench, and dust with more flour if needed.
- Once rolled, cut off the uneven top and bottom edges. Brush away excess flour on the dough. Fold the top third of the dough down and the bottom third up, like folding a letter. Wrap in plastic and refrigerate for 30 minutes.
- Second fold: Place the dough so it’s vertically in front of you. Repeat the rolling process as before. Cut off scraggly or uneven bits of dough to maintain clean, sharp edges. Fold into thirds, turn, wrap, and refrigerate for 30 minutes.
- Third fold: Repeat the folding process one more time, then refrigerate for at least 2 hours.
Pastry Cream
- In a small saucepan, heat the milk on medium heat until it is just at a simmer but don’t let it boil.
- While the milk is warming, in a bowl, add the egg yolks, sugar, salt, vanilla, and cornstarch. Whisk them together until glossy and smooth.
- Place the bowl on a dampened kitchen towel to stop it from slipping around for this next step.
- Add the hot milk mixture in a steady stream to the egg mixture while whisking vigorously.
- Return the combined mixture to the saucepan over medium heat, whisking constantly until it starts to bubble.
- Once it starts bubbling, it will begin to thicken. Keep it at a bubble and don’t stop whisking for 1 minute.
- Take it off the heat and whisk in the butter until completely combined.
- Pour the hot pastry cream into a clean bowl.
- Lay a piece of plastic wrap directly onto the surface of the custard to avoid a skin forming and let it come to room temperature. Chill it in the refrigerator until completely cold.
Shaping
- Add the raisins to a small bowl and pour over boiling water. Let them soak for 15-30 minutes.
- Roll out the chilled laminated dough into a 40×30 cm (15×12 inch) rectangle, about 5 mm (1/4 inch) thick.
- Spread cold pastry cream across the entire surface, leaving a 2 cm (1 inch) border at one long edge clean so it can seal nicely.
- Drain the raisins well then sprinkle them evenly over the pastry cream.
- Starting from the long edge with filling, roll the dough into a tight cylinder, finishing at the clean border so it can seal. Chill this in the fridge for about 15–20 minutes to make it easier for cutting later.
- Trim off the ends to make it even. Slice the log into rounds about 2 cm / 3/4 inches thick (about 16-18)
- Place the spirals on baking trays lined with parchment paper, leaving space for them to expand. They will double once baked.
- Cover loosely with plastic wrap or a clean kitchen towel.
- Proof for around 2 hours at room temperature, or until the pastries look puffed and light. The time varies based on kitchen temperature.
- Preheat the oven to about 190°C (375°F). Gently brush the pastries with egg wash.
- Bake for around 18 minutes, rotating the tray halfway through, until they’re deep golden brown.
- While the pain aux raisins are baking, heat together the sugar and water in a small saucepan until the sugar has dissolved.
- Brush on the hot pastries as they come from the oven. Transfer to a cooling rack and cool before serving.

I hope you love these as much as I do!
Are you able to freeze the dough after you have sliced then but before proving, can you bake these in an air fryer. Can you freeze these after baking them.
Hey, you can freeze the dough after slicing but before the final proof. Freeze in a single layer until solid, then store in an airtight freezer container or bag. When you’re ready to use them, thaw overnight in the fridge, then let them rise at room temperature until fully proofed before baking.
I’ve not used an air fryer to bake these, but I imagine you’ll get a slightly different texture than in the oven. Bake at a slightly lower temperature and check often so they don’t burn. You can also freeze them after baking. Store in an airtight container or wrap em well and reheat in the oven or air fryer 🙂
I will be trying these soon. thanks.
Any updates?
Can you slow proof final shaped pastries overnight in the fridge and bake in the morning?
Hey Brandon, you can slow-proof the shaped pastries overnight in the fridge, then cover them with plastic wrap so they don’t dry out. In the morning, take them out and let them sit at room temperature for 30–45 minutes, or for as long as needed to finish proofing and come up to temperature before baking.
These were one of the best things I’ve ever made! Although the process is time consuming (no complaints, just the nature of laminated dough), it is totally worth it, especially considering that you get a huge number of pastries for your effort. They look beautiful and professional. I was thrilled with all of the layers. The pastry cream was very easy and flavorful. I actually made a couple of variations – some with mini chocolate chips and some with guava marmalade lightly spread over the cream. So delicious! I froze leftovers and then re-heated by putting in airfryer at 375 degrees for about 5-6 minutes, and they crisped right up. Thank you so much for the detailed breakdown – I will be making these on repeat!
Thank you so much for your lovely review! It’s made my day reading it :). Your additions sound delicious!