
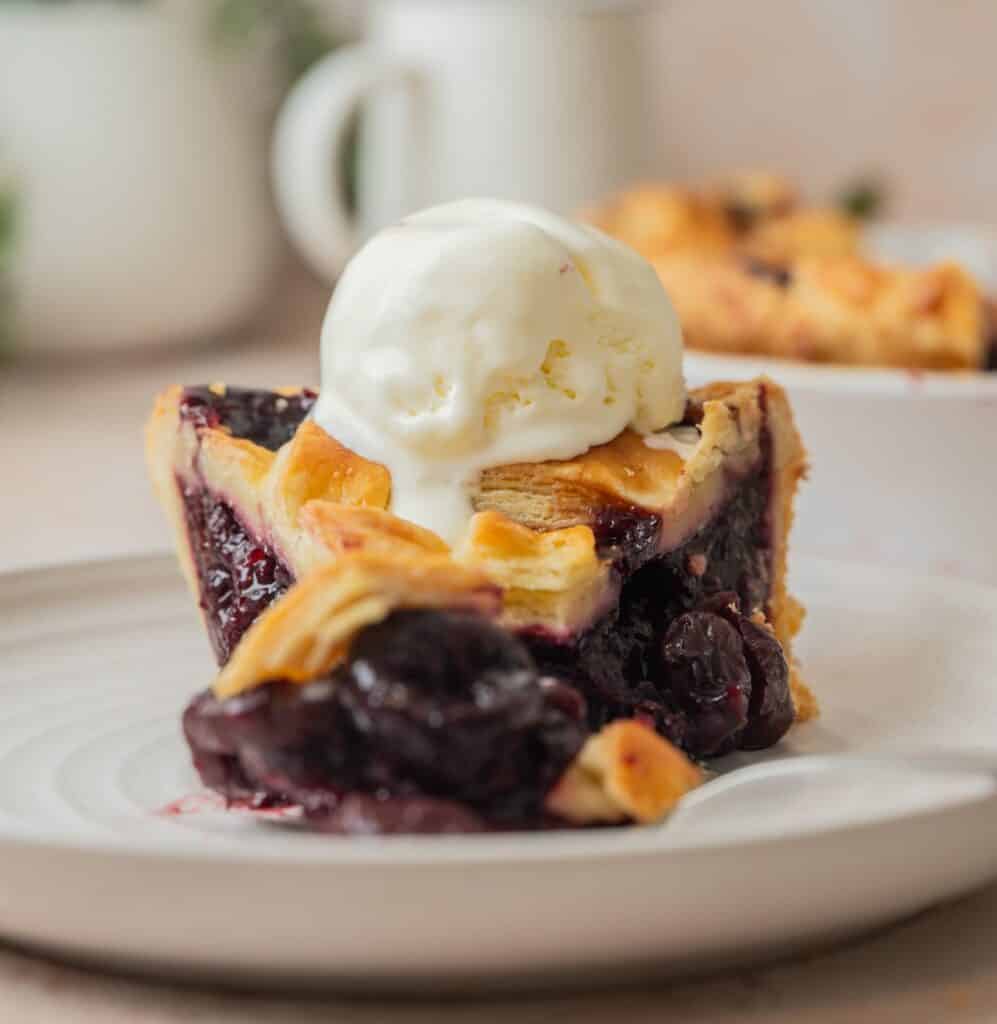
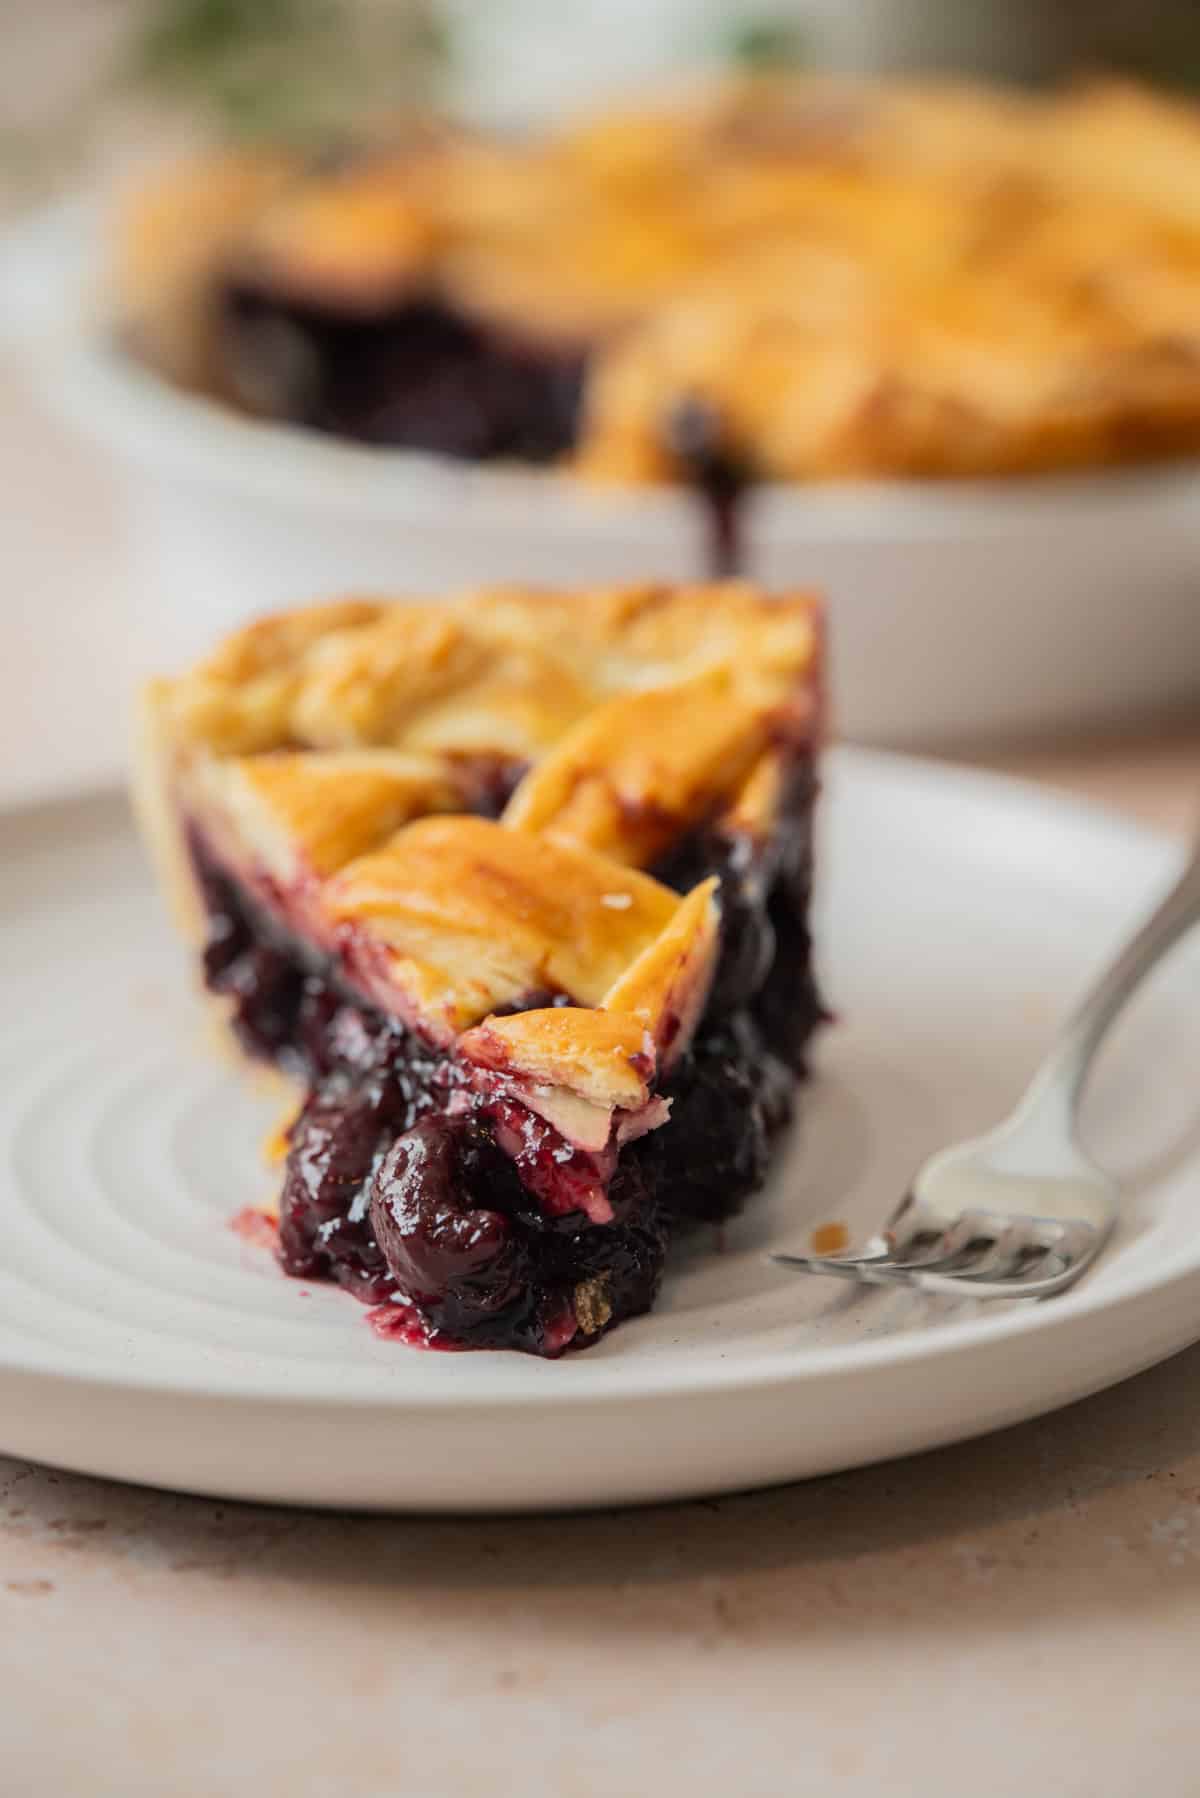
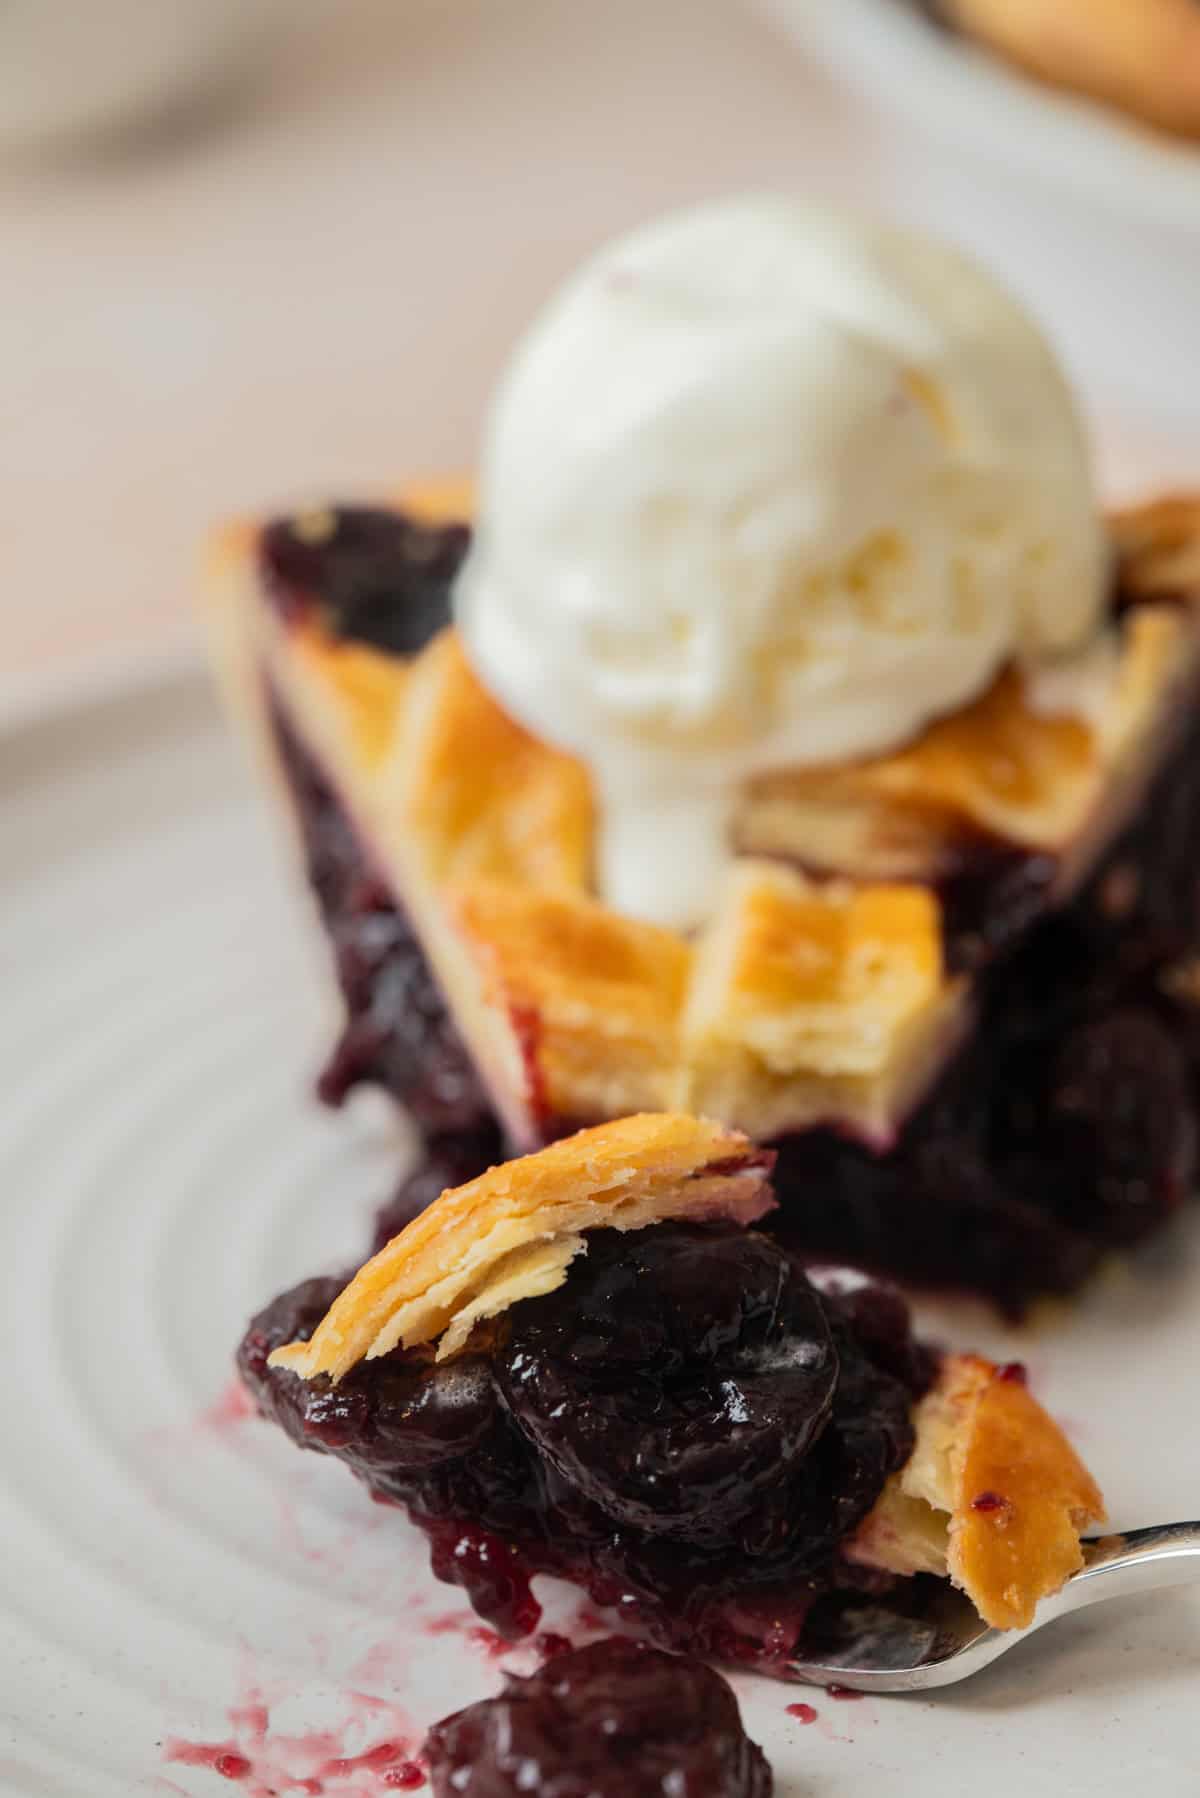
Cherry Pie with Frozen Cherries
This cherry pie with frozen cherries has a deep, glossy filling and a flaky homemade crust. You can make it any time of year, no fresh cherries needed.
About this recipe
This is a from-scratch cherry pie made with frozen dark sweet cherries, a cooked filling, and a homemade yogurt pie crust. Frozen cherries work brilliantly here because they’re picked and frozen at peak ripeness, which means the flavor is consistently good no matter the season. I also love that they are usually pre-pitted too so that makes things a ton easier.
The filling is cooked on the stovetop before going into the pie, which gives you control over the thickness and lets the cornstarch activate properly before baking. Almond extract in the filling is the secret ingredient, and it deepens the cherry flavor so so much!
The crust is my flaky yogurt pie crust, which uses some yogurt for tenderness and acidity. The full standalone recipe with detailed instructions is there if you want it, but I’ve included all the steps here too so you can make the whole pie from start to finish in one place.
Key ingredients and why
- Frozen dark sweet cherries are the base of the filling. Dark sweet cherries are richer and more intensely flavored than sour cherries, and they hold their shape reasonably well through cooking. No need to thaw them before starting, they can go straight into the pan.
- Cornstarch thickens the filling. It goes in with the cherries at the start and activates as the mixture heats up and comes to a boil. Once the filling turns thick and glossy and loses its cloudy appearance, it’s ready.
- Almond extract deepens the cherry flavor. A small amount goes a long way. You can substitute vanilla extract if you don’t have it, but the flavor will be a lot milder.
- Lemon juice balances the sweetness of the filling.
- Unsalted butter, a few small cubes dotted over the filling before the top crust goes on, adds richness and helps the filling bake up glossy.
- Yogurt pie crust: the yogurt adds a acidity that inhibits gluten development, giving you a more tender crust. Combined with the lamination fold, this is one of the flakiest crusts I’ve made.
The pie crust
- Whisk the flour, salt, and sugar together in a large bowl.
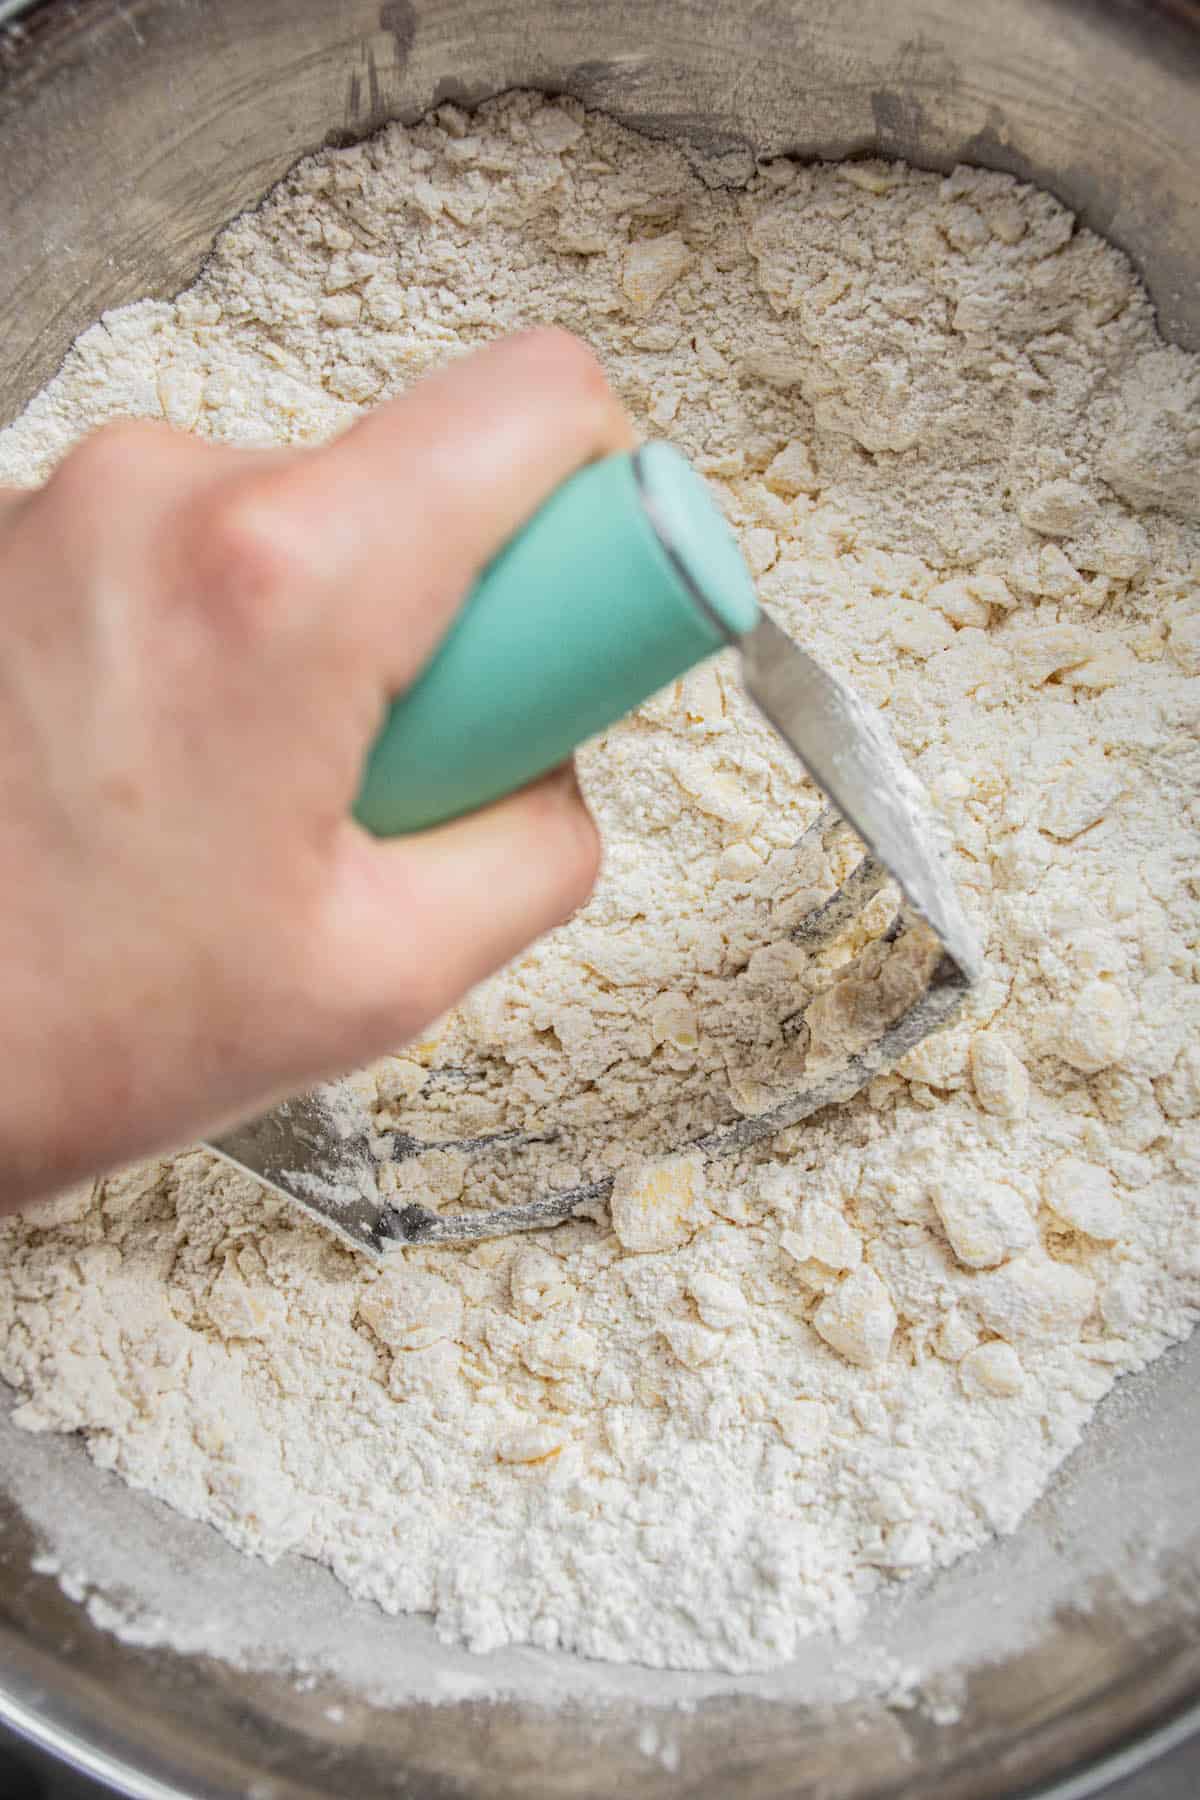
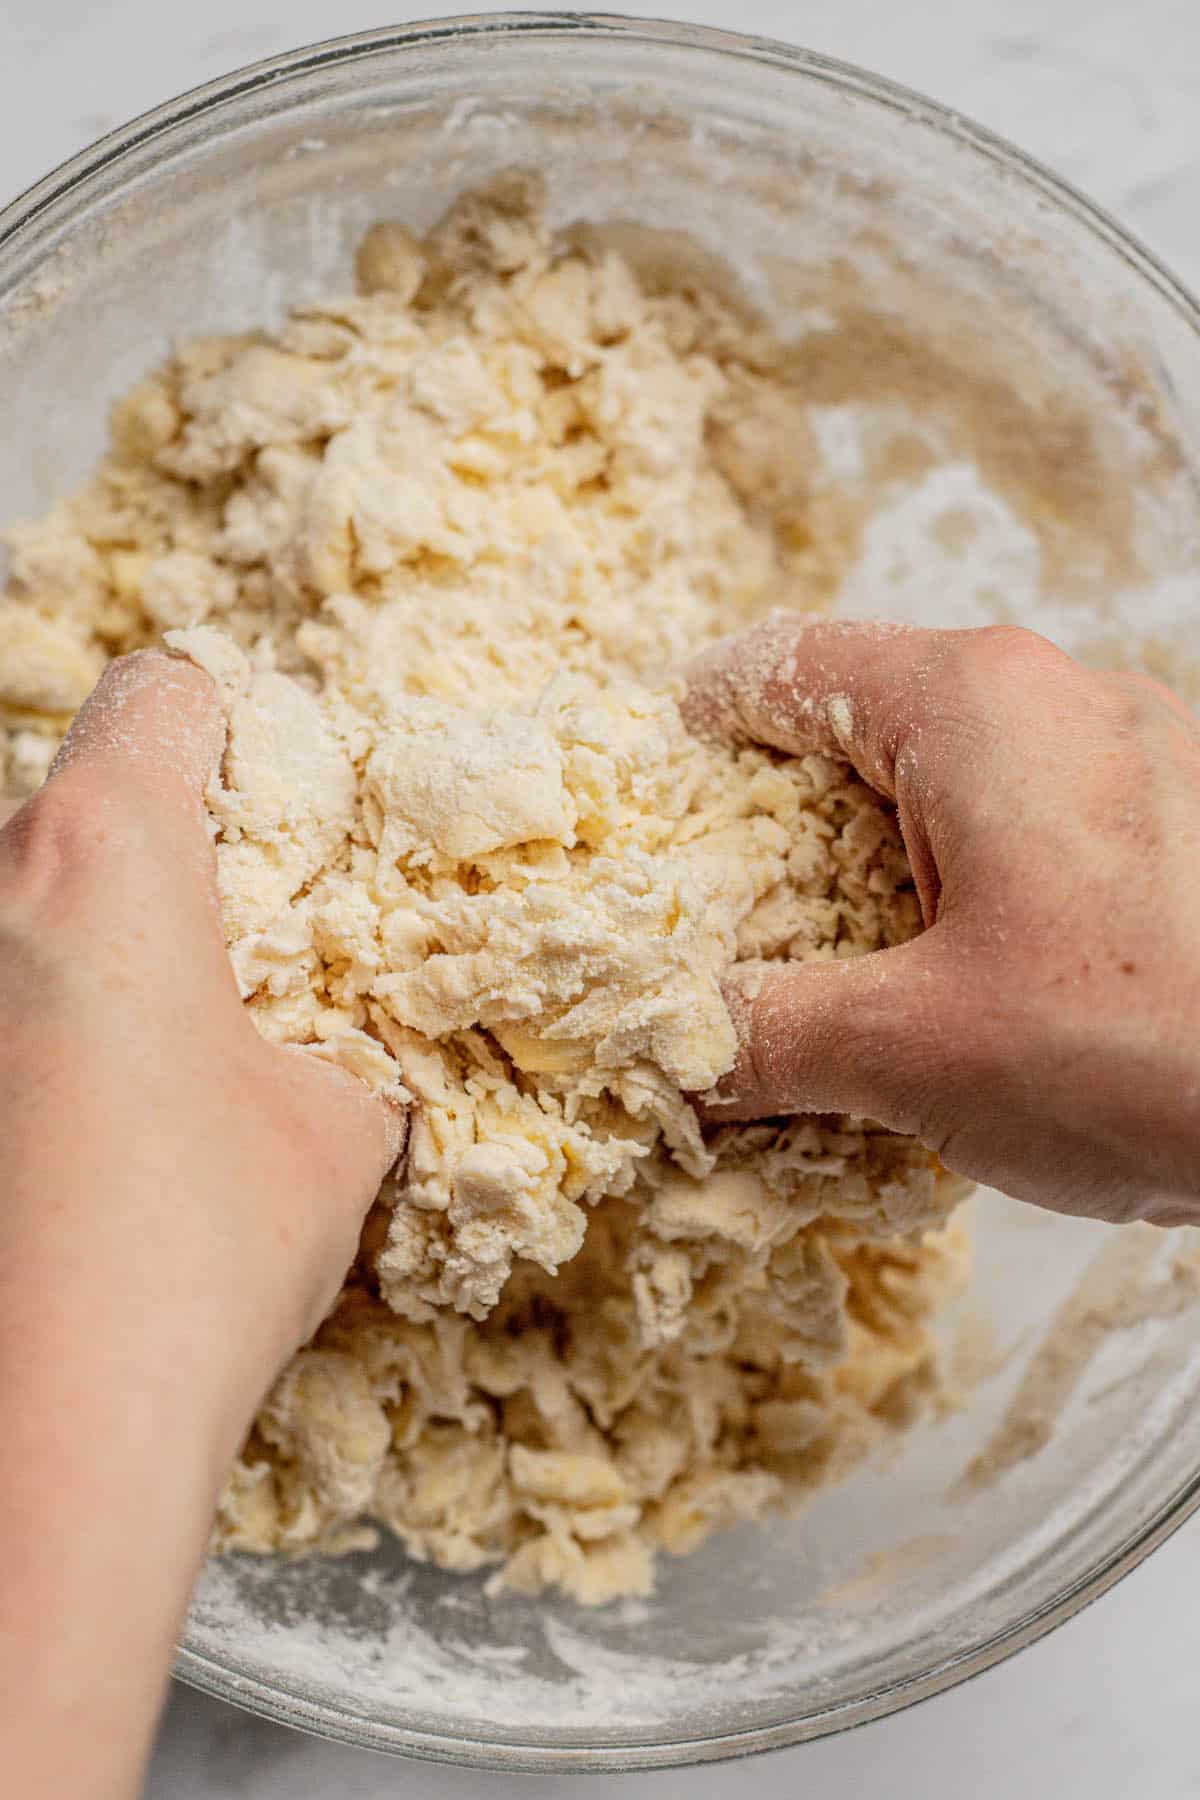
- Cut the cold butter in using a pastry cutter until the mixture looks like coarse crumbs with a few pea-sized pieces.
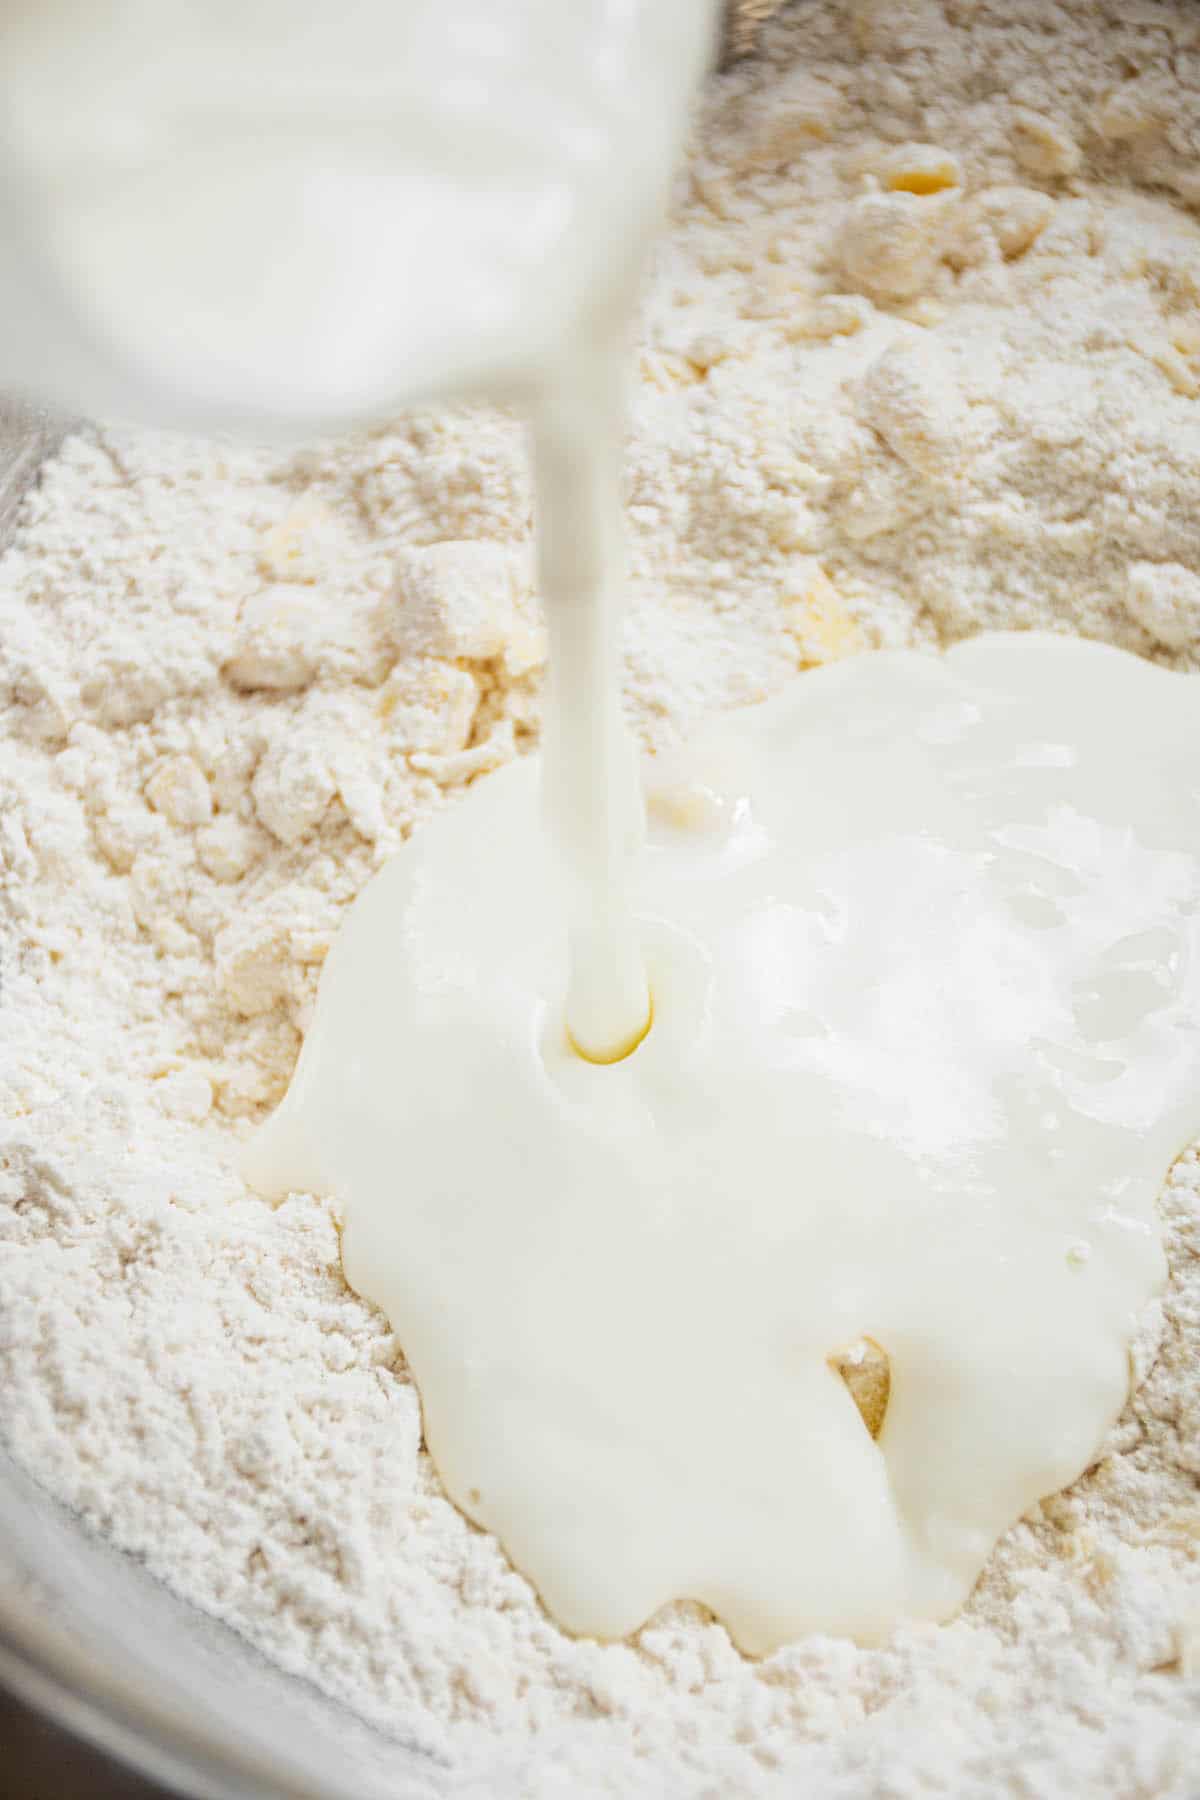
- Add the yogurt and stir to bring the dough together.
- Add cold water a teaspoon at a time until it just holds when pressed.
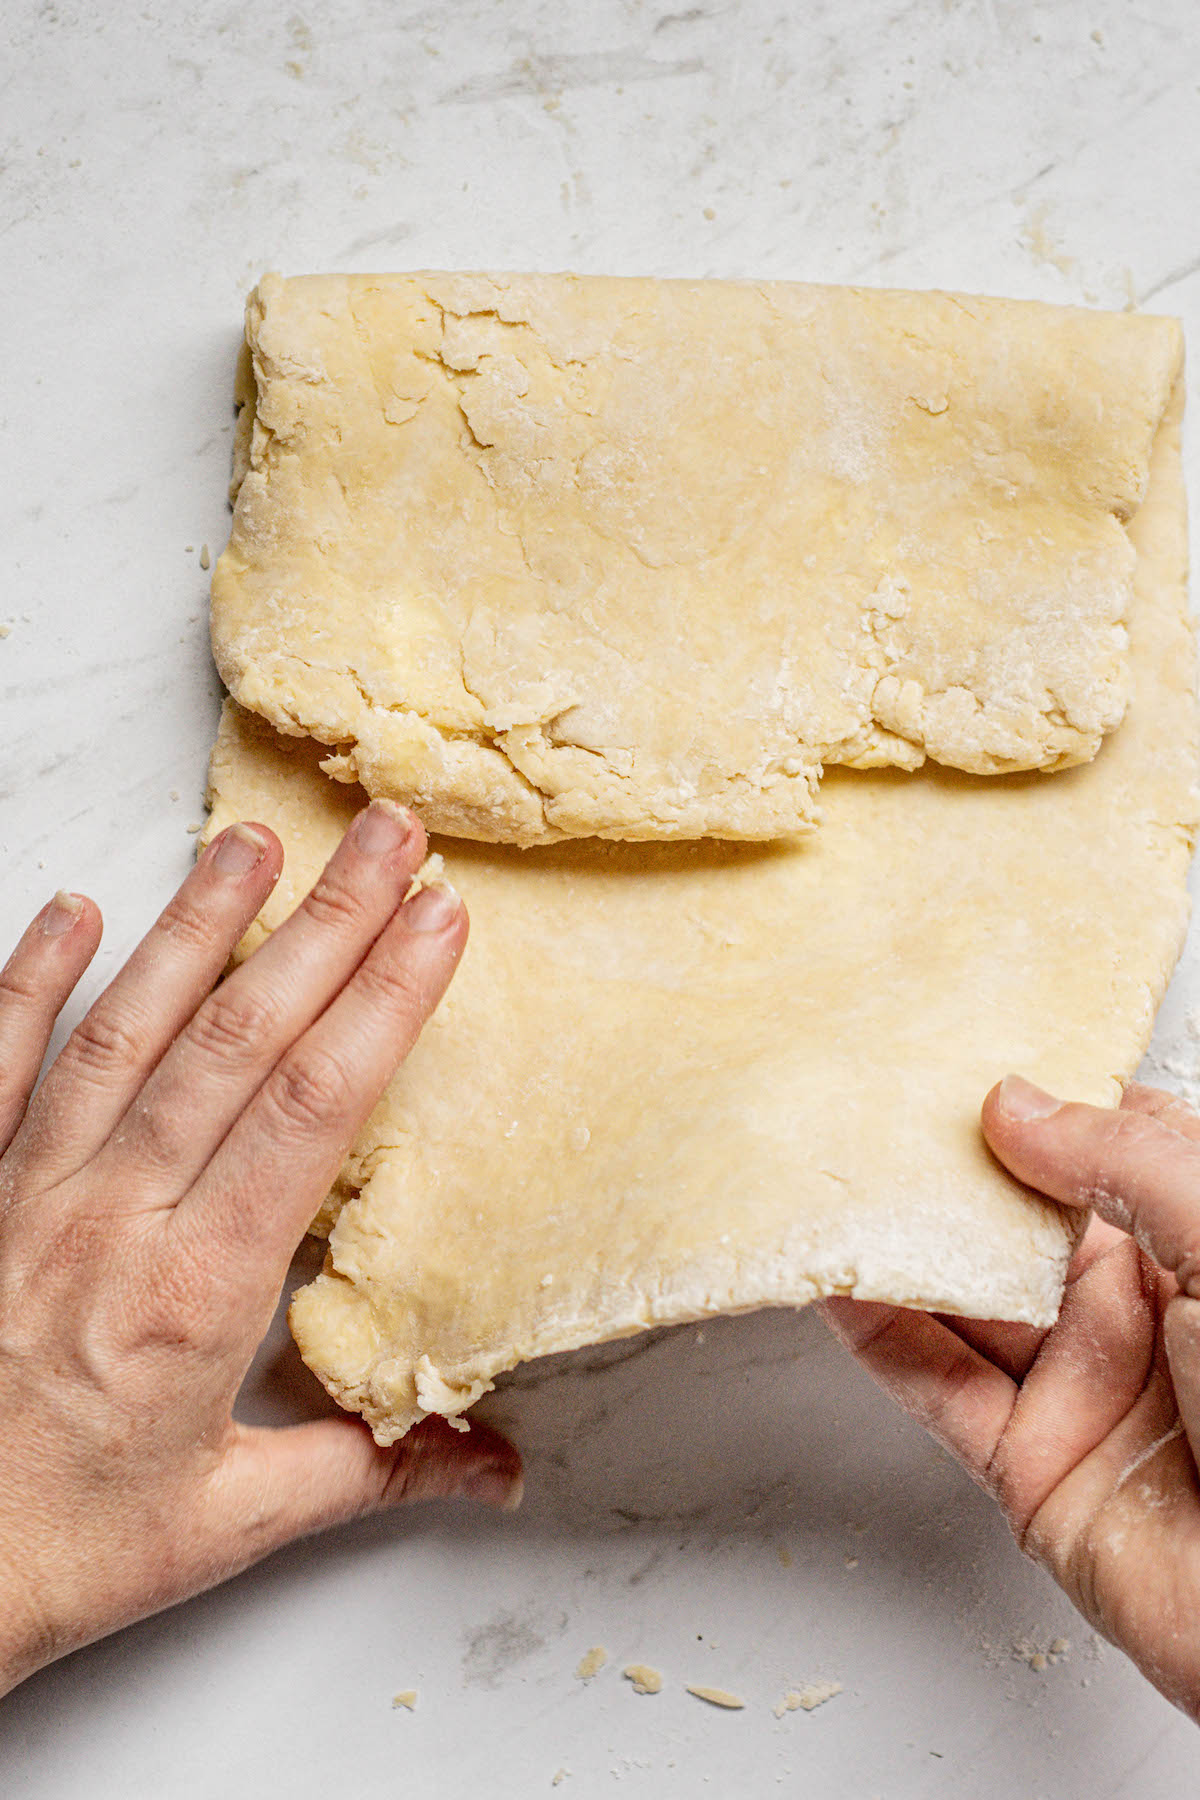
- Turn out onto a floured surface and roll into a rough rectangle. Fold in thirds.
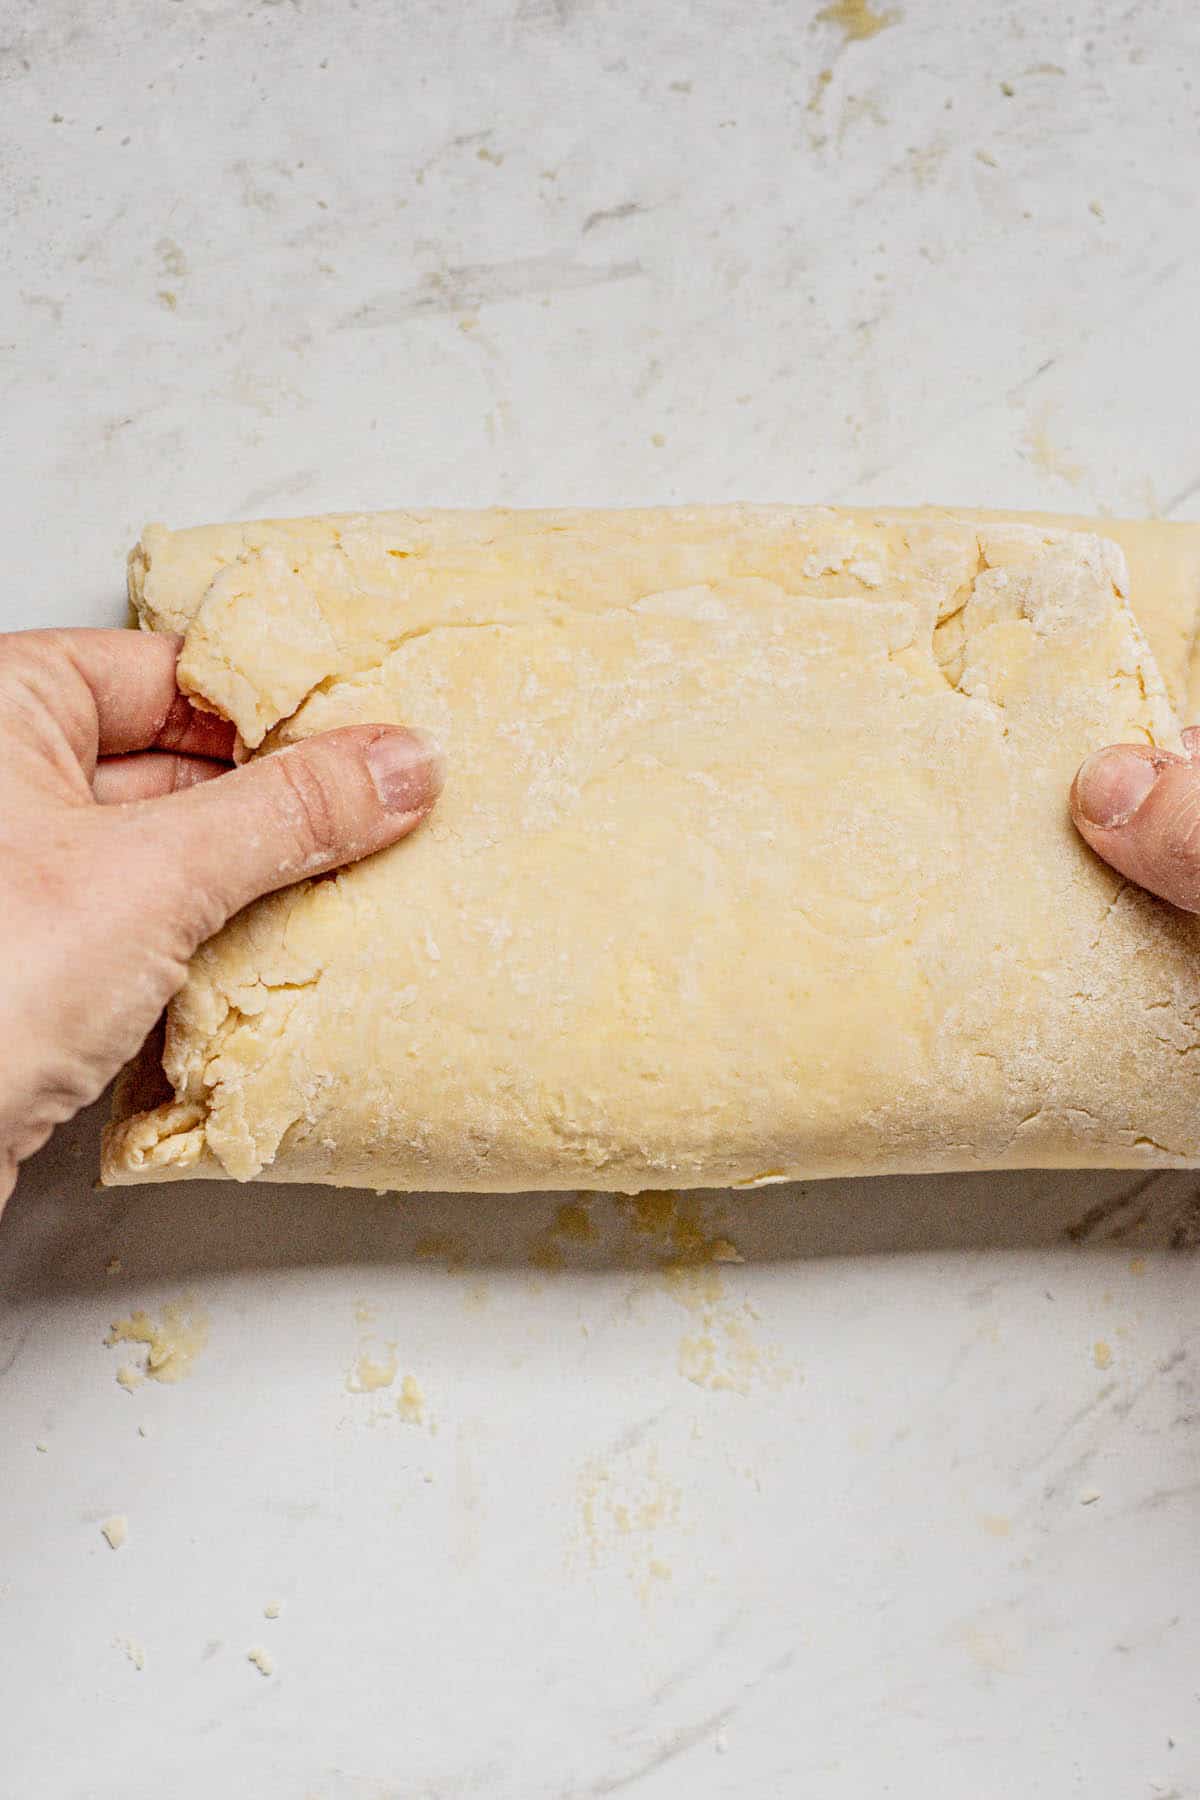
- Turn the dough a quarter turn, and repeat the roll-and-fold process once more.
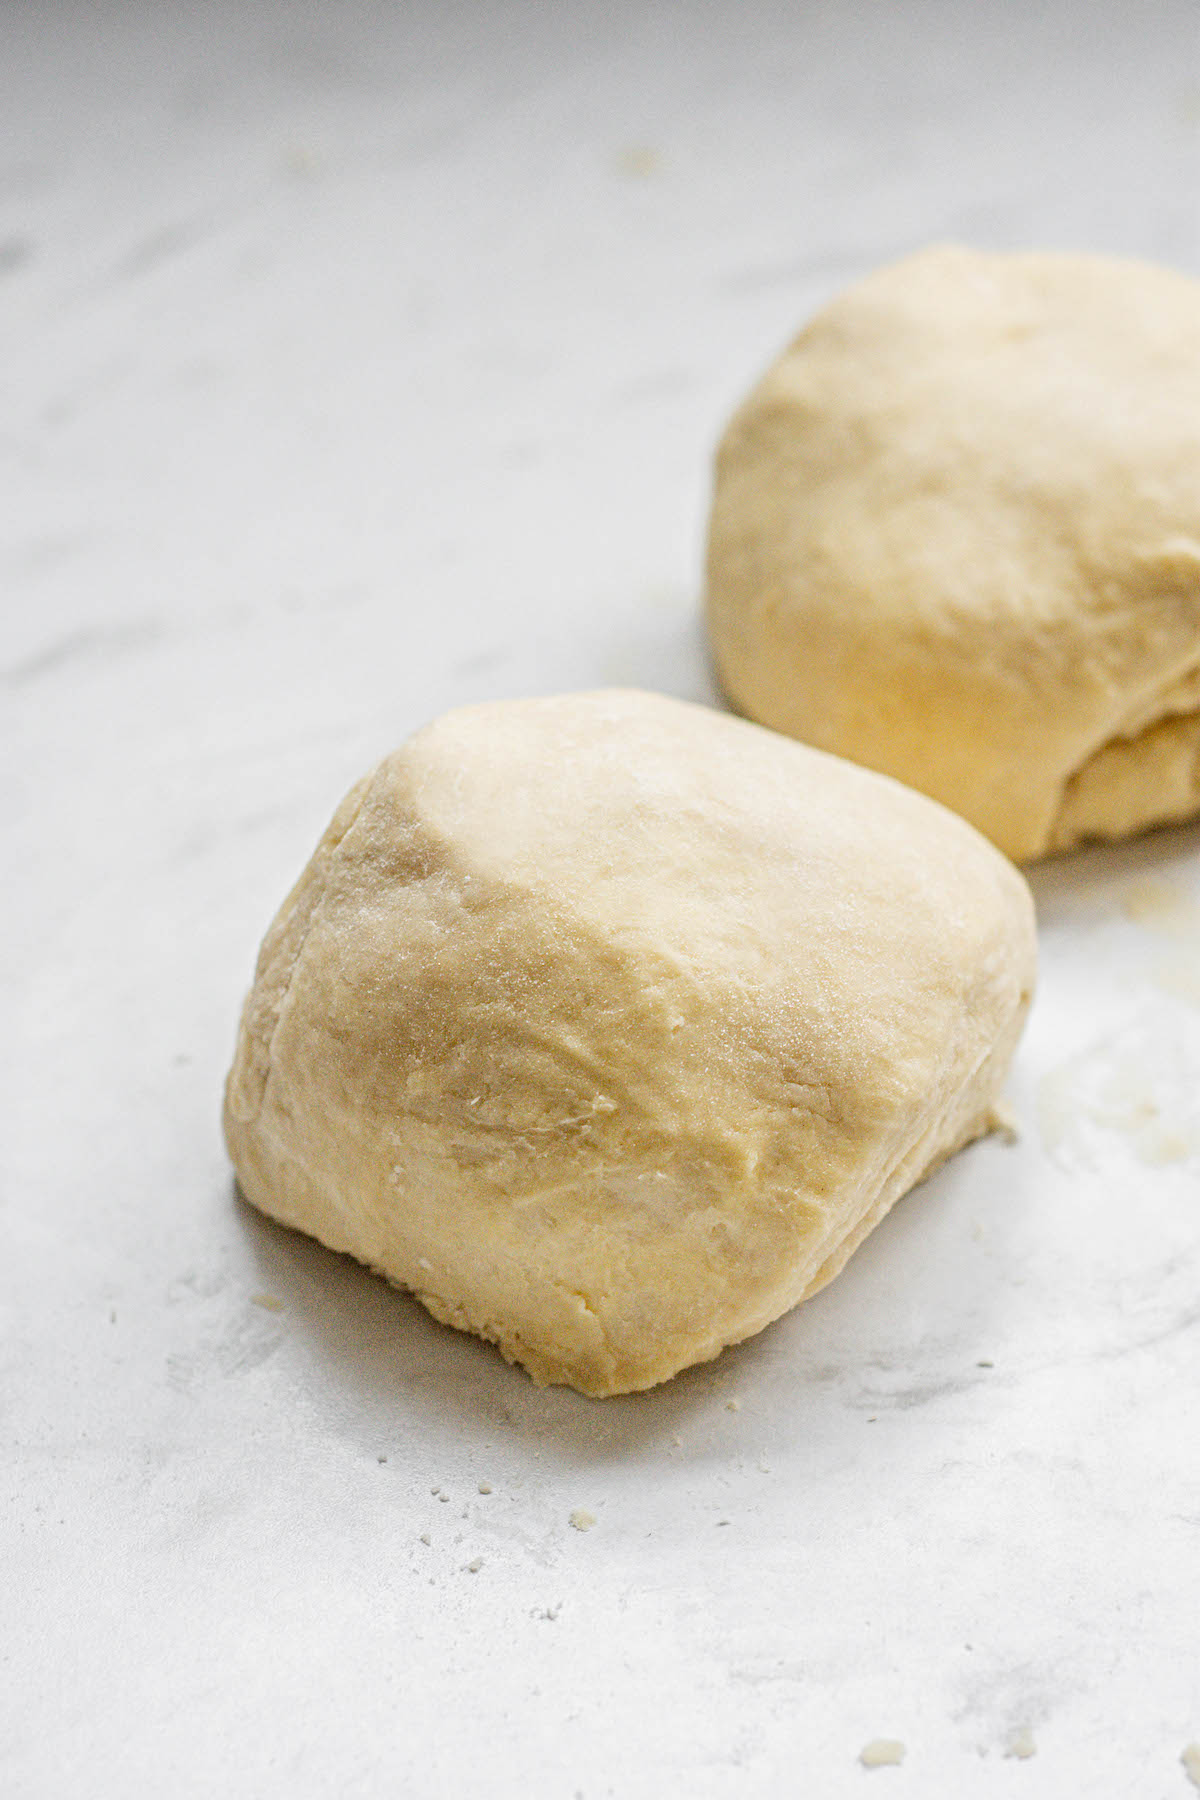
- Divide into two equal discs, wrap tightly, and refrigerate for at least 2 hours.
The filling
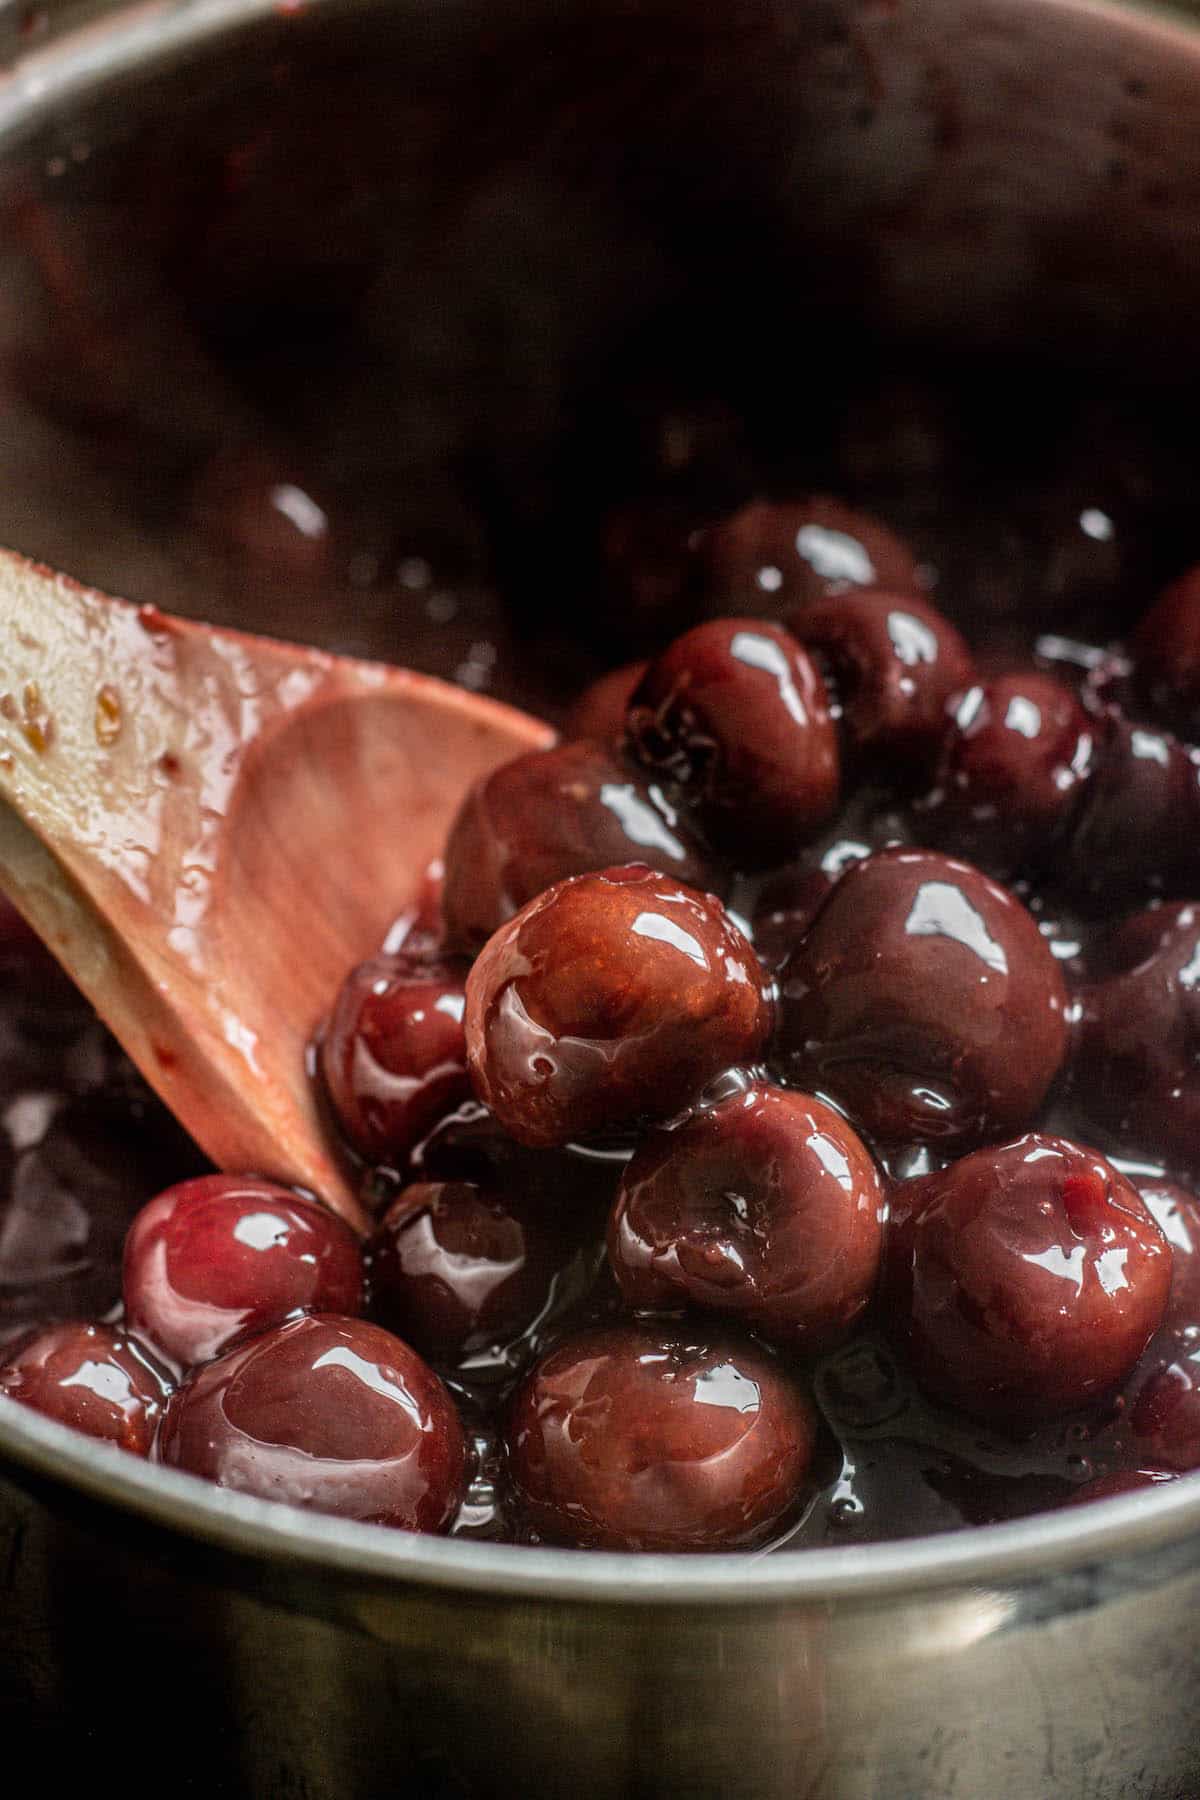
- Combine the frozen cherries, cornstarch, lemon zest, lemon juice, sugar, almond extract, and salt in a large saucepan. Cook over low heat until the cherries release their liquid.
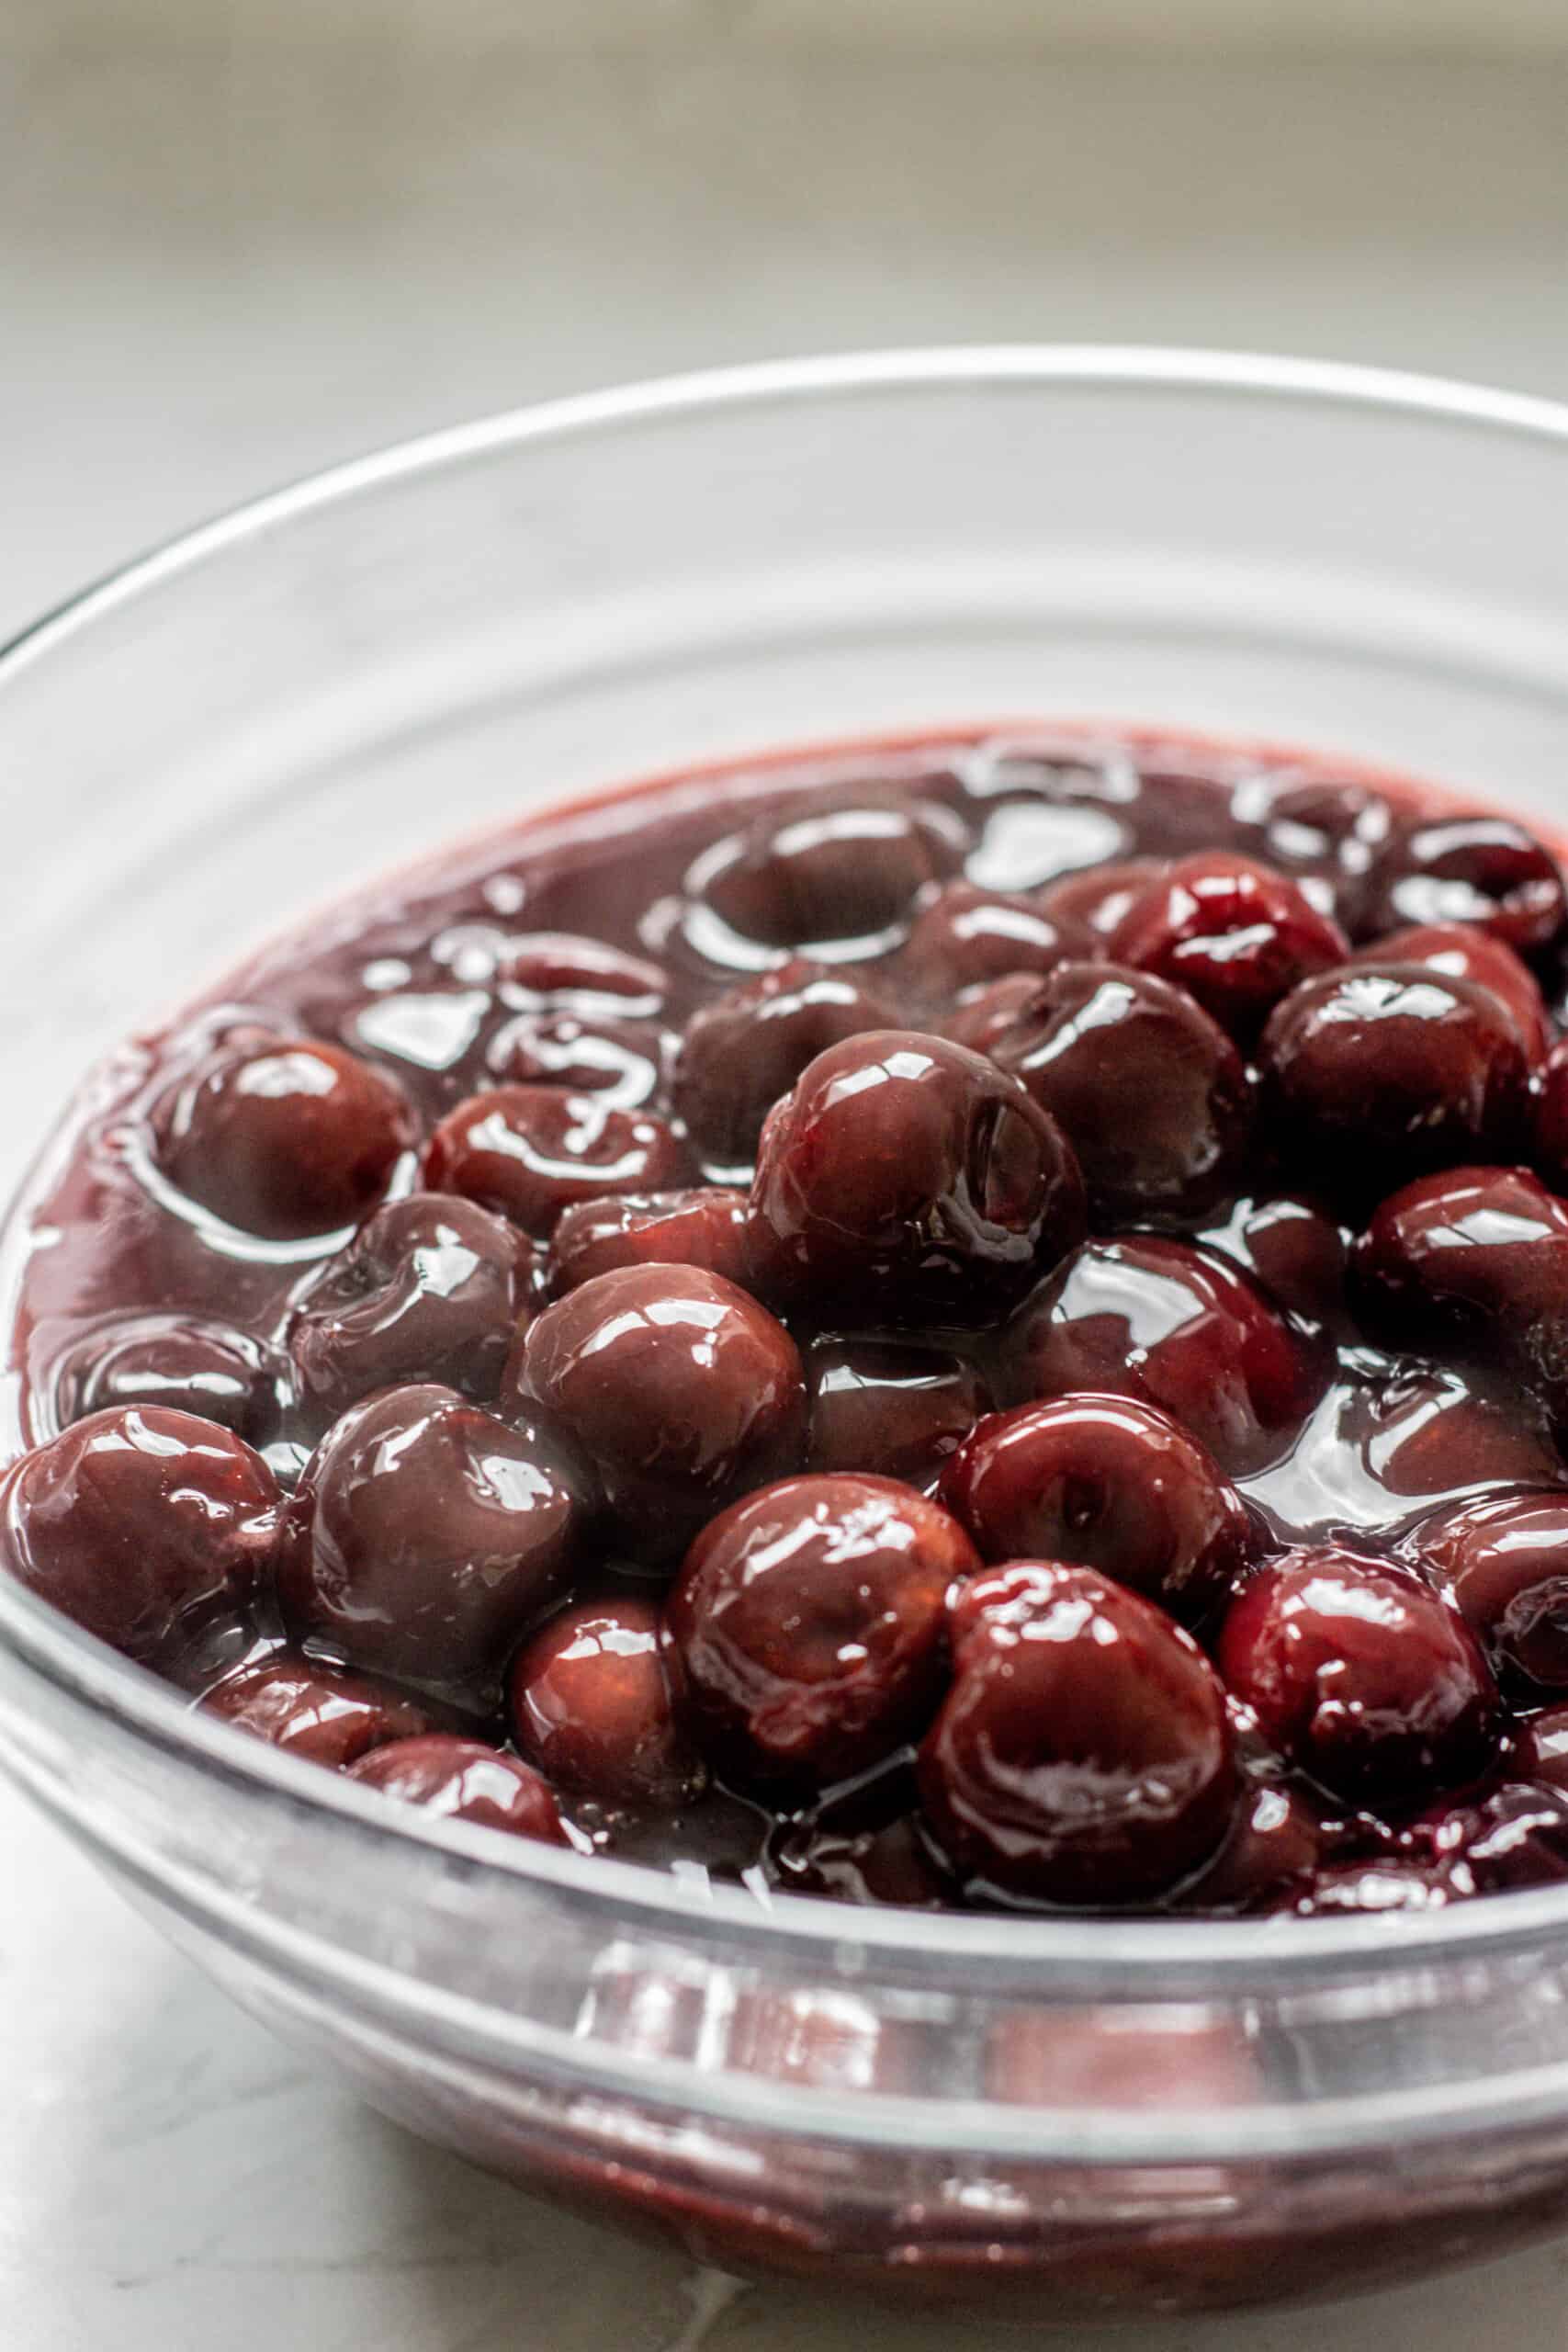
- Turn up to medium and stir until the mixture bubbles and turns thick and glossy. Pour into a bowl and cool completely before using.
Assembling
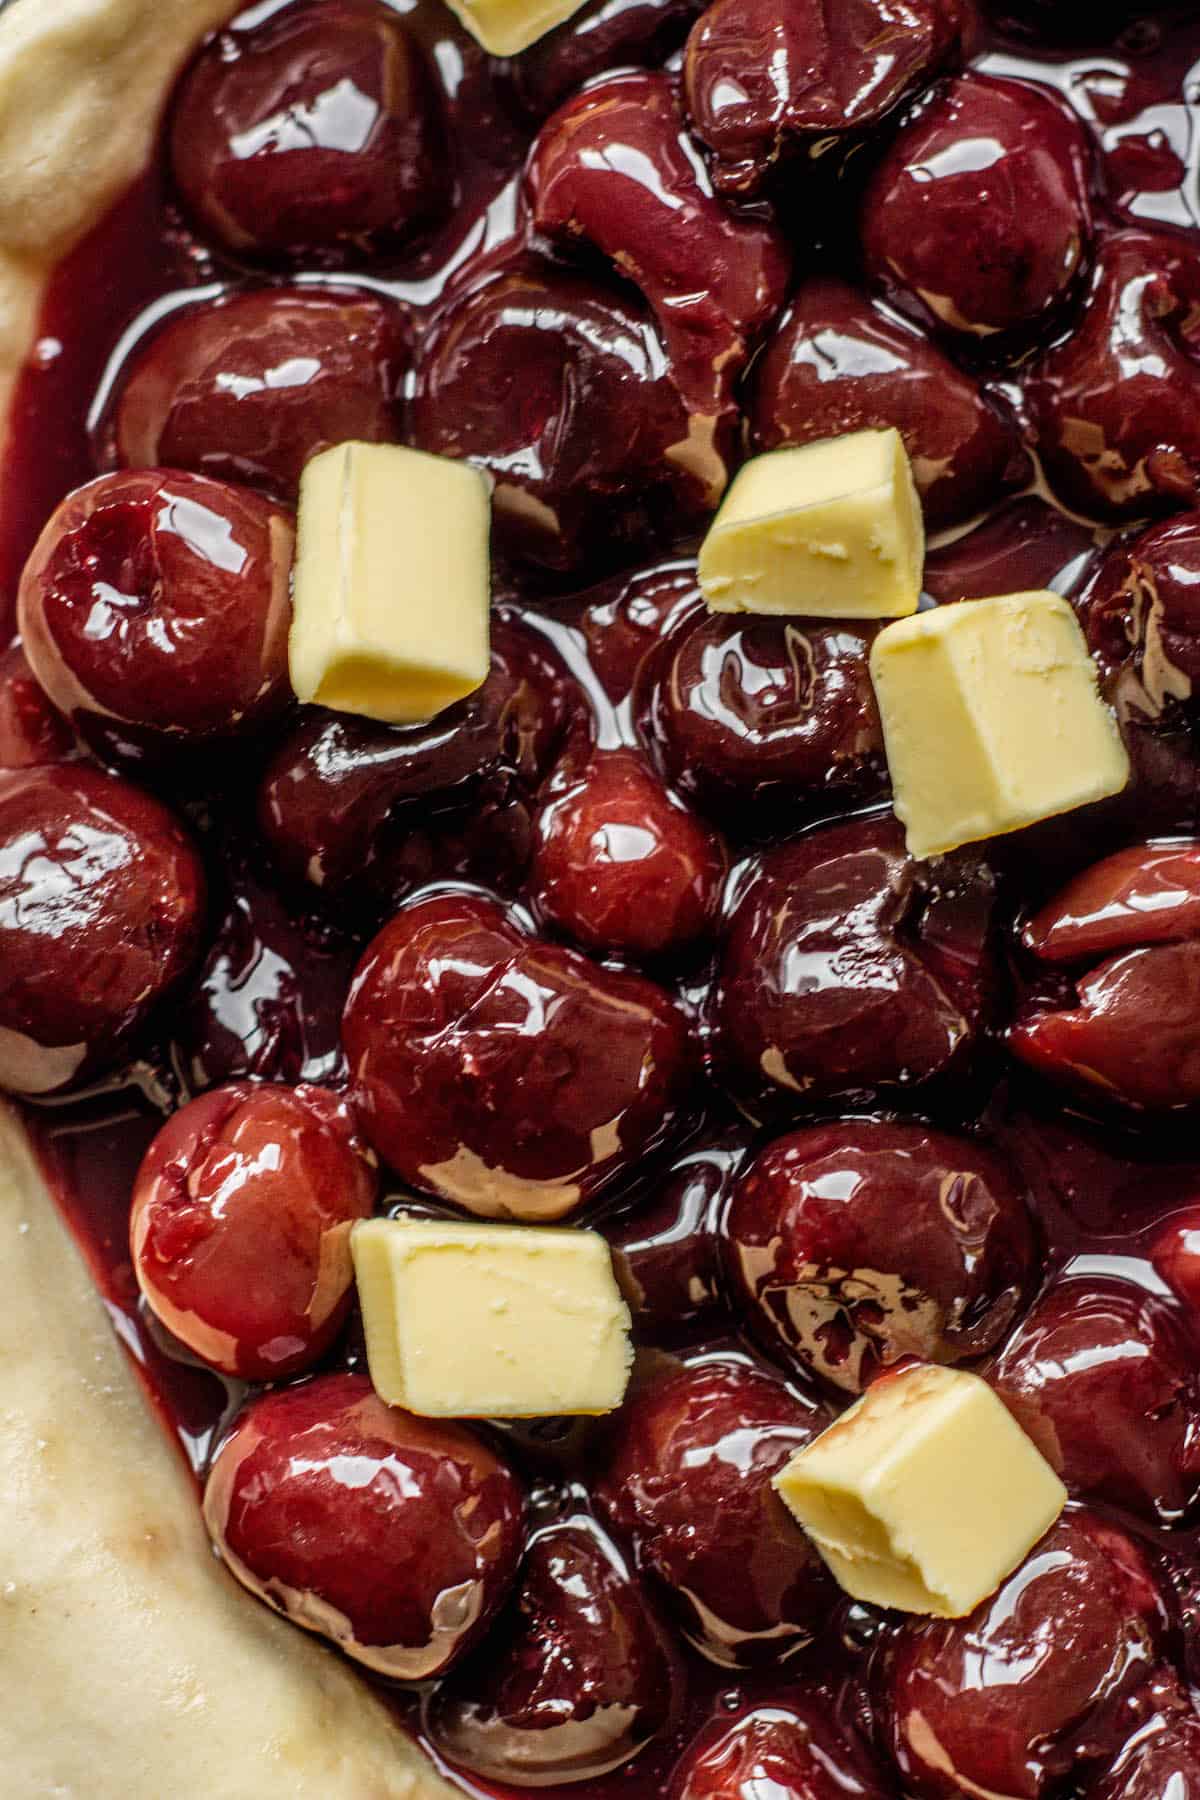
- Roll one dough disc into a 12-inch (30cm) circle and drape over a 9-inch pie dish. Pour in the cooled cherry filling and dot with small cubes of butter.
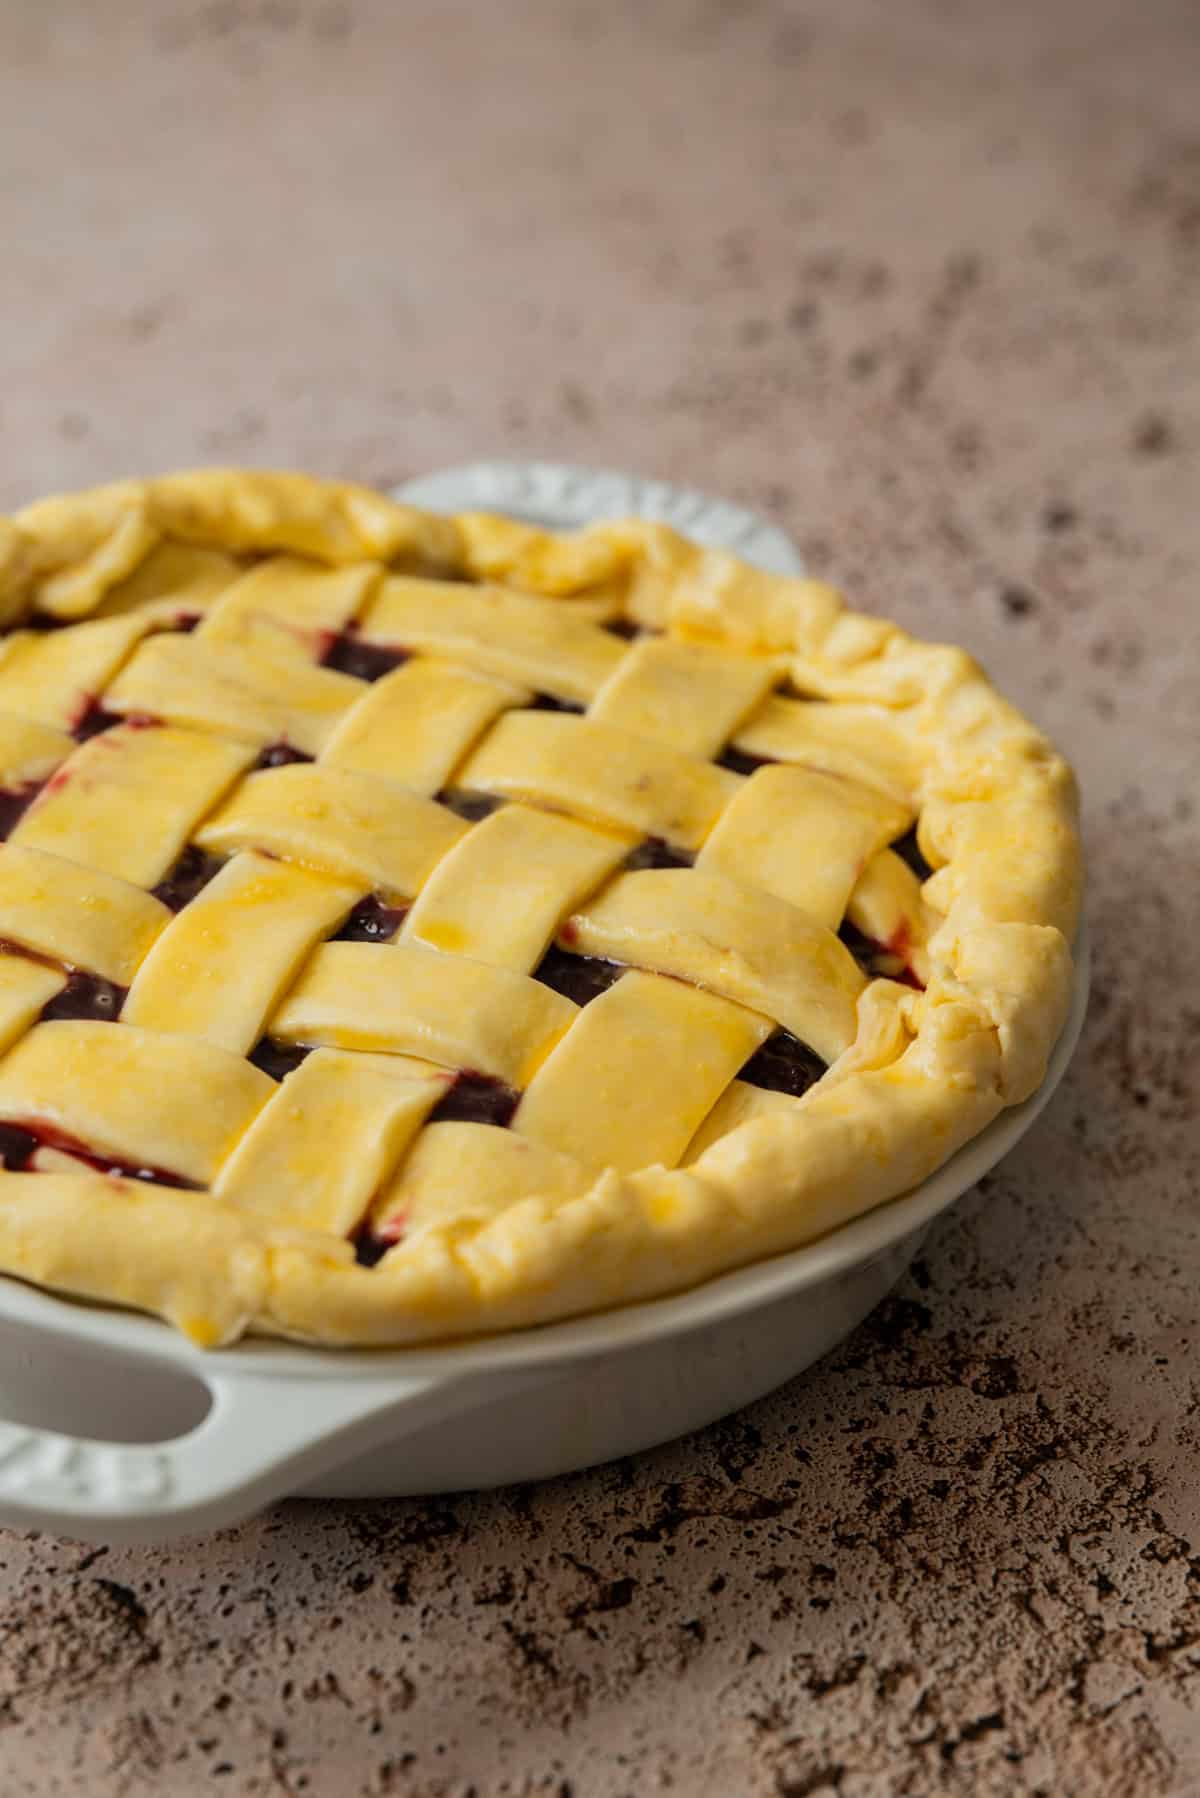
- Roll the second disc and lay over the top, either as a full crust with slits cut in, or cut into strips for a lattice. Trim the overhang, crimp the edges, and brush with egg wash.
Baking
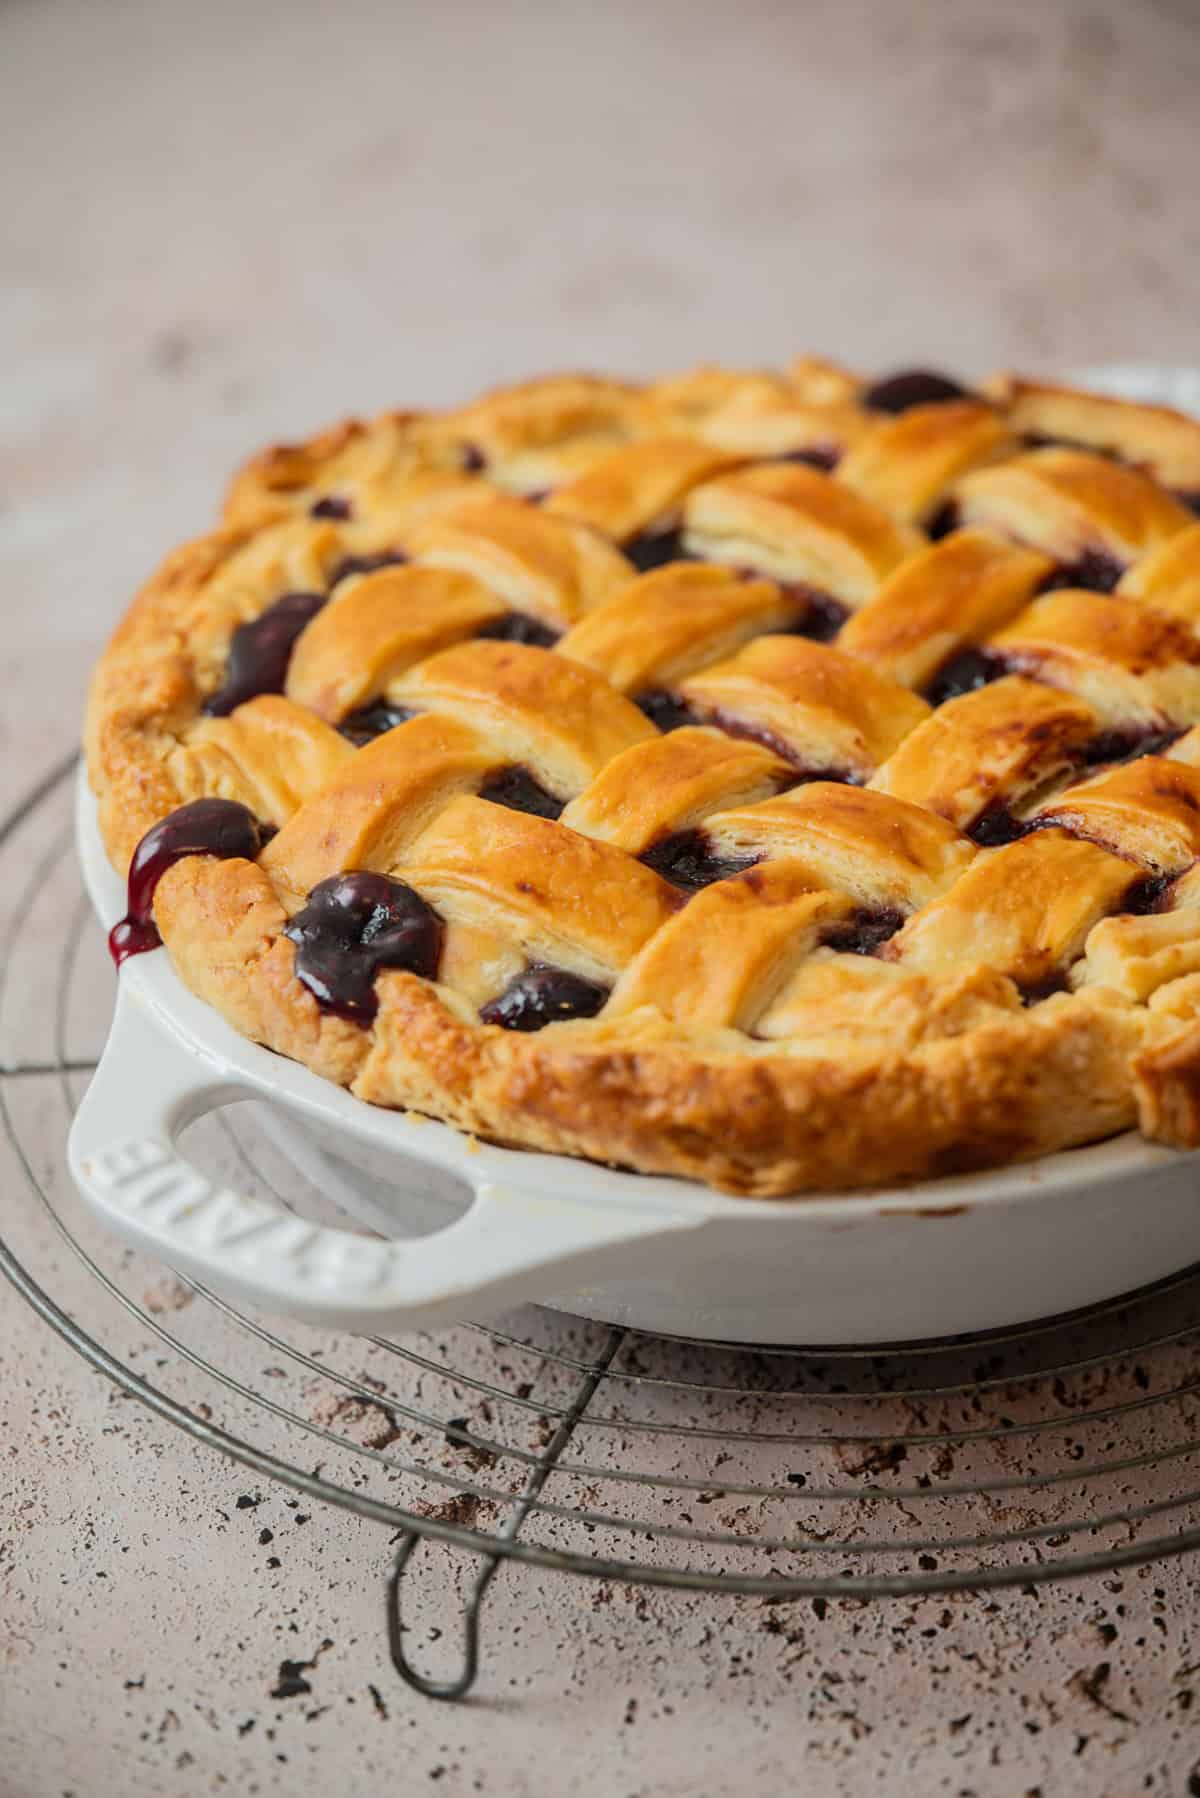
- Bake at 425°F (220°C) for 15 minutes, then reduce to 350°F (180°C) and bake for a further 60 minutes until the crust is deep golden brown and the filling is bubbling.
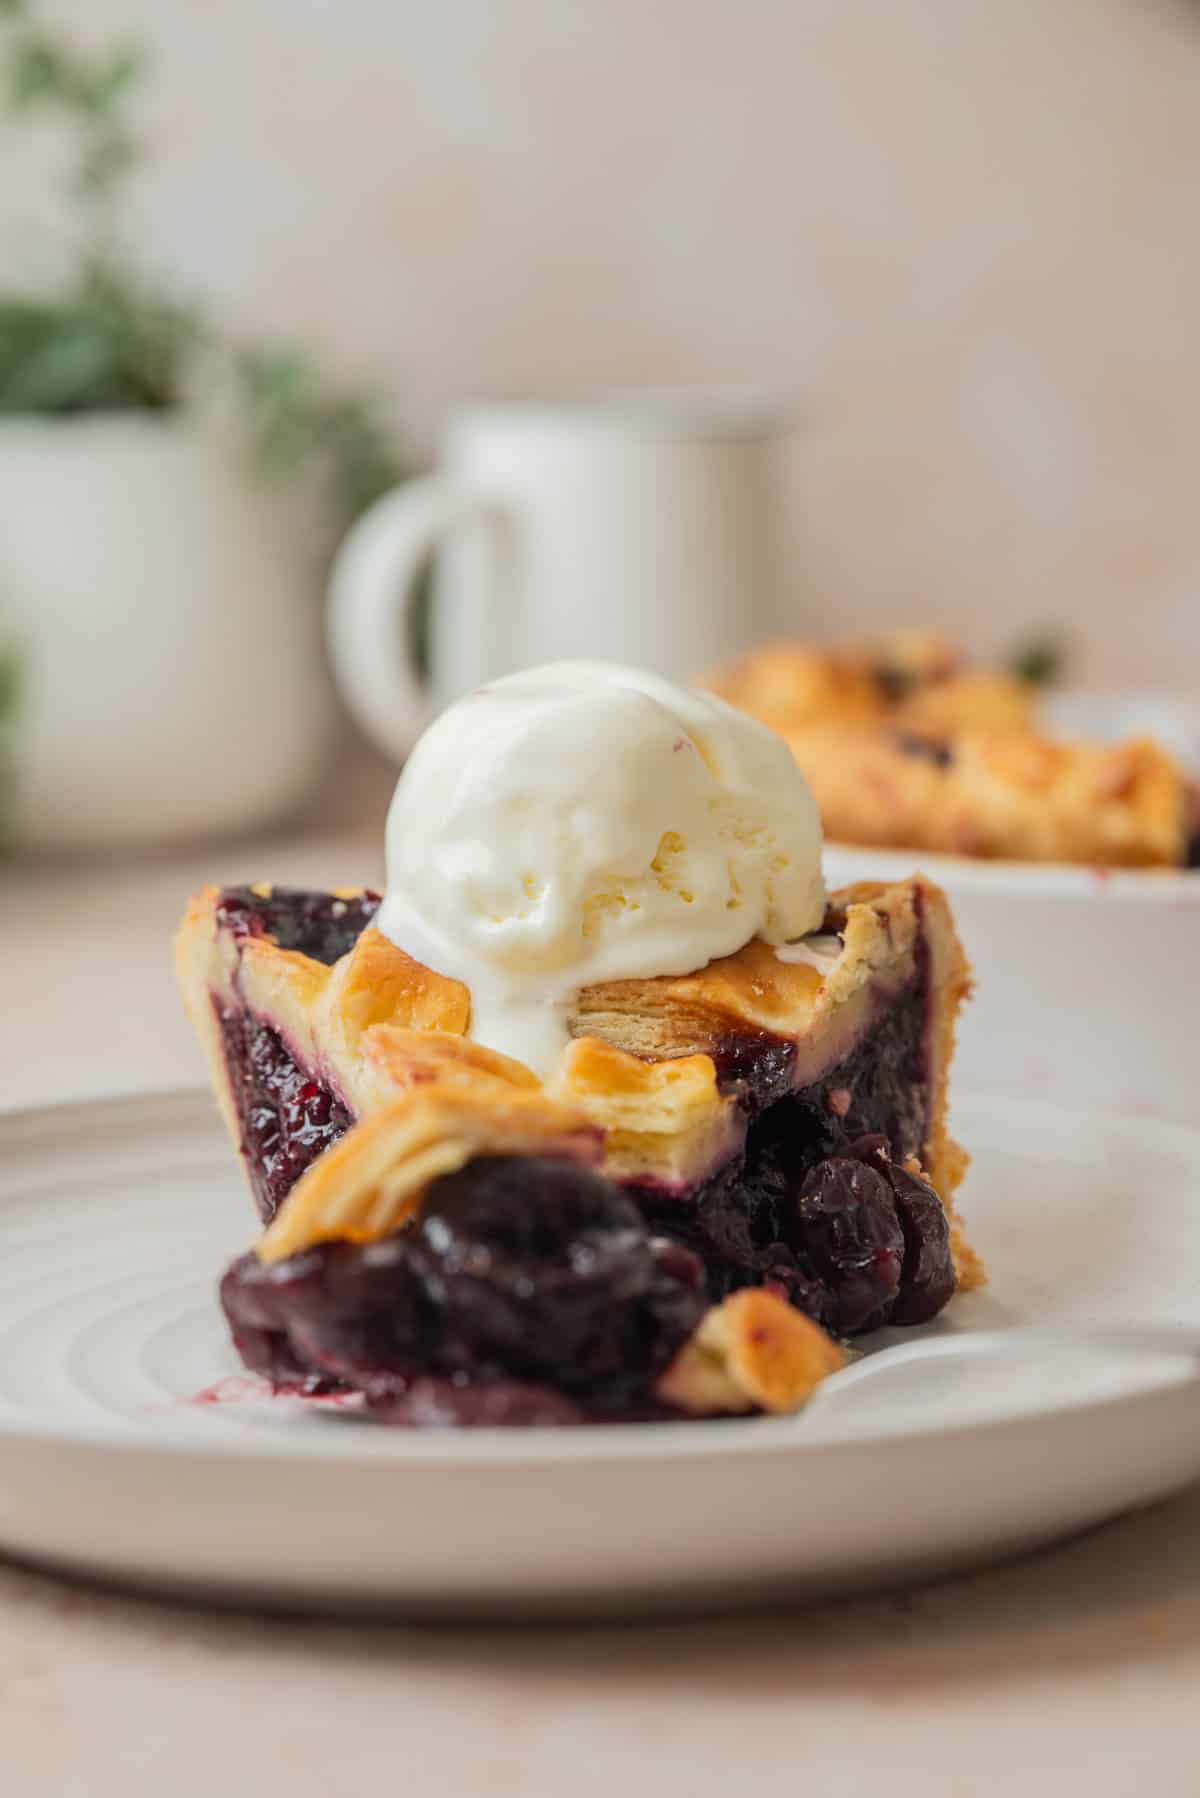
- Cool for at least 4 hours before slicing.
Tips
- Cool the filling completely before assembling. If the filling goes in warm, it softens the bottom crust and can lead to a soggy base so make it ahead of time if you can.
- Keep the butter cold throughout. If the dough starts feeling soft or greasy at any point, wrap it and put it back in the fridge for 20 minutes before continuing. Warm butter means dense, crumbly pastry rather than flaky layers.
- The fold is what makes it flaky. Rolling the dough into a rectangle and folding it in thirds creates distinct layers of butter in the dough. When the butter hits the hot oven, the steam pushes those layers apart. It only takes a minute and it’s worth doing.
- Don’t skip the high-heat start. The initial 15 minutes at 425°F (220°C) helps the bottom crust set quickly so it doesn’t go soggy from the filling. Dropping to 350°F (180°C) after that lets the filling bubble properly without burning the top.
- The crust is done when the filling bubbles. A pie that looks golden on top but isn’t bubbling at the edges isn’t done yet. You need to see those thick, lazy bubbles coming up through the vents or lattice gaps before pulling it out.
- Shield the edges if needed. If the crust edges are browning too fast, cover them loosely with foil or a pie shield while the filling finishes baking.
- Cool before cutting. I know it’s hard to wait, but cutting into a hot pie means the filling will run everywhere. Four hours at room temperature lets the cornstarch set fully. I actually like leaving the pie to set up overnight at room temp.
Storing
Cherry pie keeps covered at room temperature for up to 2 days. After that, refrigerate for up to a further 3 days. Warm individual slices in the microwave for about 30 seconds before serving.
The baked pie freezes well for up to 3 months. Wrap tightly and thaw overnight at room temperature. The filling can also be made up to 2 days ahead and kept covered in the refrigerator.
More pie and cherry recipes
You might like these too!
- Black Forest Ice Cream
- White Forest Cake
- Puff Pastry Cherry Galette
- Old-fashioned lemon pie
- Blackberry hand pies
Cherry Pie with Frozen Cherries
Ingredients
Pastry
- 312 g all-purpose flour
- 1 teaspoon sugar
- 3/4 teaspoon salt
- 225 g unsalted butter cold, cubed
- 120 g natural yogurt cold
- Ice-water as needed
Filling
- 1 kg dark cherries frozen
- 135 g granulated sugar
- 28 g cornstarch
- 1 Tablespoon lemon juice
- ½ teaspoon almond extract
- ½ teaspoon salt
- 28 g butter cut into small pieces
Egg wash
- Large egg + 1 tablespoon water whisked
Instructions
Make the crust
- Whisk the flour, salt, and sugar together in a large bowl. Add the cold cubed butter and use a pastry cutter or your fingertips to cut it in until the mixture resembles coarse crumbs with a few pea-sized pieces of butter remaining. 312 g all-purpose flour, 1 teaspoon sugar, 3/4 teaspoon salt, 225 g unsalted butter
- Add the yogurt and stir with a fork to bring the dough together. Add cold water a teaspoon at a time until the dough just holds together when pressed. It should not be sticky or wet. 120 g natural yogurt, Ice-water as needed
- Turn out onto a lightly floured surface and pat into a rough rectangle. Roll into a 10-inch (25cm) rectangle, fold in thirds like a letter, turn 90°, and roll and fold once more.
- Divide into two equal portions and shape each into a flat disc. Wrap tightly in plastic wrap and refrigerate for at least 2 hours or up to 2 days.
Make the filling
- Combine the frozen cherries, sugar, cornstarch, lemon juice, almond extract, and salt in a large saucepan. Stir to combine. 1 kg dark cherries, 135 g granulated sugar, 28 g cornstarch, 1 Tablespoon lemon juice, ½ teaspoon almond extract, ½ teaspoon salt
- Place over low heat and stir occasionally until the cherries release their liquid and start to thaw. Turn the heat to medium and continue stirring. Take care not to crush the cherries too much.
- Once the mixture starts to bubble, stir continuously for around 2 minutes until it turns thick and glossy and loses its cloudy appearance.
- Pour into a large bowl and leave to cool completely to room temperature before assembling. The filling can be made up to 2 days ahead and refrigerated.
Assemble and bake
- Preheat the oven to 425°F (220°C).
- On a lightly floured surface, roll one dough disc into a 12-inch (30cm) circle. Lightly dust the top with flour, roll it up onto the rolling pin, then unroll it over a 9-inch pie dish. Press it gently into the dish and let it overhang the edges.
- Spoon the cooled cherry filling into the crust and spread evenly. Dot the small cubes of butter over the top. 28 g butter
- Roll the second dough disc into a 12-inch (30cm) circle. Either lay it over the top as a full crust and cut a few vents, or cut it into strips for a lattice. Trim any excess, then fold the overhang under itself and crimp to seal.
- Whisk the egg and water together and brush over the top crust. Large egg + 1 tablespoon water
- Bake at 425°F (220°C) for 15 minutes, then reduce the oven to 350°F (180°C) and bake for a further 60 minutes until the crust is deep golden brown and the filling is visibly bubbling through the vents in thick slow bubbles. If the crust edges brown too quickly, cover them loosely with foil.
- Cool on a wire rack for at least 4 hours before slicing.
Doh! Forgot to mention when to add the yogurt. I completely made the dough without adding it.
So sorry about that Joy! Have updated that instruction step. If you used cold water instead the dough will fortunately still work. 🙂
Hey Ellen ,,l have made two cherry pies for Easter. I know l am suppose to cook the two uncooked pies from frozen and perhaps 10 to 15 minutes longer, but do l still keep the temperature the same 425 F for 15 min then turn down temp to 375 for at least 50 to 60 min , with them being frozen and uncooked an additional 10 to. 15 min
Hey yup I’d still do the initial high temp for 15 minutes ☺️
PERFECTION!!! Thank you Elien for this amazing cherry pie recipe! I followed the recipe as written and it’s truly perfect!
Thank you so much Cindy!!
Made the pie and totally forgot the butter! Will it be alright?
The butter in the filling I assume? That’s fine if you missed that 🙂 it just adds a bit of richness
When do you add the butter to the cherries?
Hey Shannon, it’s at step 3 of the Assembling steps :), Add the little pieces of butter on top of the cherries
The almond extract was a genius addition to this recipe, it blended beautifully with the cherry flavor. Dark black frozen cherries from Costco were perfect and when I weighed out the amount it was the perfect amount to fill a deep dish pie crust. I did use store bought pie crusts, I have tried and never enjoyed making them. Saving this recipe and will be making it again, I want to try the warm filling on a scoop of vanilla ice cream.
So happy you enjoyed the recipe Jim! 😀
Do you think I could make the filling on one day, refrigerate and then assemble and bake the pie later in the week? I am thinking this would work, but wonder what you think?
Hey yup that will work! The filling and crust can be made a couple of days in advance and be assembled later 🙂
Hi ,
My friend would like me to make her a cherry pie, but wants me to freeze it and she will bake it later. I’ve never done that! Wouldn’t that make the pie soggy? I would rather bake it for her , then freeze it.
Hey you can freeze the unbaked pie, it won’t go soggy. Don’t add the egg wash until baking time and when ready to bake, bake it from frozen, don’t defrost it first. It might need 10-15 minutes longer in the oven too 🙂
Can Greek yogurt be used? Also, is it necessary to refrigerate dough for two hours?
Yes to the yogurt, and ideally yes to the refrigeration too for extra flaky dough. You want to give the gluten in the dough time to rest and the butter enough time to chill again. If you can’t do 2 hours, I would still try to chill it as long as possible 🙂
Thanks for the speedy response!
My pastry remained very soft, even after chilling for three hours, where did I go wrong?
Hey are you by chance using a butter substitute? Three hours in the fridge with real butter shouldn’t leave a soft dough
Hi! Do you parbake the crust at all? If so, how long/what temperature?
Hey, I don’t par-bake this crust 🙂
Can I freeze the pie filling to be used at a later date?
Yes, you can but it may be a bit runny when thawed. Reheating it during baking until bubbling should help thicken it back up though
Can I use a sugar substitute such as monk fruit?
I’ve not tried that but I think that should be fine! 🙂
I’ve used turbinado (sugar in the raw) and agave sugar and both worked wonderfully.
Hi Elien, thank you for the lovely recipe! Looking forward to trying it out 🙂
Do you think it would work out fine if I fully made and assembled the pie one day and then kept it in the fridge overnight before baking the next day? Or would it be necessary to freeze instead so it doesn’t get soggy?
Thank you so much for your help!
Hey Sunny, I’ve not tried it either way but I think it might be okay to refrigerate it because the filling is precooked so it should release liquid into the crust the way that fresh fruit would
Thank you for this recipe. The flavor of the cherry filling was so delicious. I had to make the filling a day before and I thought I followed the recipe correctly but I found that the filling ended up like lumpy gelatin. I ended up pushing these lumps though a sieve to smooth out the sauce. It seemed to work. I baked the slab pie and it turned out great. As it cooled, the filling solidified again. It tasted great but the gelatinous feel of the sauce was not really what I had hoped for which was a filling that had substance but also a juicy. Next time should I use a different thickener? Or may use only 1/2 the amount of cornstarch? Or cook it longer? I’m not sure what will help to correct this. Thank you for you help.
Hey Susan, you could reduce the cornstarch next time, especially if you’re making a slab pie as you mentioned, which is larger and has a thinner layer of filling compared to a 9-inch pie dish that I use for this recipe since the filling is spread out more and less juicy. Some cornstarches are more refined, which can affect how quickly they thicken or how much you need to use, so I would play around with the amount and find find what works for you :). The filling does thicken more when cold, so you could also serve the pie slightly warm to have it be a bit runnier. Also, if the filling was a bit lumpy when cold, that’s normal and it would have loosened and spread out on its own in the oven as it baked. I would just give it a good stir before adding it to the pie.
Hi! I’m making this deep dish style and I’m wondering if I should double the recipe or maybe do a 1 and a half the recipe? The crusts are already made. Does par baking help with a soggy bottom?
Hi I’m 8 and I wanted to make a cherry pie for thanksgiving so so glad I chose this one 😍
So happy to read this! 😀 Thanks for choosing this recipe
We loved the flaky crust and delicious filling.
There was a lot of ice in the cherries when I made it, it was nice and congealed when I brought it together on the stovetop, however, the filling got very runny when I cut into it. What would you recommend for making this in the future?
I’m looking forward to making more of your recipes?
I think try adding an extra tablespoon of cornstarch to the filling. Your cherries may be juicier than mine. I’m so glad you enjoyed the pie! 🙂
This was hands down the best pie crust I’ve ever made. The lamination came out perfectly. I found this recipe just googling. Thank you for this!
Thank you so much for your lovely comment Emma! So happy you loved it!
I’m out of plain yogurt. Can I substitute the yogurt with sour cream?
Yes you can, it will make a richer pie crust than the yogurt 🙂
Muy delicioso! I just made it for valentines day and my family loved it.
I cut a bunch of hearts with a cookie cutter and used that for the top crust, it turned out very cute.
gracias!
So happy you loved it! Thanks so much for making it!
Should it work to use phyllo dough and make “hand pies?”
Do you thaw and drain the frozen cherries first?
No, you’ll heat the frozen cherries )
wish you could make this in spoons and cups
Hey Mary, I have provided US customary measurements as well as metric, you can use the toggle on the recipe card to switch between the two 🙂
Is the pie pan supposed to be buttered before the pie dough is added?
No it doesn’t need to be 🙂