
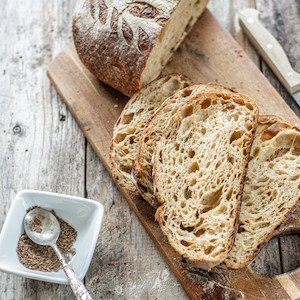
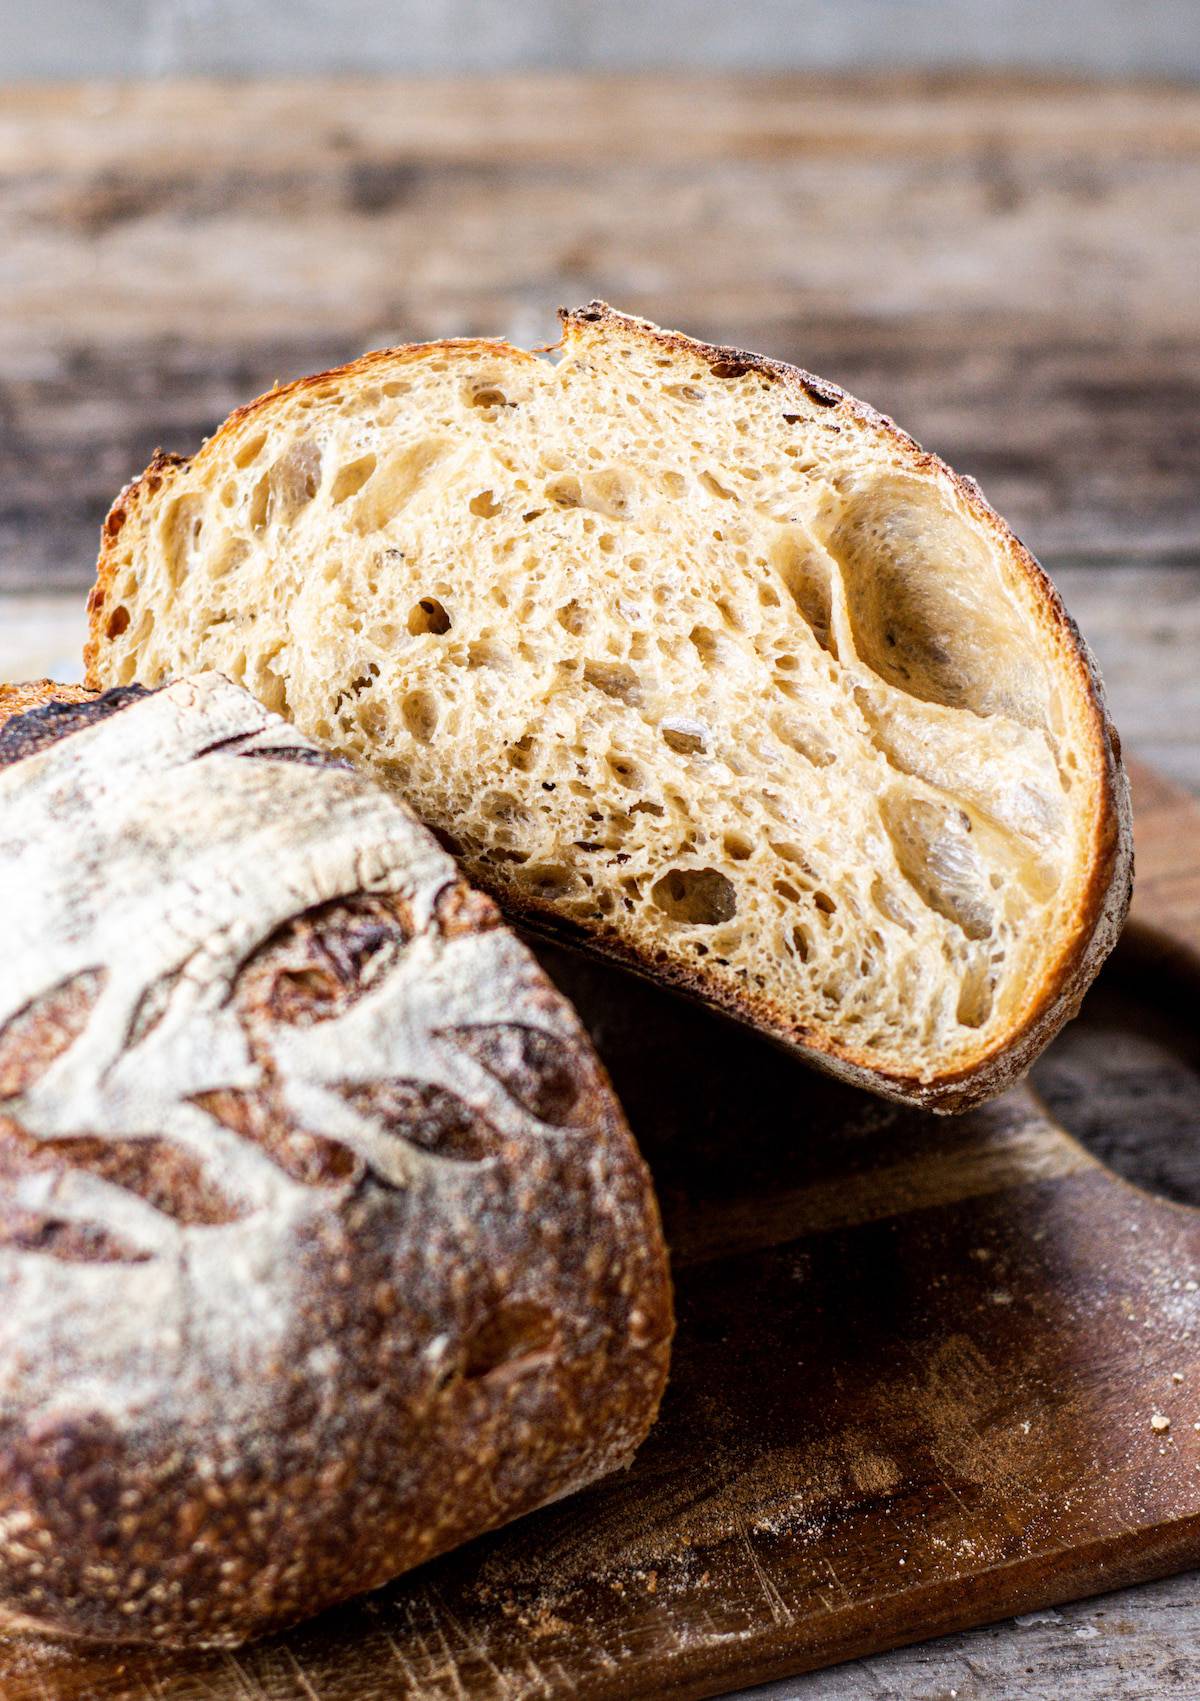
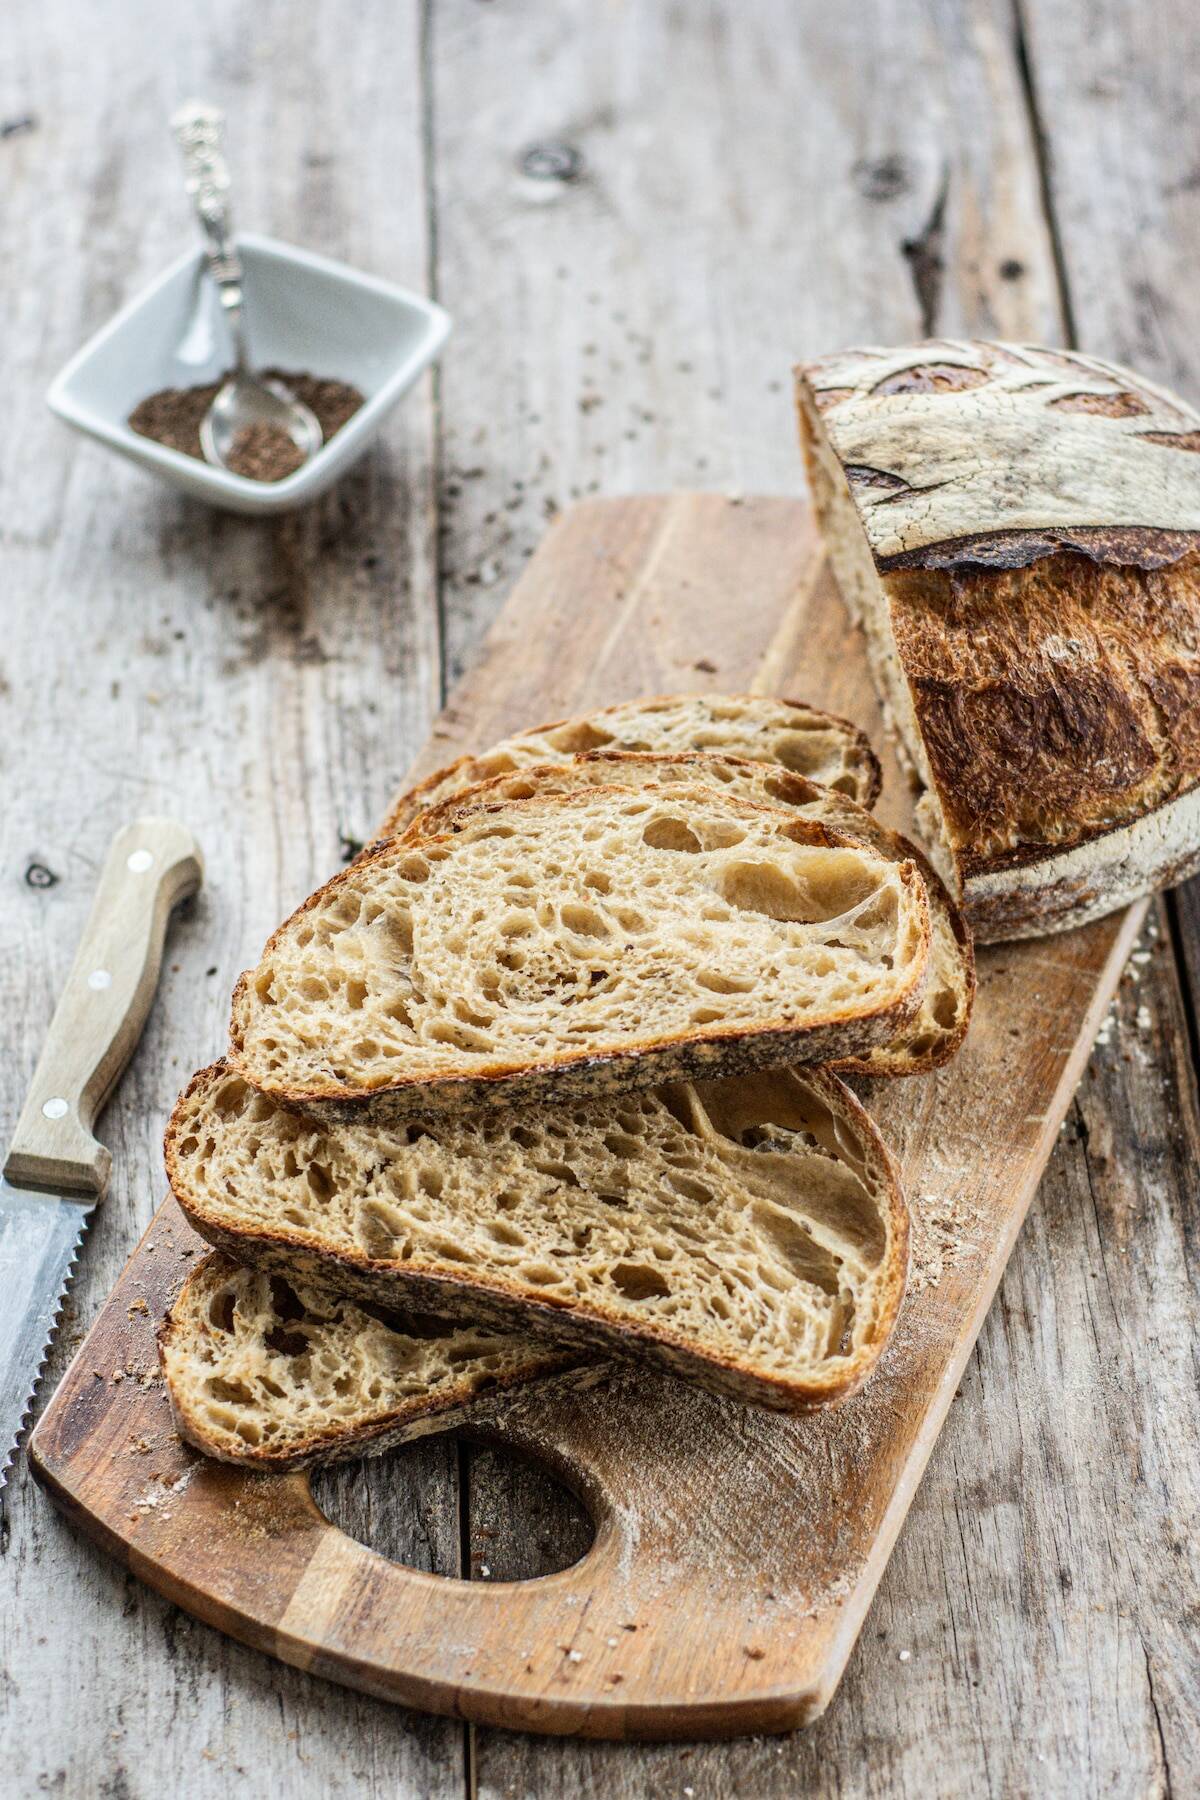
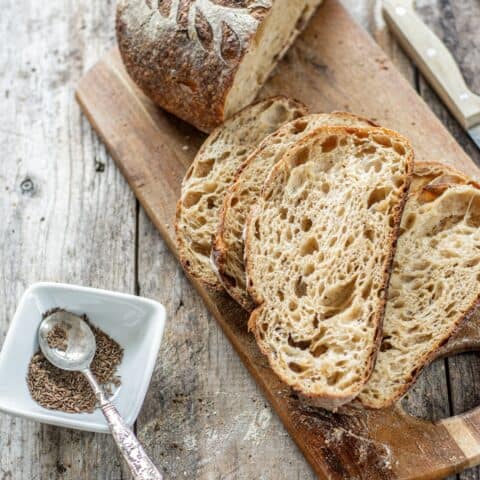
Sourdough Bread with Caraway Seeds and Molasses
A sourdough bread loaf with caraway seeds and blackstrap molasses. It’s soft and flavorful. Caraway seeds make this sourdough loaf extra special. Their flavor is citrusy, a little spicy, and with a hint of licorice.
The dough in this recipe is folded using a simple coil-fold technique.

The starter
To make this sourdough loaf, you need an active sourdough starter. If you don’t have one, learn to make your own sourdough starter.
If you do have one, keep feeding and discarding regularly to keep the acid content in the starter low. Too much acid can affect the structure of the bread.
Any ‘discard’ starter can be saved up and used in delicious sourdough discard recipes like sourdough banana bread, sourdough chocolate cake, or sourdough pancakes.

The flour
Use bread flour for this recipe, or a strong all-purpose flour with at least 11% protein. This will allow you to create a good dough structure.
This caraway and molasses sourdough dough is pretty sticky, with hydration of around 73%. Strong bread flour and a good sourdough starter can easily handle this amount of water.
Through coil-folding, the structure will be built up in the dough and it will go from a sticky shaggy dough to a stretchy and smooth elastic dough.
Caraway seeds and molasses
This sourdough bread with caraway seeds and molasses has the addition of whole caraway seeds and blackstrap molasses for the ultimate flavor.
Caraway seeds are very strong so you don’t need many, but it’s a real treat chewing on a little pop of bright citrus flavor throughout the bread.
There are many types of molasses available but in this bread, blackstrap molasses is used.
Blackstrap molasses is the strongest in flavor as it has been boiled three times. This is perfect for this loaf as it means you don’t need to add too much (and make it too sweet), and it still brings flavor.
The equipment
A dutch oven is needed to bake this bread properly and a cast-iron one is best as they hold heat very well.
Baking sourdough in a dutch oven is one of the most important pieces of equipment as the steam it traps during the baking stage allows the sourdough to rise to its full potential before the crust forms.
If you have no dutch oven, you can bake the bread on an oven tray instead and use ice cubes or cold water to create steam. It will be better, but it will still work.
Other handy tools are –
- Kitchen scale
- Banneton basket
- Dough scraper
- Razor blades or a sharp knife to score the dough
Baker’s schedule
This is a high-level overview and example of the timing of what goes into the process of the sourdough bread schedule.
These exact times of day can be adjusted to suit your own schedule.
- 8 am – Feed your starter
- 12 pm – Mix the water, molasses and flour (this is called an autolyze)
- 1 pm- Add the starter to the dough
- 1.30- 4:30 pm – Fold every 30mins for 3 hours (6 total)
- 4:30– Bulk ferment
- 8:30 pm – Shaping and fridge proof overnight
- The next morning – bake
Step-by-step instructions
Step 1 – Feed your starter.
Leave it to rise in a warm place for 4-6 hours to double or triple (but not collapse). A temperature between 69-77°F (21-25 °C) is best.
Note: The starter amounts in the recipe card below will make a bit more than is needed for the dough. This is so that any leftover starter not needed can be fed again and stored in the refrigerator for the next time.
Step 2 – the autolyze.
An autolyze is when flour and water are mixed together and the flour is left for a period of time to hydrate. An autolyze hydrates the gluten and helps to create an elastic dough.
Start this at least 30 minutes before your starter is ready to use, but up to a few hours in advance.
In a large bowl, combine the molasses and water and mix it well. Add in the flour and mix it together into a rough dough. Ensure all the dough has been wet through. Let it rest.
Cover the bowl with a damp tea towel to stop the dough from drying out.
Step 3: add starter, caraway seeds, and salt
Add in the doubled starter, caraway seeds, and salt. Use wet hands to squish it all together until well combined. It’s a bit messy and sticky but working quickly helps.
Tip this sticky dough into a baking dish or tray and let it rest for 30 minutes before starting the coil-folding.
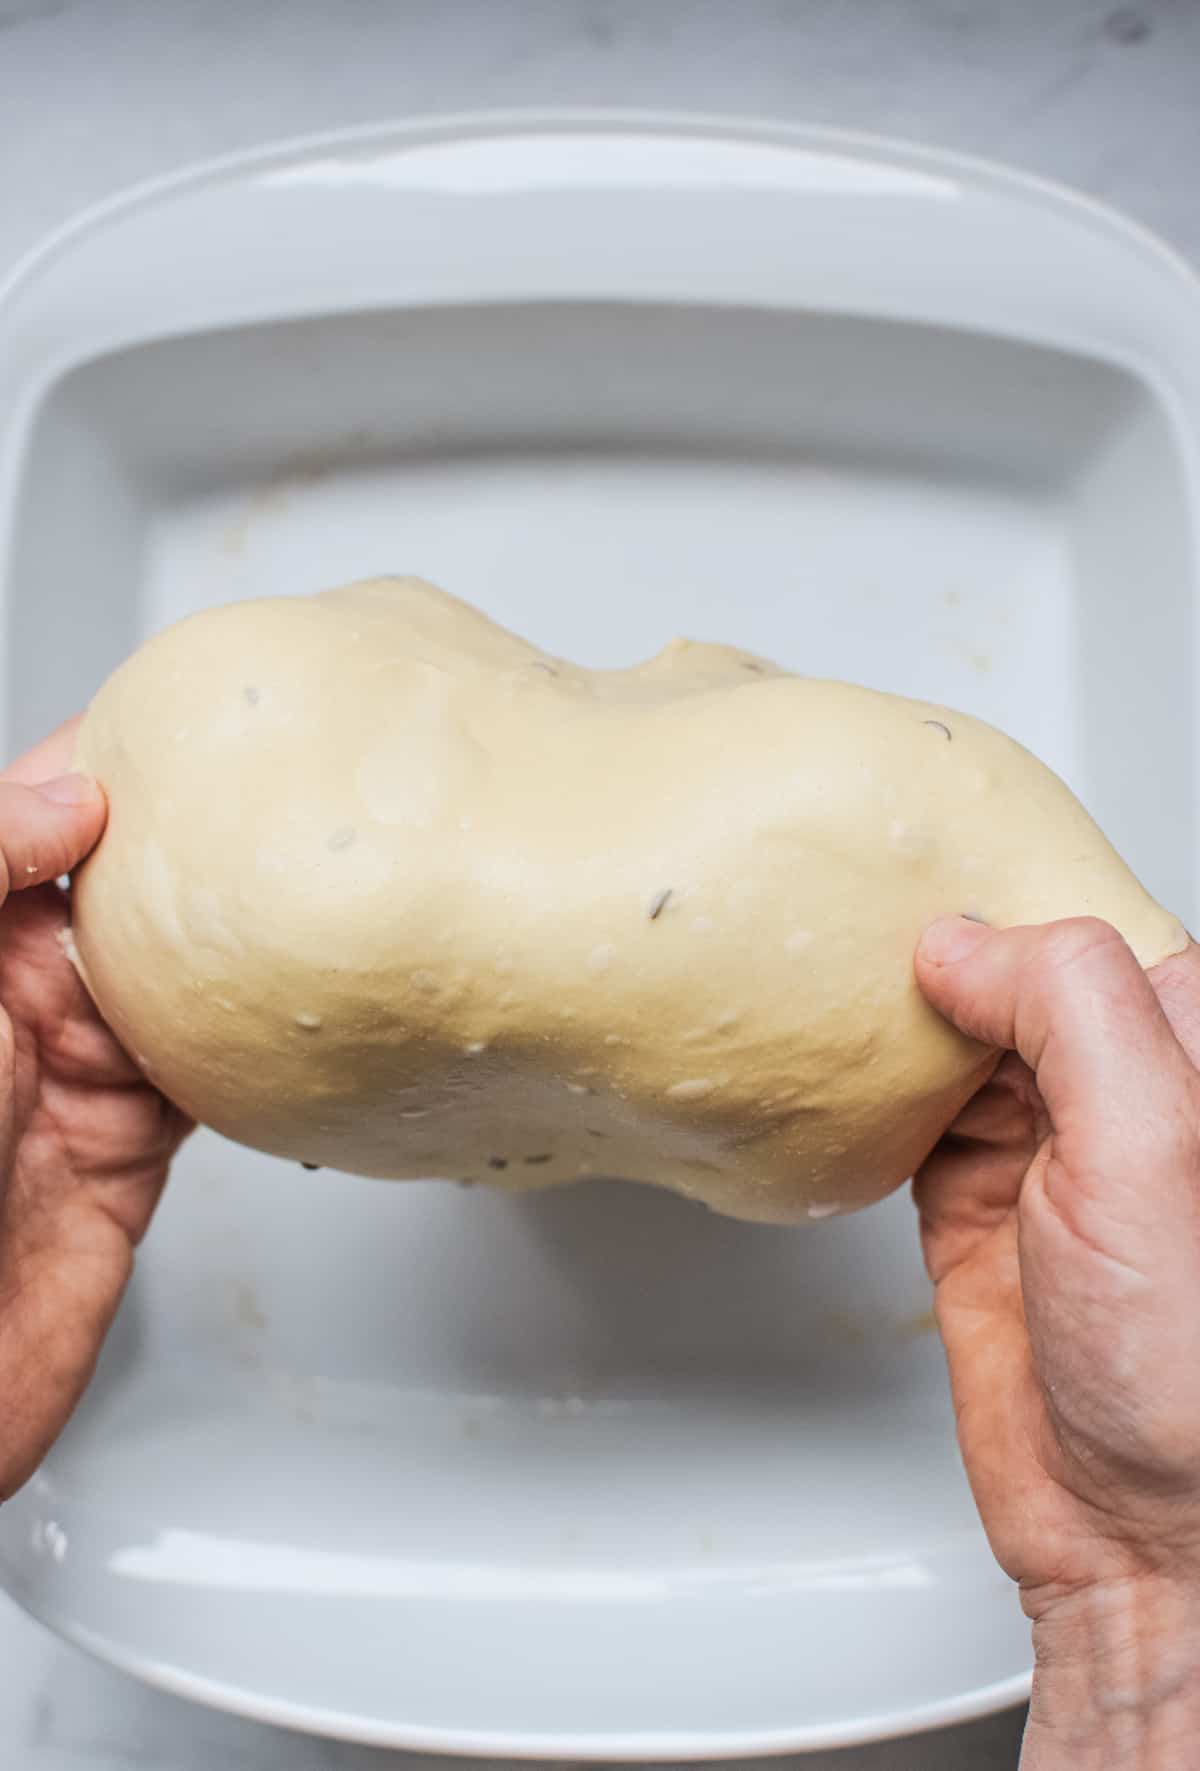
Step 4 – coil folding
Using wet hands, coax the sides of the dough up with your fingers and lift it up from the middle and back onto itself. See the video below for a demonstration.
Turn the dough and repeat on all sides, until it forms a ball. If the dough sticks too much to your hands, wet them again.
Repeat this every 30 minutes for three hours. If you would rather do regular stretch and folds instead of coil folding, go for it!
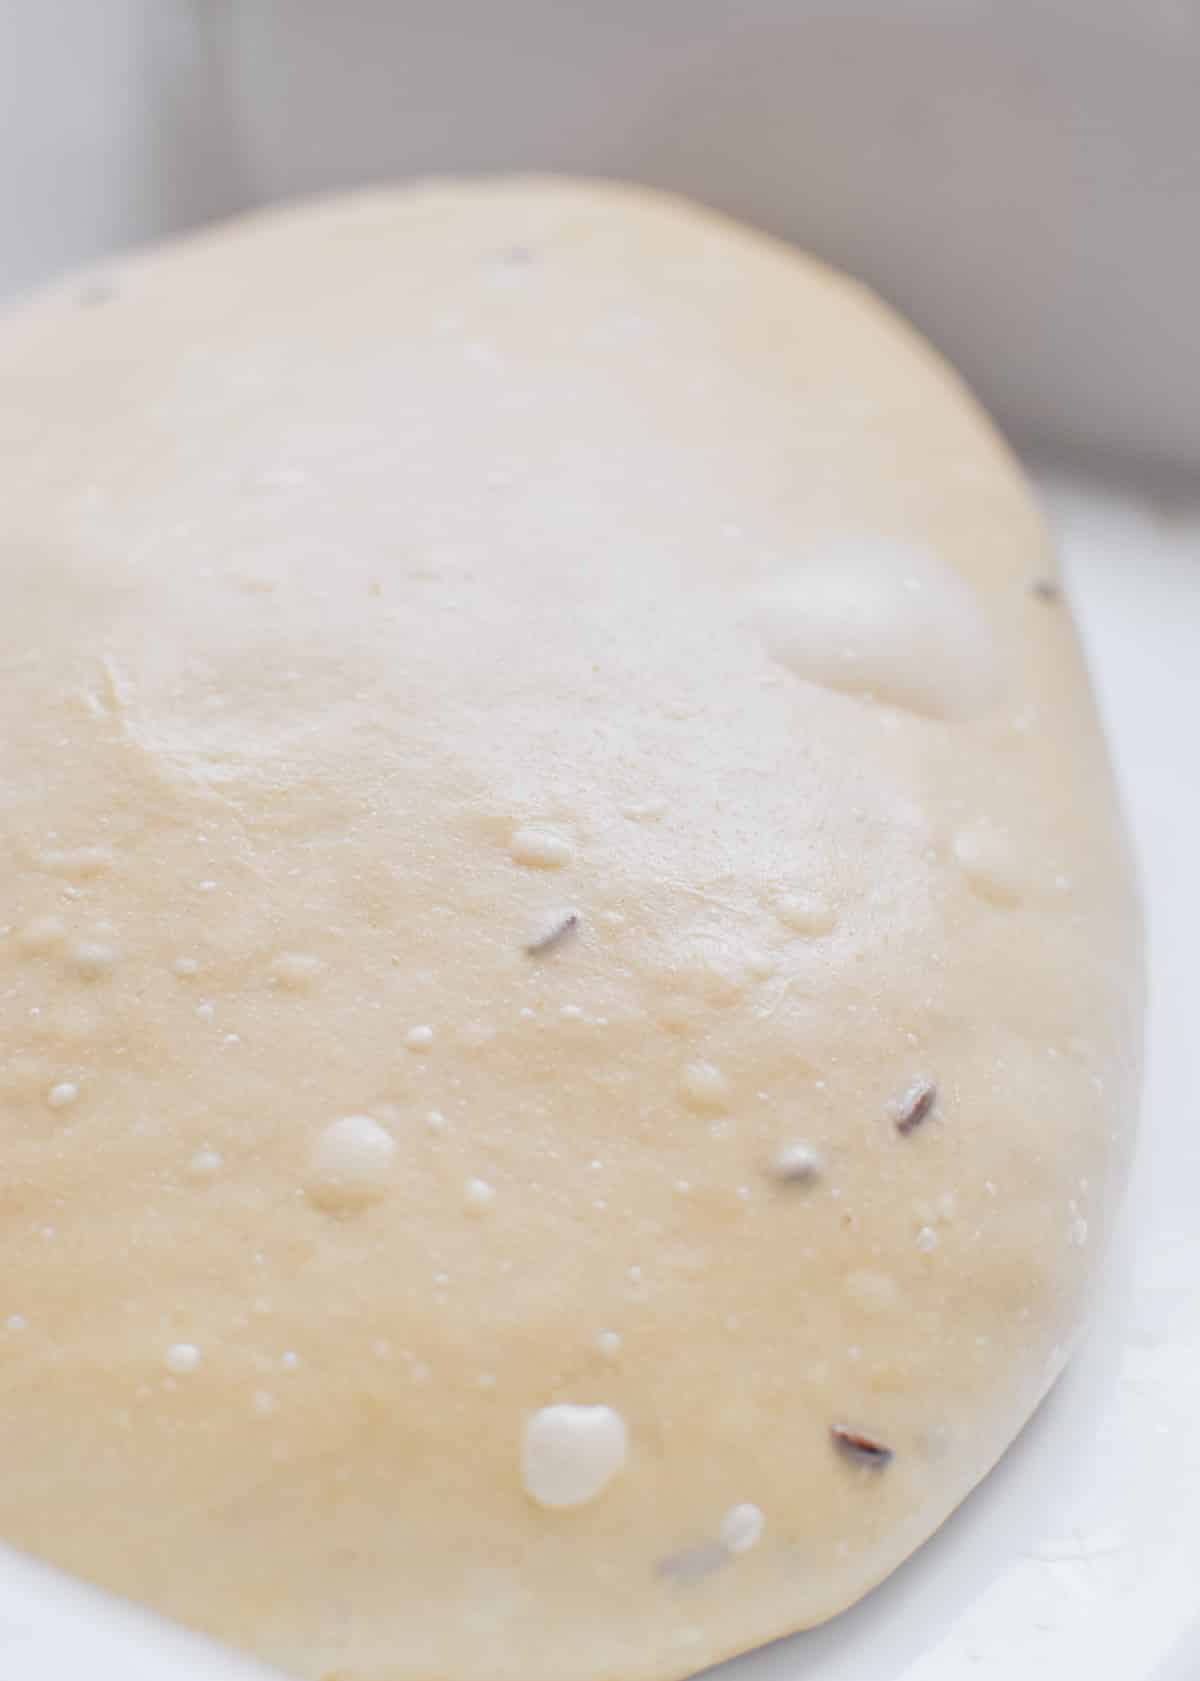
Initially, the dough will be very sticky and wet but after a few folds, it will hold together more and become elastic. If your starter was in a good condition and not collapsed or too acidic, you will easily feel improvement as the folds go on.
If you’ve ever made sourdough and found the dough becomes sloppy and unworkable during the folding and shaping stages, check your starter. It’s likely too acidic.
Keeping your starter refreshed regularly, using a small amount of seed starter each time can keep the acid load low.
Step 5 – Bulk fermentation
After the folding comes one of the most important steps of sourdough – the bulk ferment.
This step decides whether you achieve a light and open crumb or a dense and gummy sourdough.
The bulk ferment needs to be long enough for your to bulk out by 50%. It doesn’t mean it doubles, but it needs to fill out by half the amount and look much puffier.
How long this takes greatly depends on the warmth of your room. You can create a warm spot by gently preheating, then turning off the oven and placing the dough in there. Keeping the oven light on can make it a little warmer too.
Watch the dough and not the clock. It is normal for your dough to stretch back out and fill the dish again, but it should feel bouncier and fuller.
Top tip – take a photo of your dough at the start and end of the bulk ferment to see the difference.
Under fermented and over fermented dough
An under-fermented bread will be dense, may seem undercooked, or have a very thick and chewy crust.
Both a lack of bulk fermentation and a not optimal starter can be the cause of an under-fermented dough.
At the opposite end, if your dough starts rising too much you risk over-proofing and it will weaken the gluten structure you’ve built up. This will result in a collapsed dough.
Bulk ferment timing really varies depending on the warmth of your room. You will learn to gauge this better with practice.
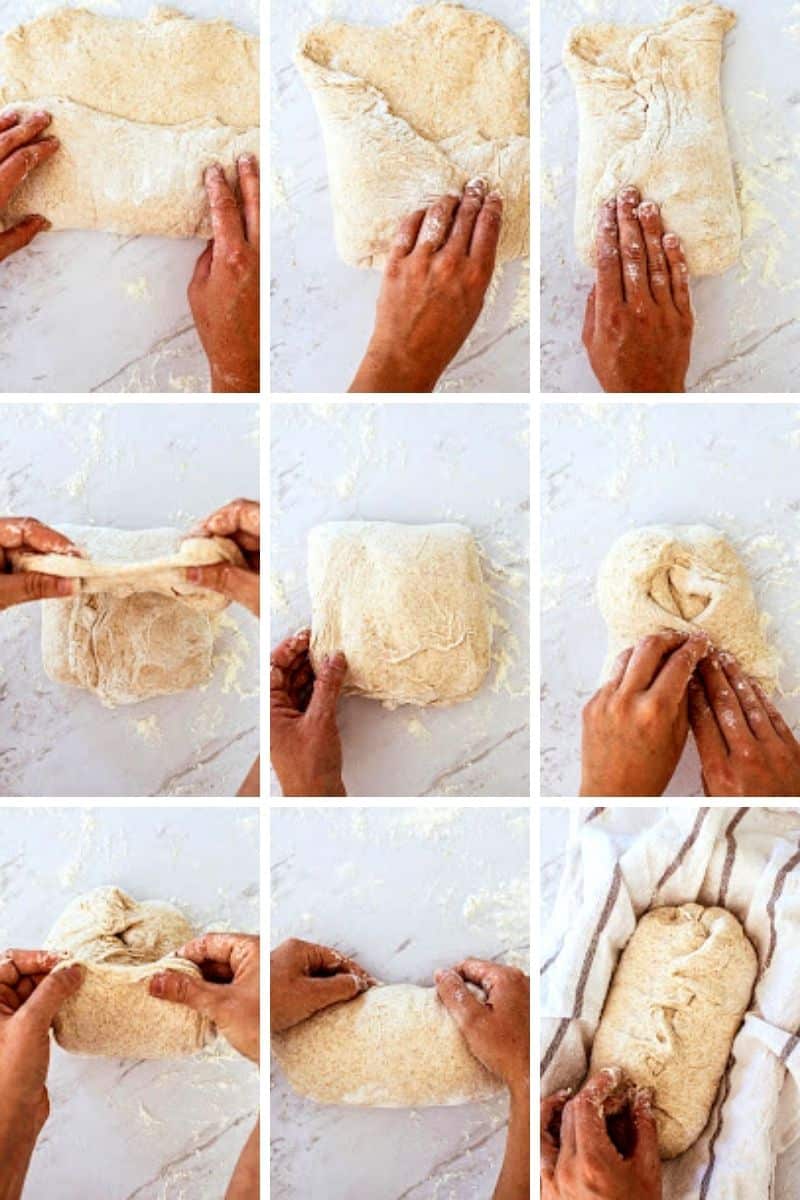
Step 6 – shaping
Shape the dough and place it in a towel-lined, well-floured banneton basket or bowl. This will help the dough keep its shape.
- Tip your dough out on to floured work surface and gently form it into a rectangle.
- Take the bottom third of the dough and fold it up so it meets the middle. Take the right side of the dough and fold it to meet the middle, then do the same with the left side.
- Bring the top third of the dough down to meet the bottom. Now you have a sort of ball shape.
- Stitch this ball together by grabbing a little bit of dough from the top left and a little from the top right and bringing them together to meet in the middle.
- Carry on doing this down the length of the dough. When you get to the bottom, grab a flap of dough and carry it up over the top of the stitched dough to meet at the top. This will again create a sort of ball.
- Gently grab this ball and roll it gently towards you on the bench. This will create some surface tension. All the while, take care not to de-gas your dough too much.
Place in the floured bowl or basket, smooth side down.
Step 7 – cold proof
Cover with a floured tea towel and place in the refrigerator for 8-20 hours. This is when the flavor develops in the bread.
Step 8 – baking
Preheat the oven to 450°F/230°C as well as the cast-iron dutch oven. Let them preheat for at least 30 minutes until very hot.
If you have no dutch oven, you can preheat an oven tray instead and later add ice cubes or water for steam.
Once hot, remove the dutch oven from the oven and flour the bottom pan well. Remove the sourdough loaf from the fridge and gently tip it into the pan so the smooth side of the loaf is showing.
Use a razor blade or sharp knife to score gashes into the loaf. This gives the steam a place to escape from when the bread bakes.
Add on the lid of the dutch oven and place it in the oven. Bake covered for around 20 minutes.
Remove the lid then bake uncovered for a further 15-20 minutes until browned to your liking.
Let the loaf cool for 2 hours before slicing.
Related recipes
Sourdough Bread with Caraway Seeds and Molasses
Ingredients
Active Starter*
- 25 g starter
- 50 g flour
- 50 g water
Bread
- 280 g water
- 1 1/2 Tbsp molasses
- 400 g bread flour or a strong all-purpose flour with at least 11% protein
- 80 g active starter
- 1 1/2 tsp salt
- 3/4 tsp caraway seeds
Instructions
- Mix together the starter ingredients and tip into a clean jar. Leave it to rise in a warm place for 4-6 hours to at least double (but not collapse).
- When the starter has been rising for around 3-4 hours – in a large bowl, combine the molasses and water and mix it well. Add in the flour and mix it together into a rough dough. Ensure all the dough has been wet through. Cover the bowl with a damp tea towel and let the dough rest.
- Once the starter has doubled, add it to the dough along with the caraway seeds and salt. Use wet hands to squish it all together until well combined. It's a bit messy and sticky but working quickly helps.
- Tip this sticky dough into a baking dish or tray and let it rest for 30 minutes before starting the coil-folding.
- Coil folding – Using wet hands, coax the sides of the dough up with your fingers and lift it up from the middle and back onto itself. See the video below for a demonstration. Turn the dough and repeat on all sides, until it forms a ball. If the dough sticks too much to your hands, wet them again.
- Repeat this every 30 minutes for three hours.
Bulk ferment
- Let the dough rest in a warm spot until bulked out by 50%. It should look a lot puffier. How long this takes greatly depends on the warmth of your room. You can create a warm spot by gently preheating, then turning off the oven and placing the dough in there. Keeping the oven light on can make it a little warmer too.
- Line a banneton basket or bowl with a towel and flour it well.
Shaping the dough (see photos in post)
- Tip your dough out on to floured work surface and gently form it into a rectangle. Take care at this shaping stage to not squash the dough too much and lose all the gases that have been forming.
- Take the bottom third of the dough and fold it up so it meets the middle. Take the right side of the dough and fold it to meet the middle, then do the same with the left side.
- Bring the top third of the dough down to meet the bottom. Now you have a sort of ball shape.
- Stitch this ball together by grabbing a little bit of dough from the top left and a little from the top right and bring them together to meet in the middle.
- Carry on doing this down the length of the dough. When you get to the bottom, grab a flap of dough and carry it up over the top of the stitched dough to meet at the top. This will again create a sort of ball.
- Gently grab this ball and roll it gently towards you on the bench. This will create some surface tension. All the while, take care not to de-gas your dough too much.
- Place in the floured bowl or basket, smooth side down.
- Cover with a floured tea towel and place in the refrigerator for 8-24 hours. This is when the flavor develops in the bread.
Baking
- Preheat the oven to 450°F/230°C as well as the cast-iron dutch oven. Let them preheat for at least 30 minutes until very hot. If you have no dutch oven, you can preheat an oven tray instead and later add ice cubes or water for steam.
- Once hot, remove the dutch oven from the oven and flour the bottom pan well. Remove the sourdough loaf from the fridge and gently tip it into the pan so the smooth side of the loaf is showing.
- Use a razor blade or sharp knife to score gashes into the loaf. This gives the steam a place to escape from when the bread bakes.
- Add on the lid of the dutch oven and place it in the oven. Bake covered for around 20 minutes.
- Remove the lid then bake uncovered for a further 15-20 minutes until browned to your liking.
- Let the loaf cool for 2 hours before slicing.


I am new to baking bread with a sourdough starter. One issue I was having was timing the ‘proofing’ and baking. With an early morning schedule and divided ‘weekend days’ I was struggling to get bread into the oven. Finding you website has been wonderful. Thank you for putting out this timing. I could not see it, buy you brought it all together. Watching so many videos and YouTubes, I was getting discouraged. You have brought back my interest to make homemade – good and healthy bread.
Oh thank you so much Dawn!! That was such a lovely comment to read :). I’m so pleased you enjoyed the recipe
I was having similar issue on timing. You demystified. Thank you!
Hi there! I think I am going to start this today for my very first sourdough loaf ever. I have a cast iron pot, but it isn’t very large. I am curious what size cast iron pot can be used or if I should try to split this into two loaves?
Thank you!
Christa
Hey Christa, sorry for the late reply! My pan is 10 inches. The size you need would depend a bit on how big the banneton basket is too.
Could you clarify the starter, please. It lists the starter ingredients. Then it lists adding in 84 grams of starter. Do you use all the starter and then an additional 84 grams of additional starter? Thank you! It sounds lovely and can’t wait to try it
Sorry it is written confusingly! From the 20:50:50 starter feeding, measure out 80g of that to put in the bread 🙂
I have been baking and eating only sourdough bread the past two years. Discovered this recipe about 15 months ago. Ever since, it is the loaf that gets the most enthusiastic praise from those I have shared it with. “You could sell this!” is a common compliment. I have a four loaf batch in the coiling stage as I type. In the morning, the aromas will have us drawing in deep breaths. Five star rating! Give this recipe a try, I bet you won’t regret!
Thank you so much Peter, I’m so happy you love it! 😀
Made this today. Lovely moist and tasty loaf. Plenty of complements – will definitely be making again. Thank you for the recipe
If you double the recipe how long do you bake with the lid on and off?
I made this bread last week and again today. Absolutely divine. The carraway reminds me of childhood in my Hungarian mothers kitchen. This ones a keeper.
So happy you love it, Catherine!!
I love that you added the timing for the process. Really appreciate that for those of us who are newbie sourdough bakers. I’m contemplating buying rye flour. How do you think this would taste as my bread flour and can I add the same amount you listed? I’m craving a strong rye bread with caraway seeds. Thanks for your input!
Hey, you can swap some of the bread flour for rye, but I would not do all of it because rye doesn’t have much gluten. I would start with replacing about 20% of the flour with rye. You will also need a little more water since rye absorbs more, so add a splash extra if the dough feels stiff. 🙂
Thank you! I’ll give it a try and report back 😉