
Sourdough Ciabatta Sandwich Rolls
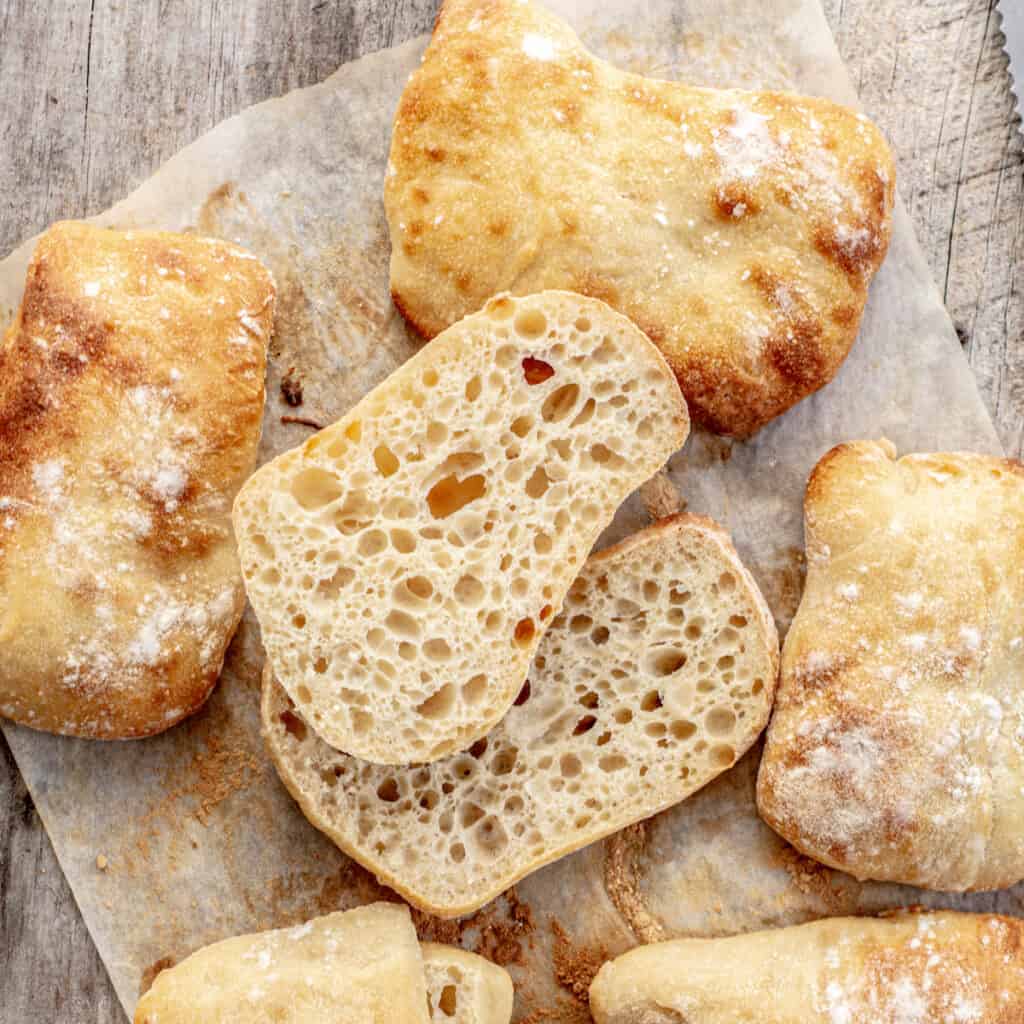
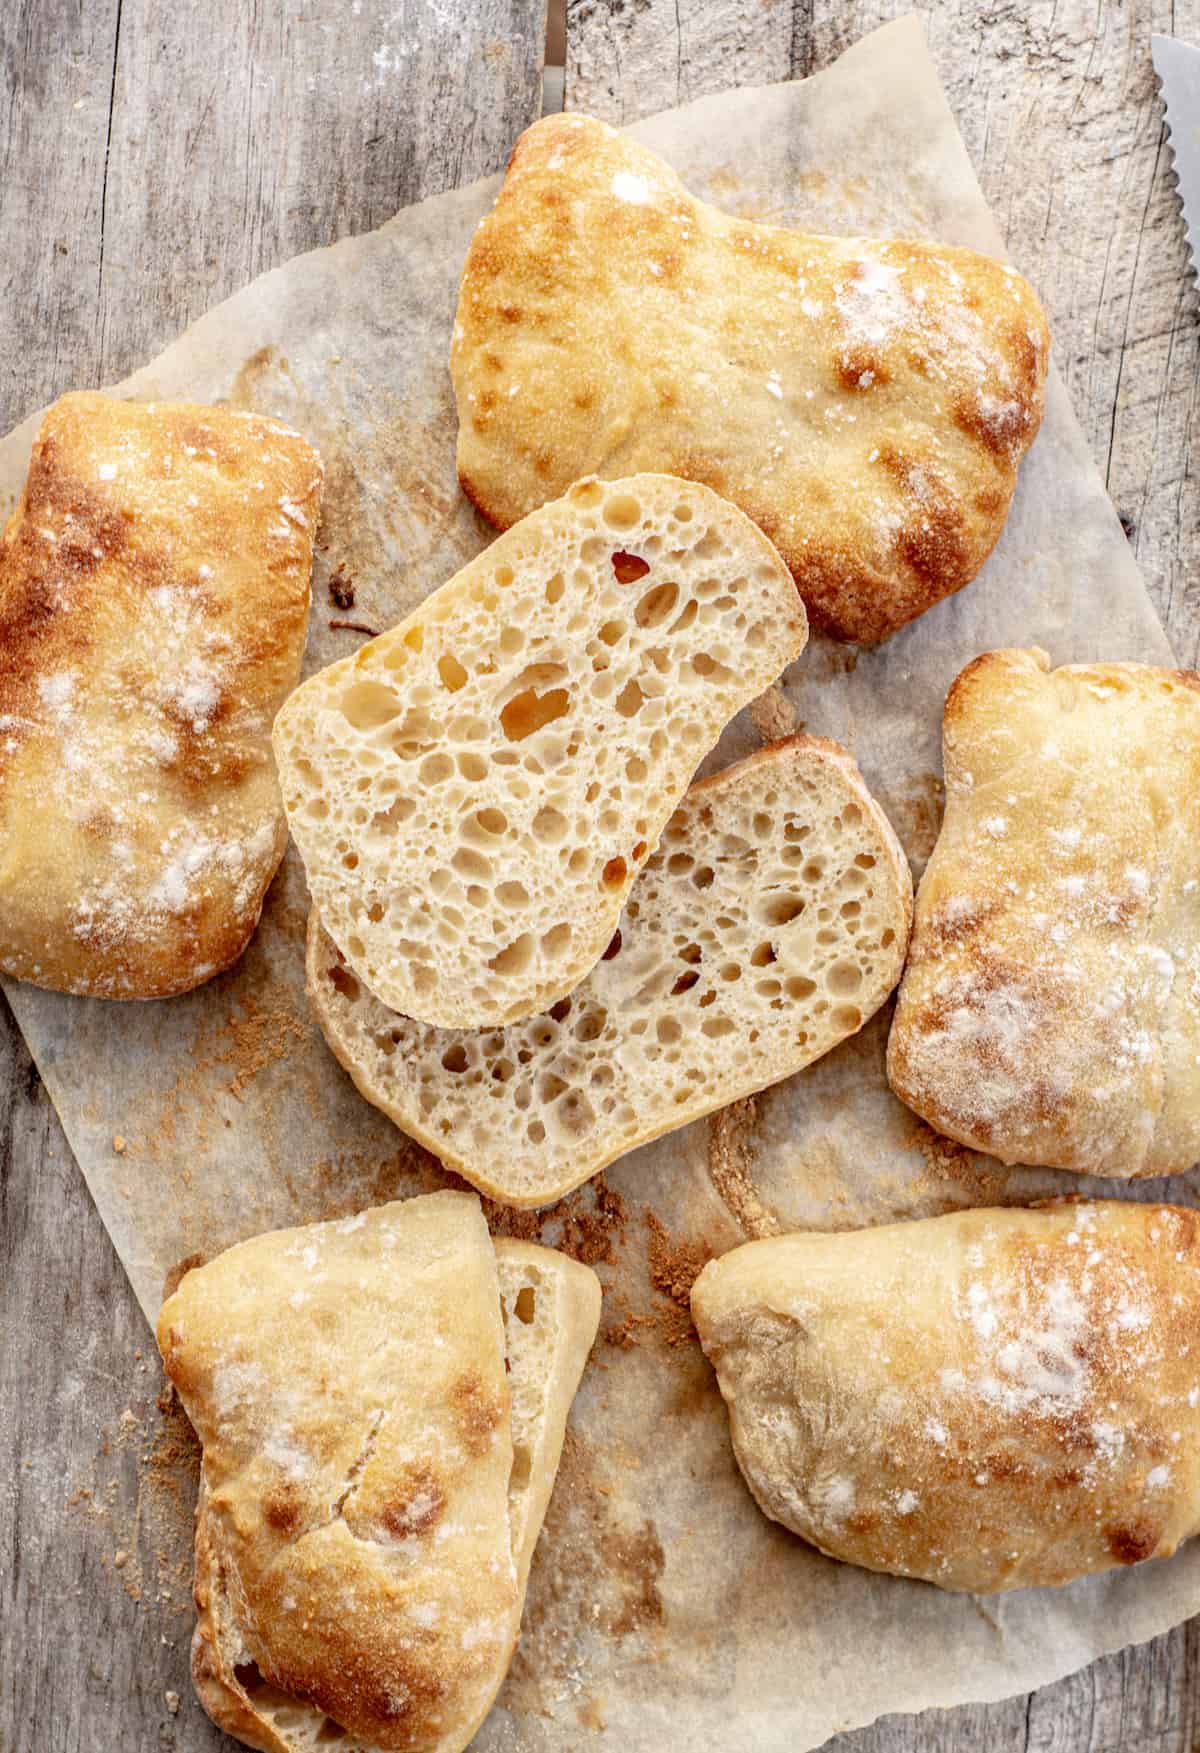
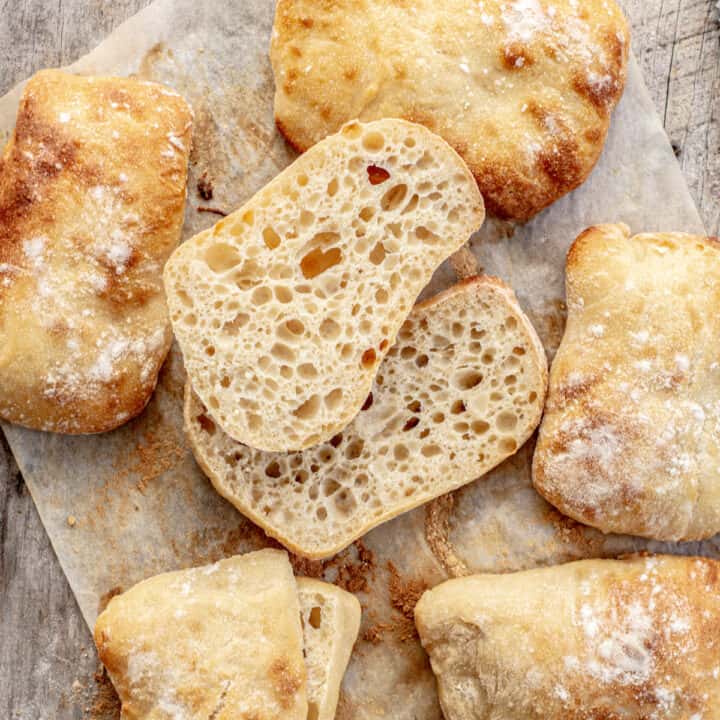
These sourdough ciabatta rolls make the perfect sandwich bread. The sourdough sandwich rolls are light and airy with a golden crust. The dough is high hydration, but it’s still simple to make by hand.
This recipe uses no commercial yeast and is leavened with the wild yeast in your sourdough starter.
Ciabatta bread
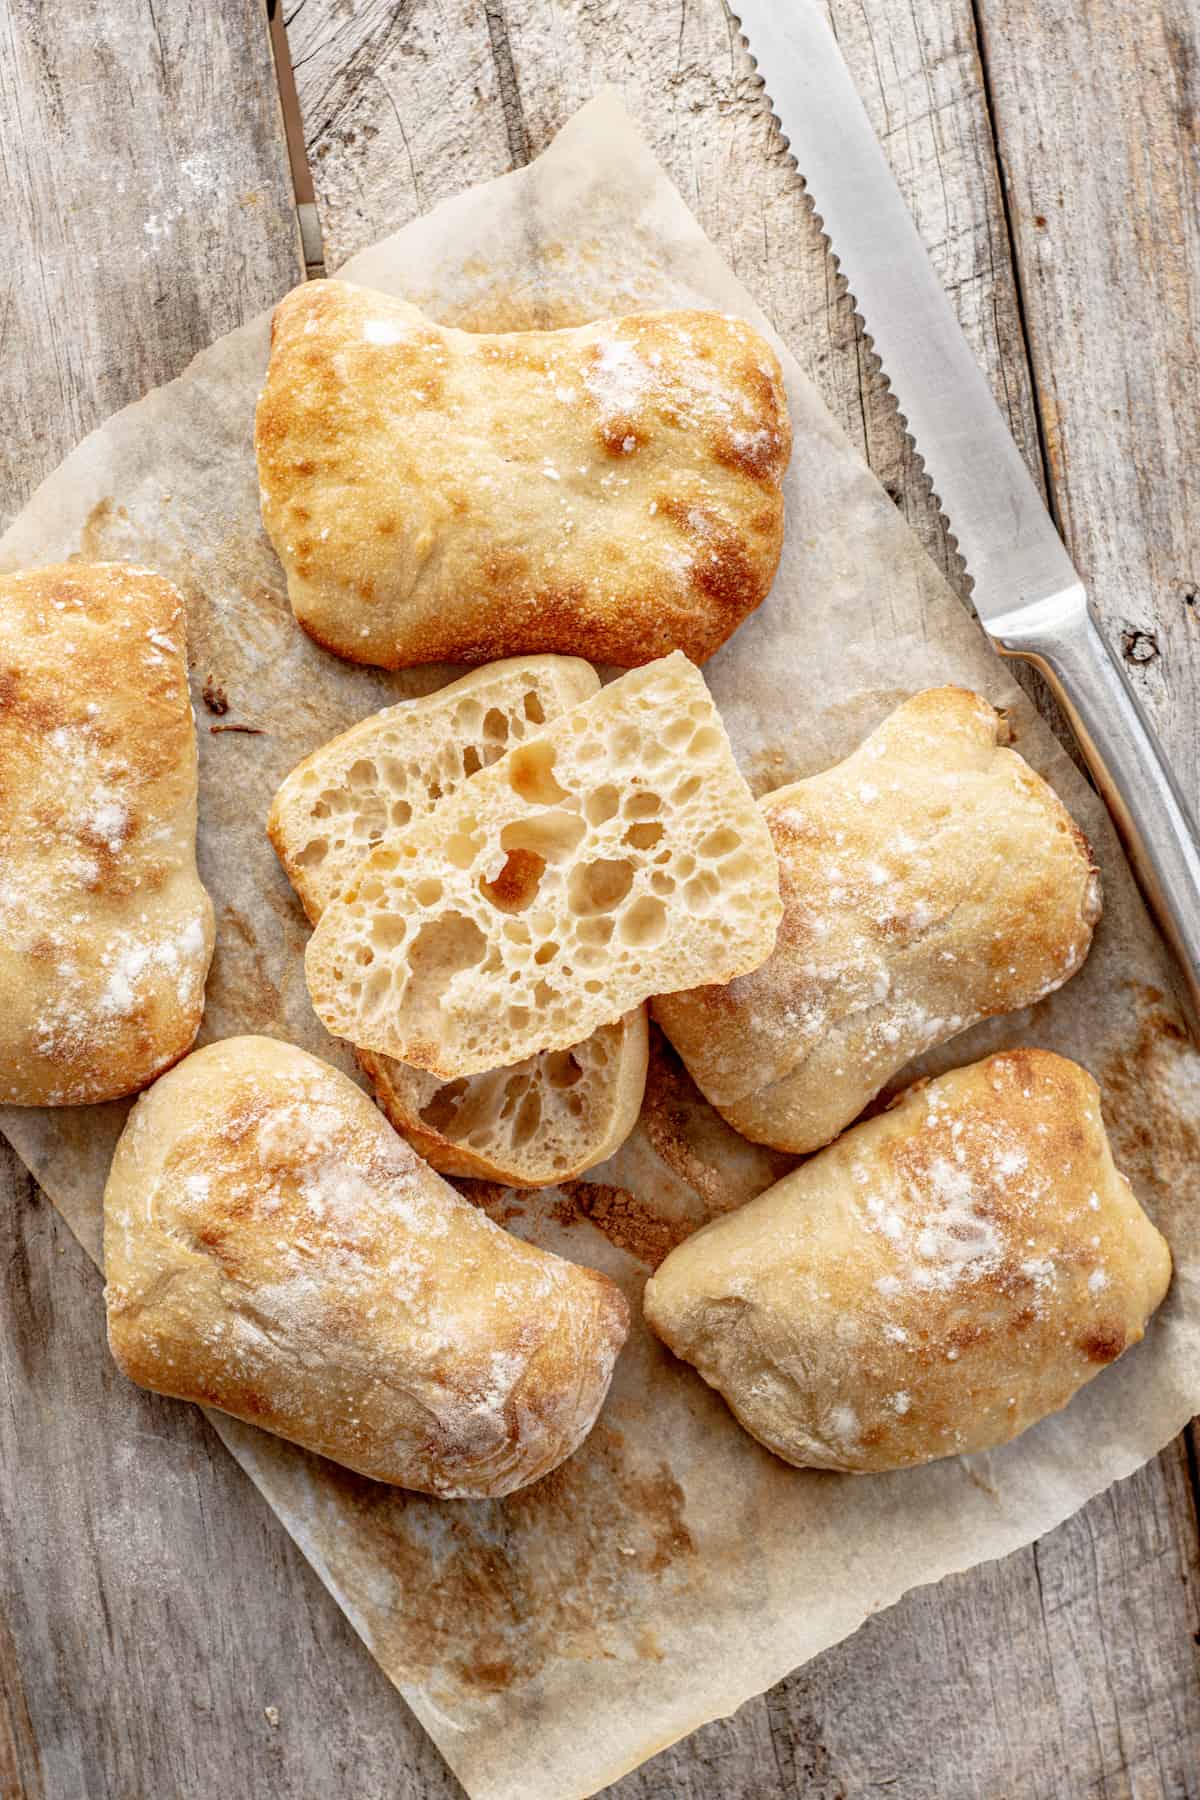
The word ciabatta means ‘slipper‘ in Italian, and it’s easy to see why. Ciabatta bread is made with a very slack dough. The high hydration means the dough spreads out a little more, into a long slipper shape. These sourdough ciabatta rolls have a high hydration dough of nearly 83%. (You can work out the dough hydration with this sourdough hydration calculator.)
This high water content is partly responsible for ciabatta’s open crumb. There’s no kneading required in this recipe though, the strength is given to the dough through stretches and folds. As the dough rests the gluten is also developed and creates a lovely elastic dough.
Sourdough sandwich rolls
These rolls are made over a period of 2 days. The dough undergoes two lots of bulk fermentation – a room temperature first rise on day one, and then an overnight cold ferment too. The bacteria in the sourdough starter bring different flavor profiles depending on their temperatures. The cold ferment brings additional flavors into the bread.
After the fridge rest, the cold dough is shaped into rustic rolls, simply by cutting them into rectangles. Then those rolls are left to puff a little more before baking in a hot oven. Though time is required, this recipe doesn’t actually have too much hands-on time.
Next time, try these soft sourdough dinner rolls!

The sourdough starter
This sourdough ciabatta rolls recipe needs 100g of active sourdough starter.
Use your starter once it has doubled or tripled but before it passes the peak and collapses.
Ingredients
This sourdough ciabatta dough is a lean dough with minimal ingredients. The full dough ingredients amounts are in the printable full recipe card at the bottom of this post. To make these rolls you need –
- Strong bread flour – Strong bread flour is best to use for the ciabatta dough. The extra protein in bread flour allows for a high-hydration dough that’s much more elastic and easy to work with. That being said, you can use all-purpose flour too as long as it has a protein level of at least 11%.
- Active sourdough starter
- Extra virgin olive oil
- Water
- Salt
Don’t have your own sourdough starter yet? Here’s how to make a sourdough starter.
Equipment
You don’t need any fancy equipment to make these rolls but here are a few optional extras that can help create a better bread.
- A baking stone. This can hold the heat really well and for a long period of time which creates a better rise and crisp crust in the bread.
- Cast iron skillet. If you heat a cast-iron skillet while preheating the oven, you can pour cold water into it when the bread bakes. This creates some steam to give the ciabatta bread a better crust.
Method
Day 1
In the morning feed your starter. It needs to at least double, if not triple, but be used before it passes its peak and collapses.
Autolyze
An autolyze is when flour and water are mixed together and the flour is left for a period of time to hydrate. An autolyze hydrates the gluten and helps to create an elastic dough.
When the starter has nearly finished rising, in a large bowl mix together the flour and water into a sticky and shaggy dough. Leave this to autolyze for at least 30 minutes.
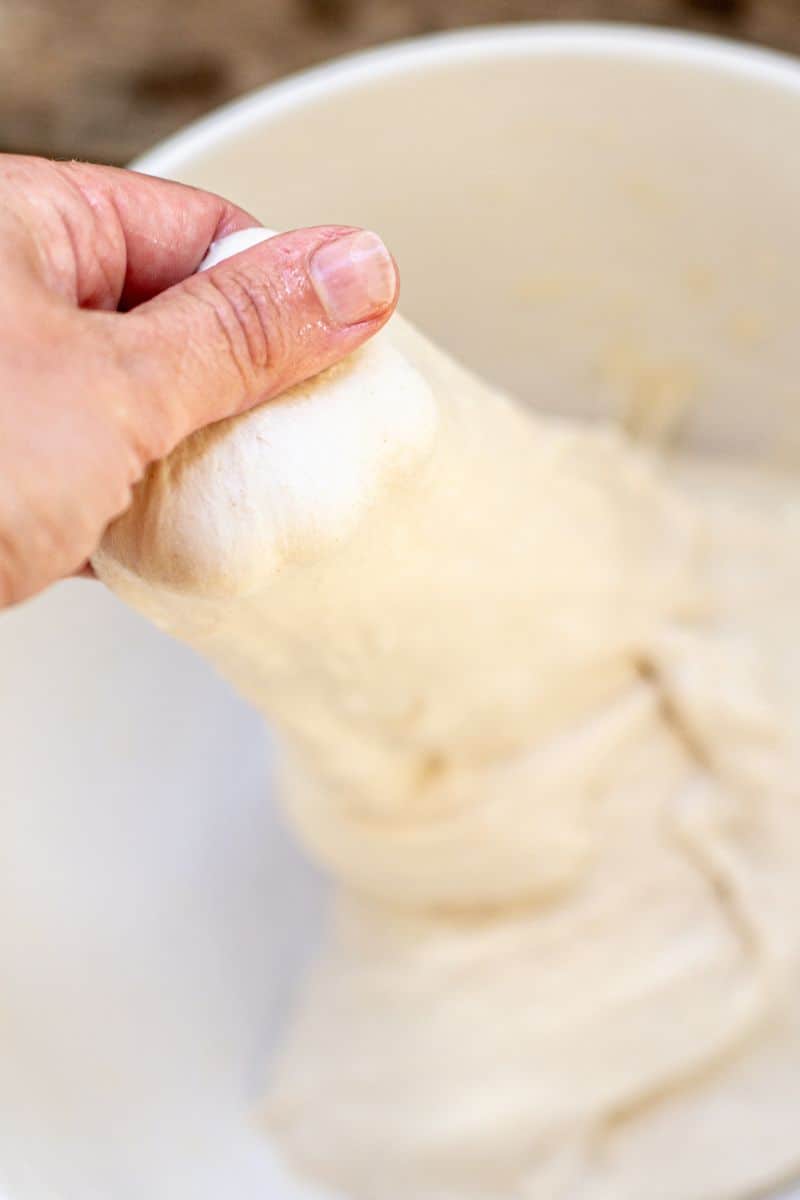
Add the olive oil, salt, and risen starter and mix it well together until everything is combined. It makes a very sticky and wet dough. Tip this sticky dough into a shallow dish or clean bowl and leave it to sit for 15-20 minutes
Folding
Over the next 3 hours, stretch and fold or coil fold the dough every 30 minutes (6 sets of folds in total.)
Stretch and fold – Using wet hands, take one side of the dough and stretch it up, then pull it over itself. Turn the bowl a quarter turn and repeat this move. Continue stretching and folding and turning the bowl until all sides have been folded. That is ‘one set’ of stretch and folds.
Coil folding – Using wet hands, coax the sides of the dough up with your fingers and lift it up from the middle and back onto itself. Turn the dough and repeat on all sides, until it forms a ball. If the dough sticks too much to your hands, wet them again.
Fold the dough 6 times in total, once every 30 minutes for three hours.
In between each of the sets of stretches and folds, let the dough rest. Cover the dish with a lid or damp towel to stop it from drying out.
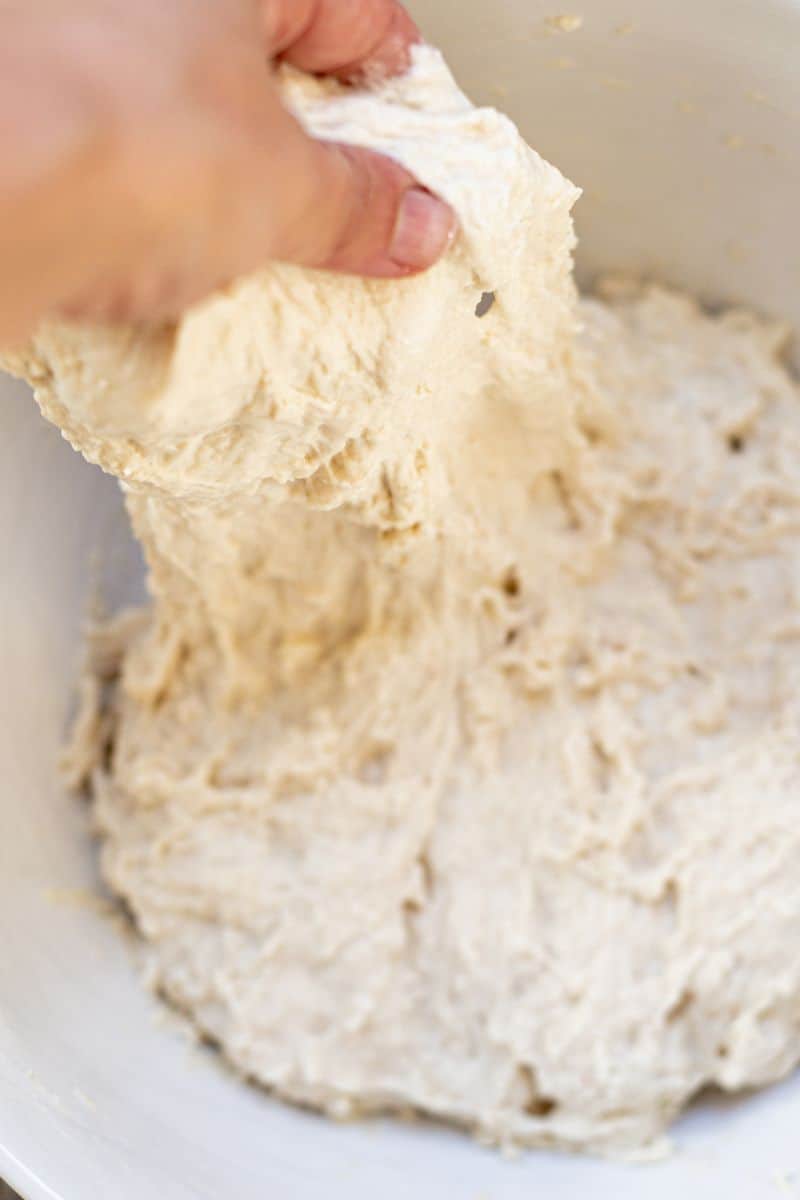
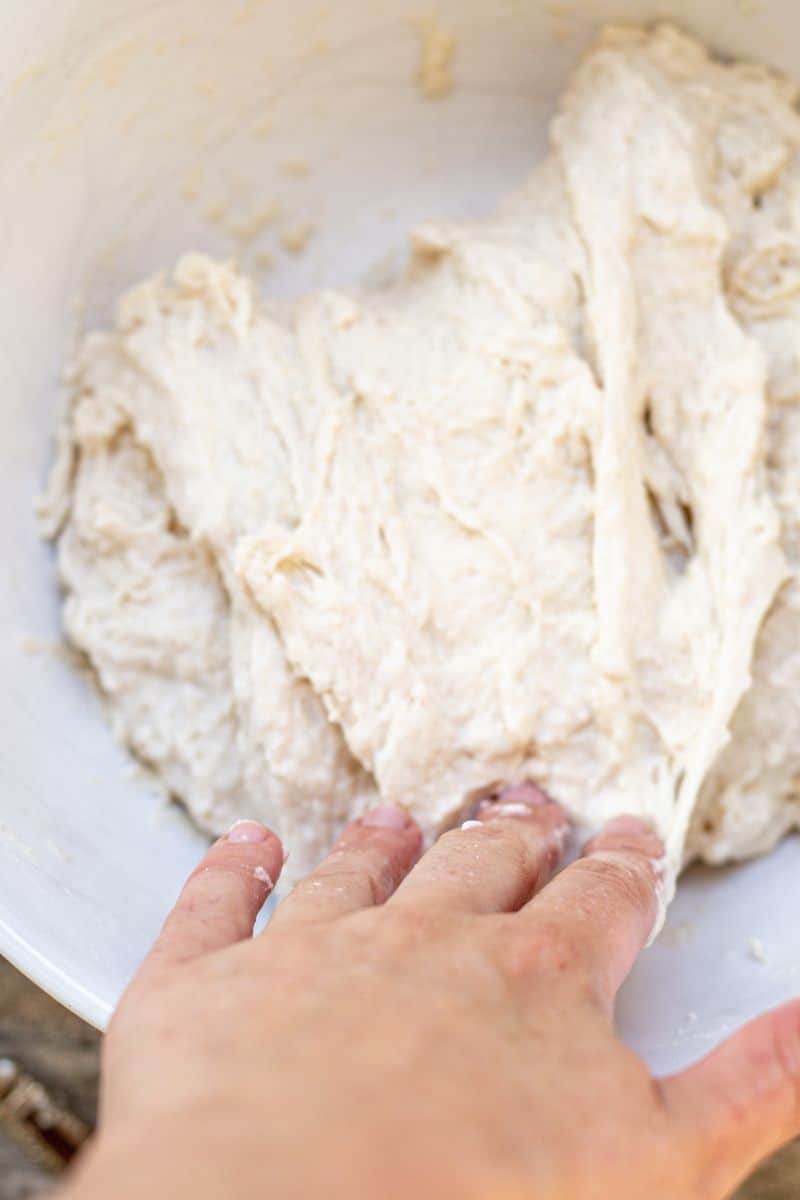
Initially, the dough will be very sticky and wet and the first stretch will be very slack. After a few folds, it will hold together more and the final dough will be very elastic. If your starter was in a good condition and not collapsed or too acidic, you will easily feel improvement as the folds go on.
Bulk rise
After the folds, let the dough bulk ferment in a warm place, ideally around 25°C/77°F for 3-5 hours until it shows clear signs of fermentation and has risen by around 60%. You can place the dough in a clear container with straight sides to easily gauge if it has risen. Cover it to stop the dough from drying out.
The fermentation time will change depending on temperature. Once risen, cover the container or bowl with a lid or compostable plastic wrap and place it in the refrigerator overnight.
The next day
In the morning, tip the cold dough onto a floured work surface. Line a baking sheet with a piece of parchment paper and generously dust it with flour.
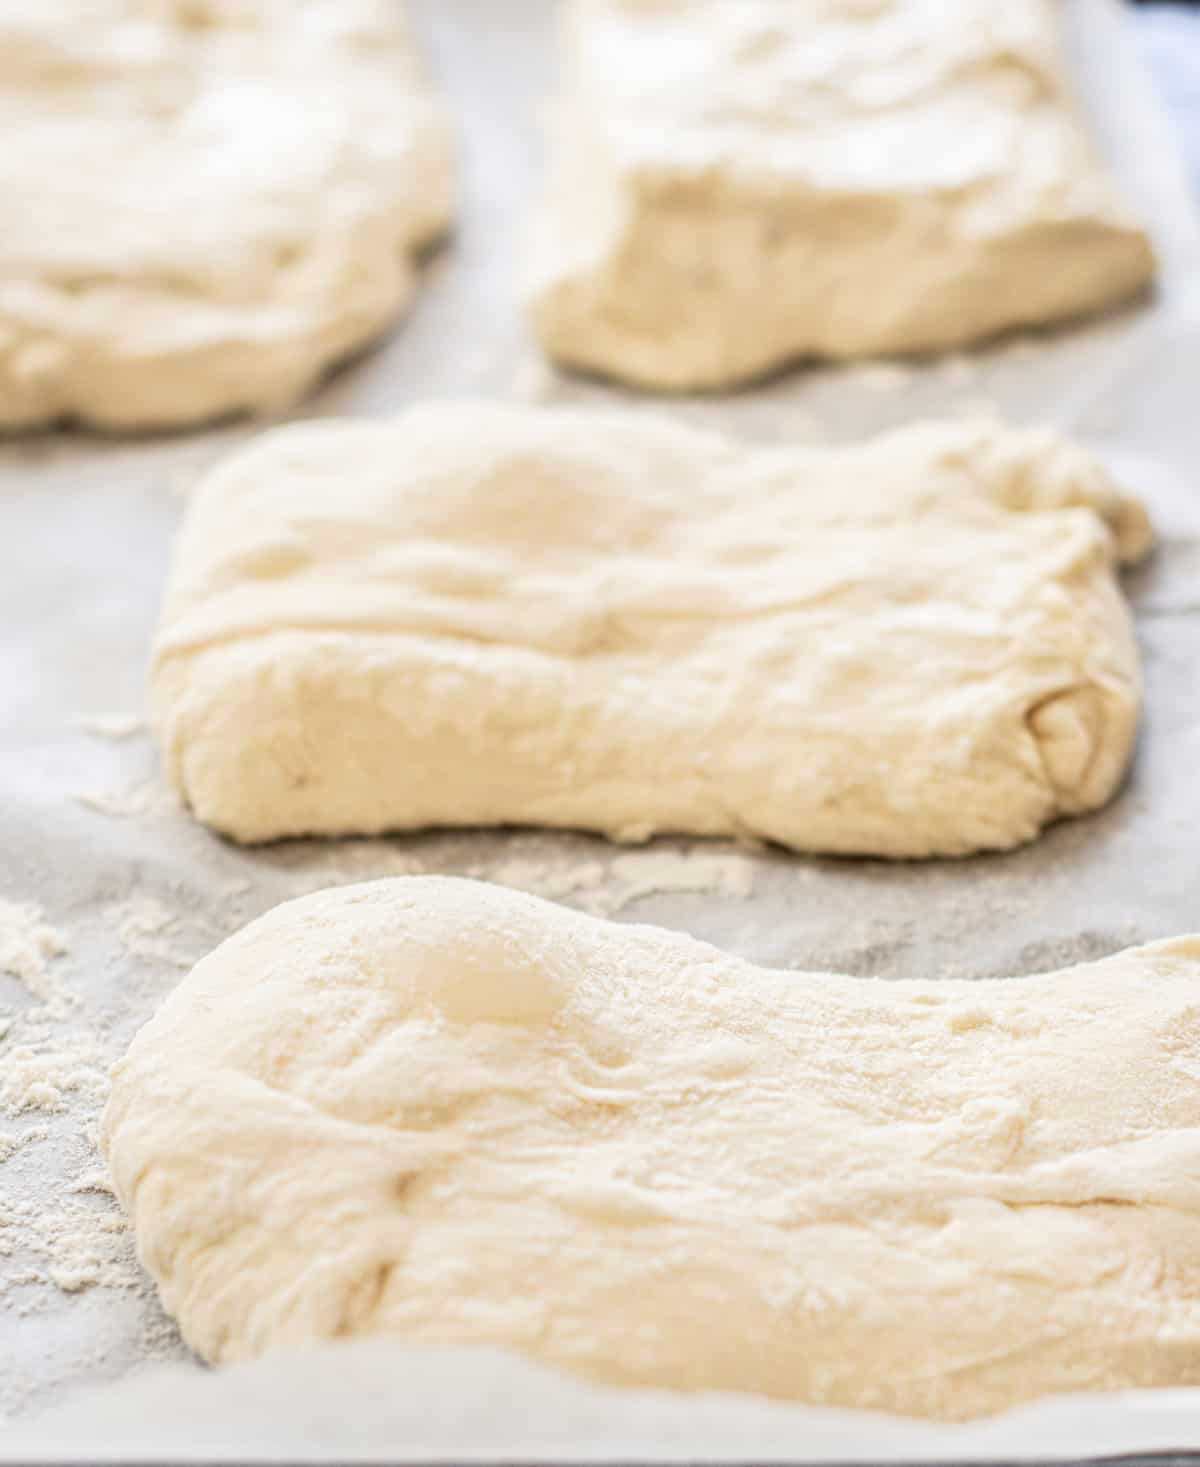
Use floured hands to pull it into a rectangle measuring approximately 9x11inches/23x28cm. Flour the dough well and use a bench scraper to cut this dough into 6 equal pieces. They will be rustic but that’s totally fine, just aim to cut equal portions.
Use floured hands to pick up a piece of dough and transfer it to the baking tray. Repeat with the remaining pieces. If the dough has stretched out too much, sprinkle with a little more flour and nudge the pieces into a rectangle using the dough scraper. Try not to degas the dough as you’re moving it.
Let the pieces rest at room temperature for around an hour, and preheat the oven to 450 °F/ 230°C while the dough is resting. If you have a baking stone, preheat this now too.
Steaming – Optional
While the oven is preheating, add a cast iron skillet to the bottom oven rack of the oven. When baking the bread, carefully pour about 1/2 a cup of cold water into the hot skillet to create some steam.
Shut the oven door right away to trap the steam. The steam helps to create an extra-crusty crust in the ciabatta. Do take care because it’s very hot.
Baking
After the dough pieces have sat, mist the top of the dough lightly with water. Place the baking sheet in the preheated oven alongside the water for the steam (if using). If you’re using a baking stone, lift the dough pieces up with the parchment paper and place this on the hot baking stone.
Bake the rolls for around 20 minutes until deep golden brown. If they are browning unevenly, rotate the oven rack halfway through baking.
After baking, let the rolls cool right down on a wire rack to room temperature before slicing and serving.
More sourdough recipes
Sourdough Ciabatta Sandwich Rolls
These sourdough ciabatta rolls make the perfect sandwich bread.
Ingredients
Starter
- 35g starter
- 35g all-purpose flour
- 35g water
Ciabatta dough
- 420g bread flour or strong all-purpose flour (with at least 11% protein)
- 340g water
- 13g extra virgin olive oil
- 9g salt
- All the sourdough starter
Instructions
Starter -
- In the morning feed your starter. It needs to at least double, if not triple, but be used before it passes its peak and collapses.
dough
- When the starter has nearly finished rising, in a large bowl mix together the flour and water into a sticky and shaggy dough. Leave this to sit and hydrate for at least 30 minutes.
- Add the olive oil, salt, and risen starter and mix it well together until everything is combined. It makes a very sticky and wet dough. Tip this sticky dough into a shallow dish or clean bowl and leave it to sit for 15-20 minutes.
- Over the next 3 hours, stretch and fold or coil fold the dough every 30 minutes (6 sets of folds in total.)
- Stretch and fold - Using wet hands, take one side of the dough and stretch it up, then pull it over itself. Turn the bowl a quarter turn and repeat this move. Continue stretching and folding and turning the bowl until all sides have been folded. That is 'one set' of stretch and folds.
- Coil folding - Using wet hands, coax the sides of the dough up with your fingers and lift it up from the middle and back onto itself. Turn the dough and repeat on all sides, until it forms a ball. If the dough sticks too much to your hands, wet them again.
- In between each of the sets of stretches and folds, let the dough rest. Cover the dish with a lid or damp towel to stop it from drying out.
Bulk rise
- After the folds, let the dough bulk ferment in a warm place, ideally around 25°C/77°F for 3-5 hours until it shows clear signs of fermentation and has risen by around 60%. You can place the dough in a clear container with straight sides to easily gauge if it has risen. Cover the container to stop the dough from drying out.
- The fermentation time will change depending on temperature. Once risen, cover the container or bowl with a lid or compostable plastic wrap and place it in the refrigerator overnight.
Shaping
- Tip the cold dough onto a floured work surface. Line a baking sheet with a piece of parchment paper and generously dust it with flour.
- Use floured hands to pull it into a rectangle measuring approximately 9x11inches/23x28cm. Flour the dough well and use a bench scraper to cut this dough into 6 equal pieces. They will be rustic but that's totally fine, just aim to cut equal portions.
- Use floured hands to pick up a piece of dough and transfer it to the baking tray. Repeat with the remaining pieces. If the dough has stretched out too much, sprinkle with a little more flour and nudge the pieces into a rectangle using the dough scraper. Try not to degas the dough as you're moving it.
- Let the pieces rest at room temperature for around an hour, and preheat the oven to 450 °F/ 230°C while the dough is resting.
STEAMING - OPTIONAL
- While the oven is preheating, add a cast iron skillet to the bottom oven rack of the oven. When baking the bread, carefully pour about ½ a cup of cold water into the hot skillet to create some steam.
- Shut the oven door right away to trap the steam. The steam helps to create an extra-crusty crust in the ciabatta. Do take care because it's very hot.
Baking
- After the dough pieces have sat, mist the top of the dough lightly with water. Place the baking sheet in the preheated oven alongside the water for the steam (if using).
- Bake the rolls for around 20 minutes until deep golden brown. If they are browning unevenly, rotate the oven rack halfway through baking.
- After baking, let the rolls cool right down on a wire rack to room temperature before slicing and serving.
Recommended Products
As an Amazon Associate and member of other affiliate programs, I earn from qualifying purchases.

Nutrition Information:
Yield: 6 Serving Size: 1Amount Per Serving: Calories: 293Total Fat: 3gSaturated Fat: 0gTrans Fat: 0gUnsaturated Fat: 2gCholesterol: 0mgSodium: 585mgCarbohydrates: 55gFiber: 2gSugar: 0gProtein: 9g
This is an informational estimate only. I am not a certified Dietitian or Nutritionist


How much starter do I use if I already have starter going and fed? That part was a little confusing – could just be me haha 😆
use around 100g of your active fed starter 🙂
Do those ciabatta need to be baked with steam?
Hey andrea, I have some notes about this in the recipe card 🙂 You don’t need to bake with steam, but I do like to mist the tops of the dough with water before baking
Hi could this recipe be made in as one big 🍞?
Hey yes, or two medium loaves 🙂
These were excellent !! Will make on repeat ! Thank you
Yay that’s great to read! thank you!
Hello,
I really want to try making these, I’m wondering if they are super soft and can easily be squished? I’m hoping they turn out very soft!